Source Code
<div class="as-wrap">
  <div class="as-card">
    <div class="as-head">
      <span class="as-title" id="asTitle">Running agent task…</span>
      <span class="as-time" id="asTime">0.0s</span>
    </div>
    <div class="as-bar" id="asBar"></div>
    <div class="as-labels" id="asLabels"></div>
  </div>
</div>*{box-sizing:border-box;margin:0;padding:0}
body{font-family:system-ui,-apple-system,sans-serif;background:#0b0f1a;min-height:100vh;display:flex;align-items:center;justify-content:center;padding:24px}
.as-wrap{width:100%;max-width:460px}
.as-card{background:#12162a;border:1px solid #232a45;border-radius:16px;padding:20px 22px;box-shadow:0 18px 44px rgba(0,0,0,.4)}
.as-head{display:flex;align-items:center;justify-content:space-between;margin-bottom:14px}
.as-title{font-size:13.5px;font-weight:700;color:#e7e9f5}
.as-time{font-size:11.5px;color:#7d8296;font-variant-numeric:tabular-nums}
.as-bar{display:flex;gap:4px;height:8px;border-radius:5px;overflow:hidden}
.as-seg{flex:1;background:#1e2338;position:relative;overflow:hidden}
.as-seg-fill{position:absolute;inset:0;width:0%;background:linear-gradient(90deg,#6366f1,#818cf8);transition:width .4s cubic-bezier(.4,0,.2,1)}
.as-seg.as-active .as-seg-fill{background:linear-gradient(90deg,#6366f1,#a78bfa)}
.as-seg.as-complete .as-seg-fill{width:100%!important;background:#4ade80}
.as-labels{display:flex;gap:4px;margin-top:10px}
.as-label{flex:1;display:flex;flex-direction:column;align-items:center;gap:5px;font-size:10.5px;color:#565c78;text-align:center;transition:color .3s}
.as-label.as-active{color:#c8cbdb}
.as-label.as-complete{color:#4ade80}
.as-label .as-icon{width:18px;height:18px;border-radius:50%;display:flex;align-items:center;justify-content:center;background:#1a1f36;border:1px solid #2b3157}
.as-label.as-active .as-icon{border-color:#6366f1}
.as-label.as-complete .as-icon{background:#122a1c;border-color:#245a3a}
.as-label .as-dot{width:5px;height:5px;border-radius:50%;background:#3b4166}
.as-label.as-active .as-dot{background:#a78bfa;animation:asPulse 1s ease-in-out infinite}
.as-label.as-complete .as-icon::after{content:'';width:3px;height:6px;border:solid #4ade80;border-width:0 1.5px 1.5px 0;transform:rotate(45deg) translate(-1px,-1px)}
@keyframes asPulse{0%,100%{transform:scale(1);opacity:1}50%{transform:scale(1.6);opacity:.5}}// Each segment of the bar represents one real stage of an agent's task
// pipeline. Segments advance strictly in sequence: a stage cannot start
// until the previous one has genuinely finished, and the elapsed time is a
// real running clock rather than a value baked into a CSS animation.
var STAGES = [
{ label: 'Searching', minMs: 700, maxMs: 1400 },
{ label: 'Reading', minMs: 900, maxMs: 1800 },
{ label: 'Reasoning', minMs: 1000, maxMs: 2000 },
{ label: 'Writing', minMs: 800, maxMs: 1500 },
];
var barEl = document.getElementById('asBar');
var labelsEl = document.getElementById('asLabels');
var titleEl = document.getElementById('asTitle');
var timeEl = document.getElementById('asTime');
var segEls = [];
var labelEls = [];
STAGES.forEach(function (stage) {
var seg = document.createElement('div');
seg.className = 'as-seg';
seg.innerHTML = '<div class="as-seg-fill"></div>';
barEl.appendChild(seg);
segEls.push(seg);
var lab = document.createElement('div');
lab.className = 'as-label';
lab.innerHTML = '<span class="as-icon"><span class="as-dot"></span></span><span>' + stage.label + '</span>';
labelsEl.appendChild(lab);
labelEls.push(lab);
});
var startedAt = Date.now();
var timerId = setInterval(function () {
timeEl.textContent = ((Date.now() - startedAt) / 1000).toFixed(1) + 's';
}, 100);
function runStage(index) {
if (index >= STAGES.length) {
clearInterval(timerId);
titleEl.textContent = 'Task complete';
timeEl.textContent = ((Date.now() - startedAt) / 1000).toFixed(1) + 's';
return;
}
var stage = STAGES[index];
var seg = segEls[index];
var lab = labelEls[index];
seg.classList.add('as-active');
lab.classList.add('as-active');
titleEl.textContent = stage.label + '…';
// A genuine incremental fill loop rather than a single CSS transition to
// 100%, so the segment's own progress within its stage is visible too.
var fillEl = seg.querySelector('.as-seg-fill');
var duration = stage.minMs + Math.random() * (stage.maxMs - stage.minMs);
var stageStart = Date.now();
var raf = setInterval(function () {
var pct = Math.min(100, ((Date.now() - stageStart) / duration) * 100);
fillEl.style.width = pct + '%';
if (pct >= 100) {
clearInterval(raf);
seg.classList.remove('as-active');
seg.classList.add('as-complete');
lab.classList.remove('as-active');
lab.classList.add('as-complete');
runStage(index + 1);
}
}, 40);
}
runStage(0);Learn Coding Visually
Learn to code with interactive, live-preview playgrounds — HTML, CSS, JavaScript, React & more.
 HTML Playground42 lessons · Click-based · Live preview
 CSS PlaygroundLearn CSS with a live editor
 JavaScript Playground60 lessons · DOM · Async · Canvas
 React PlaygroundLearn React with a live code editor
 GSAP PlaygroundLearn GSAP animation interactively
 SVG Playground44 lessons · shapes · paths · animation
 SCSS Playground45 lessons · Sass modules · tokens
 Tailwind PlaygroundLearn Tailwind CSS with a live editor
 Bootstrap 5 Playground50 lessons · live preview
Agent Task Segment Tracker — Multi-Step AI Progress Bar in JS
Agent Task Segment Tracker · Loaders · Plain HTML, CSS & JS · Live preview
What's included
Features
About this UI Snippet
Agent Task Segment Tracker — A Segmented Progress Bar for Multi-Stage AI Agent Work
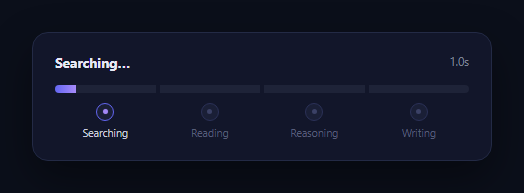
Autonomous AI agents don't do one thing at a time — they search, read, reason, and write in sequence, and users benefit from seeing which stage is active rather than a single ambiguous spinner. This snippet renders that as a segmented progress bar: one segment per named stage (Searching, Reading, Reasoning, Writing), each filling independently as its stage runs, with labels underneath that transition from idle to active to complete.
Strictly sequential stages
runStage(index) only calls itself for the next index after the current segment's own fill animation reaches 100% — there is no overlap and no stage can visually start before the previous one has genuinely finished. This mirrors how a real agent pipeline actually behaves: reasoning cannot begin before reading has produced something to reason about.
A real incremental fill per segment, not a single transition
Rather than letting one CSS transition: width 1s do all the work, each segment fills via a setInterval that recomputes (Date.now() - stageStart) / duration roughly every 40ms and sets fillEl.style.width directly. That means the segment's own internal progress is visible as it happens — useful if you later swap the fixed duration for a real progress event stream from your agent backend, where the fill only needs to track elapsed / estimatedTotal at each report.
Randomized per-stage duration
Each stage's minMs/maxMs range means the demo's timing varies between page loads, avoiding the mechanical, identical-every-time feel of a fixed CSS keyframe animation — closer to how search, reading, and writing genuinely take different, variable amounts of time depending on the task.
Pulsing active-stage indicator
The label underneath the currently active segment gets a small pulsing dot (a CSS scale/opacity keyframe) so it's immediately obvious which stage of the pipeline is running even at a glance, separate from reading the segment bar itself. Completed stages swap that dot for a checkmark built from a rotated border pseudo-element, and their segment turns green.
A real running clock
The header's elapsed-time label is driven by Date.now() - startedAt on a fast interval, exactly like the elapsed timers in the AI reasoning collapse loader — it stops and freezes only once every stage has genuinely completed, so the number in the corner is always trustworthy.
Customizing it
Change the STAGES array's labels and timing ranges to match your own agent's real pipeline (Planning, Calling tool, Verifying, etc.), or replace the simulated duration with a real progress percentage reported by your backend for each stage. Pair it with an AI agent steps timeline for a more detailed vertical trace alongside this compact horizontal summary.
Build with AI
Build, Understand, Optimize, and Extend It With AI
Rather than guessing at the sequencing logic, paste this snippet's HTML, CSS, and JS into an AI coding assistant like Claude and ask it to explain exactly how runStage()'s recursive structure guarantees strict left-to-right stage ordering, and why each segment uses its own setInterval-driven fill loop instead of one CSS transition per segment. The same assistant can help optimize it — for instance asking whether requestAnimationFrame would produce smoother fill motion than the current 40ms setInterval, especially on lower-end devices. It's also useful for extending it: ask it to replace the simulated per-stage duration with real progress events from a WebSocket, add a subtle error/retry state to an individual segment, or make the number of visible stages responsive to how many an actual agent run reports. Treat the code less like a finished artifact and more like a starting point for a conversation.
Prompt to recreate it
Copy this into your AI assistant of choice to build the effect from scratch, or as a jumping-off point for your own variant:
Build a segmented, multi-stage progress bar for an AI agent task in plain HTML, CSS, and JavaScript — no libraries.

Requirements:
- A horizontal bar made of several equal-width segments (built from a small array of named stages, e.g. Searching, Reading, Reasoning, Writing), each segment able to fill from 0% to 100% independently, with labels underneath each segment.
- Stages must run strictly in sequence: a segment can only begin filling once the previous segment has reached 100% and been marked complete — never in parallel and never out of order.
- Each segment's fill must be driven by a real repeating interval that computes elapsed time against that stage's expected duration and updates the segment's width accordingly (so genuine intermediate progress within a stage is visible), not a single CSS width transition jumping straight to 100%.
- Randomize each stage's duration within a min/max range so the pacing feels natural and varies between runs, instead of being identical and mechanical every time.
- The label under the currently active stage must show a distinct pulsing indicator (its own small CSS animation) that no other stage shows, and completed stages must show a checkmark and a different color from both pending and active stages.
- A header above the bar must show the current stage name while running, switch to a completed message once every stage is done, and display a live elapsed-time clock computed from a real timestamp difference, updated on a fast interval and frozen only once the whole sequence genuinely finishes.
Want to tighten it up first? Run this prompt through the AI Prompt Studio to score it across 8 quality dimensions, catch anti-patterns, and tune the wording for Claude, ChatGPT, or Gemini before you paste it in.
Step by step
How to Use
- 1Paste HTML, CSS, and JSThe first segment ("Searching") begins filling immediately and the header timer starts ticking.
- 2Watch each stage in turnA segment fills to 100%, turns green, and only then does the next stage\u2019s label become active.
- 3Watch the pulsing dotThe currently active stage\u2019s label shows a pulsing indicator distinct from completed and pending stages.
- 4Reach completionThe header switches to "Task complete" and the timer freezes at the true total elapsed time.
- 5Edit the STAGES arrayRename stages and adjust their minMs/maxMs duration ranges to match your real pipeline.
- 6Wire up real progressReplace the simulated duration-based fill with a live percentage reported by your agent backend for each stage.
Real-world uses
Common Use Cases
Got questions?
Frequently Asked Questions
No. runStage(index) is only called for the next stage inside the current stage\u2019s own completion branch, once its fill interval reports 100%. There is no overlapping timer, so segments always complete strictly left to right.
A single transition to 100% has no notion of intermediate real progress — you would only ever see 0% or fully filled. The interval recomputes elapsed time against the stage\u2019s duration roughly every 40ms, so the fill genuinely tracks how far into the stage you are, which matters once duration is replaced by a real backend-reported percentage instead of a fixed simulated range.
Replace each stage\u2019s randomized duration with the actual expected or reported duration from your backend, or better, report a live percentage per stage over SSE/WebSocket and set fillEl.style.width directly from that value each time a message arrives, skipping the internal setInterval loop entirely.
The .as-active class is added to a stage\u2019s label only while its segment is filling, and removed the instant it completes. The pulse keyframe is scoped to .as-label.as-active .as-dot, so exactly one stage shows the pulsing indicator at any time, making the current stage unambiguous.
Edit the STAGES array — each entry is just a { label, minMs, maxMs } object. The script builds one bar segment and one label per array entry automatically, so adding a fifth stage like "Verifying" requires no other code changes.
Yes. Keep an activeIndex and a per-stage progress percentage in state, advancing activeIndex only once the current stage\u2019s percentage state reaches 100 inside an effect-driven interval or real progress event handler. Render one segment/label pair per array entry from state; the CSS classes and transitions carry over directly.