Source Code
<div class="prs-phone">
  <div class="prs-screen">
    <div class="prs-status"><span>9:41</span><span class="prs-batt"><i></i></span></div>

    <div class="prs-dots" id="prsDots">
      <span class="prs-dot active"></span>
      <span class="prs-dot"></span>
      <span class="prs-dot"></span>
    </div>

    <div class="prs-track" id="prsTrack">
      <section class="prs-card" data-perm="notifications">
        <div class="prs-illus prs-illus-bell">
          <svg width="52" height="52" viewBox="0 0 24 24" fill="none" stroke="currentColor" stroke-width="1.6"><path d="M18 8a6 6 0 10-12 0c0 7-3 9-3 9h18s-3-2-3-9"/><path d="M13.73 21a2 2 0 01-3.46 0"/></svg>
          <span class="prs-ping"></span>
        </div>
        <h1>Stay in the loop</h1>
        <p>Get notified about order updates, price drops on your saved items, and replies to your messages.</p>
        <button class="prs-allow" data-action="allow">Allow Notifications</button>
        <button class="prs-skip" data-action="skip">Not Now</button>
      </section>

      <section class="prs-card" data-perm="location">
        <div class="prs-illus prs-illus-pin">
          <svg width="52" height="52" viewBox="0 0 24 24" fill="none" stroke="currentColor" stroke-width="1.6"><path d="M20 10c0 6-8 12-8 12S4 16 4 10a8 8 0 1116 0z"/><circle cx="12" cy="10" r="2.6"/></svg>
        </div>
        <h1>Find stores near you</h1>
        <p>We use your location to show accurate delivery times and the closest pickup points.</p>
        <button class="prs-allow" data-action="allow">Allow While Using App</button>
        <button class="prs-skip" data-action="skip">Not Now</button>
      </section>

      <section class="prs-card" data-perm="camera">
        <div class="prs-illus prs-illus-cam">
          <svg width="52" height="52" viewBox="0 0 24 24" fill="none" stroke="currentColor" stroke-width="1.6"><rect x="3" y="7" width="14" height="12" rx="2.5"/><path d="M17 10l4-2v8l-4-2"/><circle cx="10" cy="13" r="2.6"/></svg>
        </div>
        <h1>Scan and share instantly</h1>
        <p>Camera access lets you scan QR codes and add photos to your posts and reviews.</p>
        <button class="prs-allow" data-action="allow">Allow Camera Access</button>
        <button class="prs-skip" data-action="skip">Not Now</button>
      </section>

      <section class="prs-card prs-done-card" data-perm="done">
        <div class="prs-illus prs-illus-check">
          <svg width="52" height="52" viewBox="0 0 24 24" fill="none" stroke="currentColor" stroke-width="2"><circle cx="12" cy="12" r="10"/><path d="M8 12.5l2.7 2.7L16 9.5"/></svg>
        </div>
        <h1>You are all set</h1>
        <p id="prsSummary">Ready to go.</p>
        <button class="prs-allow" id="prsFinish">Start Exploring</button>
      </section>
    </div>
  </div>
</div>*{box-sizing:border-box;margin:0;padding:0}
html{scrollbar-width:none;-ms-overflow-style:none}
html::-webkit-scrollbar{display:none}
body{font-family:system-ui,-apple-system,sans-serif;background:#1e293b;display:flex;justify-content:center;align-items:center;min-height:100vh;padding:24px;scrollbar-width:none;-ms-overflow-style:none}
body::-webkit-scrollbar{display:none}
.prs-phone{width:288px;height:600px;background:#0b1220;border-radius:46px;padding:12px;box-shadow:0 30px 60px -20px rgba(0,0,0,.6),inset 0 0 0 2px #1e293b}
.prs-screen{width:100%;height:100%;border-radius:34px;overflow:hidden;background:linear-gradient(180deg,#eef2ff,#fdf4ff);color:#1e1b3a;display:flex;flex-direction:column;position:relative}
.prs-status{display:flex;justify-content:space-between;align-items:center;padding:13px 24px 0;font-size:13px;font-weight:700}
.prs-batt{width:22px;height:11px;border:1.4px solid currentColor;border-radius:3px;position:relative;display:inline-block}
.prs-batt::after{content:'';position:absolute;right:-3px;top:3px;width:2px;height:5px;background:currentColor;border-radius:0 1px 1px 0}
.prs-batt i{position:absolute;left:1.4px;top:1.4px;bottom:1.4px;width:82%;background:currentColor;border-radius:1px}
.prs-dots{display:flex;justify-content:center;gap:6px;padding:16px 0 4px}
.prs-dot{width:6px;height:6px;border-radius:50%;background:#c7d2fe;transition:background .2s,transform .2s}
.prs-dot.active{background:#6366f1;transform:scale(1.3)}
.prs-dot.done{background:#22c55e}
.prs-track{flex:1;display:flex;transition:transform .4s cubic-bezier(.65,0,.35,1);width:400%}
.prs-card{width:25%;flex-shrink:0;display:flex;flex-direction:column;align-items:center;text-align:center;padding:26px 26px 30px;overflow-y:auto}
.prs-illus{width:96px;height:96px;border-radius:26px;background:#fff;display:flex;align-items:center;justify-content:center;color:#6366f1;margin-bottom:22px;box-shadow:0 10px 26px -10px rgba(99,102,241,.35);position:relative}
.prs-illus-pin{color:#059669;box-shadow:0 10px 26px -10px rgba(5,150,105,.35)}
.prs-illus-cam{color:#d97706;box-shadow:0 10px 26px -10px rgba(217,119,6,.35)}
.prs-illus-check{color:#16a34a;box-shadow:0 10px 26px -10px rgba(22,163,74,.35)}
.prs-ping{position:absolute;top:14px;right:14px;width:11px;height:11px;border-radius:50%;background:#ef4444;box-shadow:0 0 0 0 rgba(239,68,68,.6);animation:prsPing 1.8s infinite}
@keyframes prsPing{0%{box-shadow:0 0 0 0 rgba(239,68,68,.55)}70%{box-shadow:0 0 0 8px rgba(239,68,68,0)}100%{box-shadow:0 0 0 0 rgba(239,68,68,0)}}
.prs-card h1{font-size:18px;font-weight:800;margin-bottom:10px}
.prs-card p{font-size:13px;color:#57534e;line-height:1.6;margin-bottom:24px}
.prs-allow{width:100%;background:#0f172a;color:#fff;border:none;border-radius:13px;padding:13px;font-size:14px;font-weight:800;cursor:pointer;font-family:inherit;margin-bottom:10px;transition:opacity .15s}
.prs-allow:hover{opacity:.88}
.prs-skip{background:none;border:none;color:#78716c;font-size:12.5px;font-weight:700;cursor:pointer;font-family:inherit}
.prs-done-card{justify-content:center;padding-top:0}var track = document.getElementById('prsTrack');
var dotsWrap = document.getElementById('prsDots');
var dots = dotsWrap.querySelectorAll('.prs-dot');
var cards = document.querySelectorAll('.prs-card');
var summaryEl = document.getElementById('prsSummary');
var finishBtn = document.getElementById('prsFinish');
var step = 0;
var results = {};
function goTo(index) {
step = index;
track.style.transform = 'translateX(-' + (index * 25) + '%)';
dots.forEach(function (dot, i) {
dot.classList.toggle('active', i === index);
});
}
function handleChoice(perm, allowed) {
results[perm] = allowed;
dots[step].classList.add('done');
if (step < 2) {
goTo(step + 1);
} else {
var granted = Object.keys(results).filter(function (k) { return results[k]; }).length;
summaryEl.textContent = granted === 3
? 'All 3 permissions granted. You will get the full experience.'
: granted + ' of 3 permissions granted. You can change these anytime in Settings.';
goTo(3);
}
}
cards.forEach(function (card) {
var perm = card.dataset.perm;
if (perm === 'done') return;
var allowBtn = card.querySelector('[data-action="allow"]');
var skipBtn = card.querySelector('[data-action="skip"]');
allowBtn.addEventListener('click', function () { handleChoice(perm, true); });
skipBtn.addEventListener('click', function () { handleChoice(perm, false); });
});
finishBtn.addEventListener('click', function () {
finishBtn.textContent = 'Loading...';
setTimeout(function () { finishBtn.textContent = 'Start Exploring'; }, 900);
});Learn Coding Visually
Learn to code with interactive, live-preview playgrounds — HTML, CSS, JavaScript, React & more.
 HTML Playground42 lessons · Click-based · Live preview
 CSS PlaygroundLearn CSS with a live editor
 JavaScript Playground60 lessons · DOM · Async · Canvas
 React PlaygroundLearn React with a live code editor
 GSAP PlaygroundLearn GSAP animation interactively
 SVG Playground44 lessons · shapes · paths · animation
 SCSS Playground45 lessons · Sass modules · tokens
 Tailwind PlaygroundLearn Tailwind CSS with a live editor
 Bootstrap 5 Playground50 lessons · live preview
Mobile Permission Request Screen — Free Snippet
Mobile Permission Request Screen · Mobile · Plain HTML, CSS & JS · Live preview
What's included
Features
About this UI Snippet
Mobile Permission Request Screens — Sequential Priming with a Granted-Count Summary
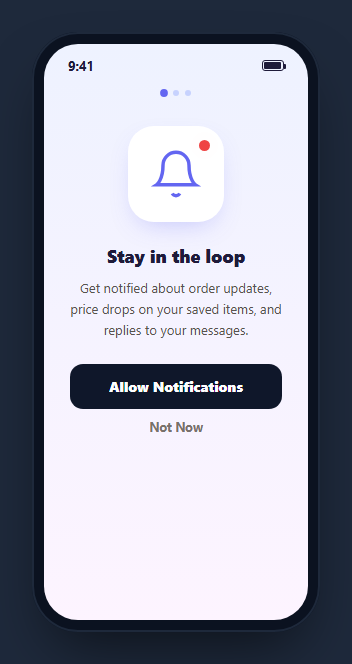
Asking for every OS permission at once, on app launch, before a user has any context for why the app needs them, is the single most common reason permission prompts get denied. This snippet builds the alternative pattern real high-conversion apps use instead — a sequential, in-app "priming" flow that explains one permission at a time, in plain language, with its own illustration and reasoning, before the real OS-level system prompt would ever appear.
A horizontal track, not four separate screens
All four cards (notifications, location, camera, and a final summary) live inside one #prsTrack flex container four times the viewport width, and goTo(index) moves between them with a single transform: translateX() change eased by a shared cubic-bezier transition. This is the same sliding-carousel technique used by onboarding flows and image galleries — one continuous strip that slides rather than four independently mounted/unmounted screens, which keeps the transition between permission cards visually smooth and avoids any layout flash.
Progress dots that show state, not just position
The three dots above the cards track more than which step is active — handleChoice() adds a .done class to the current dot the moment a choice is made (allow or skip), turning it green permanently, independent of which card is currently in view. A user glancing at the dots mid-flow can tell exactly how many decisions they have already made without needing to scroll back through the cards themselves.
Explaining "why" before asking "may I"
Each permission card pairs a specific, concrete reason ("show accurate delivery times and the closest pickup points" for location, not just "we need your location") with its own colored illustration and a subtle pulsing red dot on the notifications card to suggest an incoming alert. This is the actual content strategy behind permission priming: the in-app dialog is not the OS permission prompt itself, so it can (and should) make a real case before the one-shot system dialog appears, since most platforms limit how many times that system prompt can be re-triggered after a denial.
Allow and skip both advance the flow, honestly
handleChoice(perm, allowed) records the boolean choice into a results object and advances to the next card regardless of whether the user tapped Allow or Not Now — a permission flow that only progresses on Allow, and traps a user who wants to skip, is a dark pattern this snippet deliberately avoids. Declining a permission is a fully legitimate outcome the flow accounts for the same way as granting it.
A summary that is actually computed, not a fixed message
The final card's message is derived directly from results — Object.keys(results).filter(...) counts how many of the three permissions were actually granted and shows a different, honest sentence depending on whether it was all three or fewer, including a reminder that permissions can be changed later in Settings. Nothing about the summary is hardcoded to assume every user says yes to everything.
Wiring it to real OS permission APIs
Replace each handleChoice(perm, true) call with the platform's real permission request (Notification.requestPermission() on web, or the native PermissionsAndroid/UIApplication APIs in a React Native or native build), and only advance to the next card once that real request resolves, rather than assuming a tap on Allow already means access was granted at the OS level.
Build with AI
Build, Understand, Optimize, and Extend It With AI
Rather than tracing the sliding-track and progress-dot logic by hand, paste this snippet's HTML, CSS, and JS into an AI coding assistant like Claude and ask it to explain exactly how goTo() moves between four cards using a single transform change, and how the done-dot state stays independent from the active-position state so both can be tracked correctly at once. The same assistant can help you optimize it, for instance asking whether requesting notifications before location is the right order for a typical app versus asking for the highest-value permission first. It is also useful for extending the flow: ask it to wire each Allow button to real Notification.requestPermission() and geolocation/camera permission APIs, add a way to re-trigger a skipped permission request later from a settings screen, or persist the results object so the flow does not repeat on the next app launch. Treat the code less like a finished artifact and more like a starting point for a conversation.
Prompt to recreate it
Copy this into your AI assistant of choice to build the effect from scratch, or as a jumping-off point for your own variant:
Build a mobile "permission priming" onboarding flow in plain HTML, CSS, and JavaScript, framed inside a CSS phone mockup, requesting three permissions one at a time before a final summary screen, no library.

Requirements:
- Four cards (three permission-request cards plus a final summary card) arranged side by side inside a single wide flex container, with a JavaScript function that moves between them by changing one CSS transform: translateX() value on that container, eased with a CSS transition, rather than mounting and unmounting separate screens.
- Each permission card must show its own distinct illustration, a specific plain-language reason for that particular permission (not a generic "we need access" message), an "Allow" button, and a "Not Now" (skip) button — both buttons must advance the flow to the next card, since skipping must always remain a fully supported path with no dead end.
- Progress indicator dots above the cards must track two independent things at once: which card is currently in view (an active state), and which permissions have already been decided on, whether allowed or skipped (a separate permanent done state per dot) — both states must be visually distinct and neither should be lost when the other changes.
- Record each permission’s allow/skip choice in a single results data structure as the user proceeds, and on the final summary card, compute and display a message from that actual data (for example "2 of 3 permissions granted") rather than a fixed, hardcoded success message that assumes every permission was granted.
- A final "Start Exploring" button on the summary card that shows a brief loading label change before settling back, modeling a transition out of the permission flow into the main app.
Want to tighten it up first? Run this prompt through the AI Prompt Studio to score it across 8 quality dimensions, catch anti-patterns, and tune the wording for Claude, ChatGPT, or Gemini before you paste it in.
Step by step
How to Use
- 1Paste HTML, CSS, and JSThe first card (Notifications) renders with a pulsing red dot on its illustration.
- 2Tap Allow or Not NowThe current progress dot turns green permanently and the track slides to the next permission card.
- 3Repeat for Location and CameraEach card explains its own specific reason for the permission before asking.
- 4Reach the final cardA summary sentence reports exactly how many of the three permissions were granted.
- 5Tap "Start Exploring"The button shows a brief loading label before settling, modeling a real transition into the app.
- 6Wire it to real permission APIsReplace each Allow handler with a real OS permission request and advance only once it resolves.
Real-world uses
Common Use Cases
Got questions?
Frequently Asked Questions
No — this snippet only models the in-app priming screen, which is a common pattern used before the real one-shot OS permission dialog appears. Wire each Allow button to the real platform API (Notification.requestPermission() on web, or native permission APIs in a mobile build) and only advance once that real request resolves.
The flow still advances normally through all three cards and reaches the summary, which is computed from the actual results object — it will correctly report 0 of 3 permissions granted rather than assuming or forcing an allow.
handleChoice() adds a permanent done class (turning the dot green) to the dot matching the current step index the moment either Allow or Not Now is tapped, separate from the active class that tracks which card is currently in view during the slide transition.
It counts how many keys in the results object have a true value using Object.keys(results).filter(...), then picks between an all-granted message and a partial-count message that also reminds the user permissions can be changed later in Settings — nothing is a fixed assumption about the outcome.
All four cards sit side by side inside one flex container four times the screen width. goTo(index) sets a single CSS transform: translateX() percentage on that container, eased with a shared cubic-bezier transition, producing one continuous slide rather than four separately mounted screens.
Yes. Keep step and a results object in state, derive the translateX percentage and the done-dot classes from step, and call your real permission-request APIs inside the Allow handlers before advancing step — the summary calculation logic can be reused as-is.