

Learn Coding Visually
Learn to code with interactive, live-preview playgrounds — HTML, CSS, JavaScript, React & more.
 HTML Playground42 lessons · Click-based · Live preview
 CSS PlaygroundLearn CSS with a live editor
 JavaScript Playground60 lessons · DOM · Async · Canvas
 React PlaygroundLearn React with a live code editor
 GSAP PlaygroundLearn GSAP animation interactively
 SVG Playground44 lessons · shapes · paths · animation
 SCSS Playground45 lessons · Sass modules · tokens
 Tailwind PlaygroundLearn Tailwind CSS with a live editor
 Bootstrap 5 Playground50 lessons · live preview
Barcode Scan Sweep Loader — Free HTML CSS JS Snippet
Barcode Scan Sweep Loader · Loaders · Plain HTML, CSS & JS · Live preview
What's included
Features
About this UI Snippet
Barcode Scan Sweep Loader — Animated Laser Sweep Over a Randomized Barcode Pattern
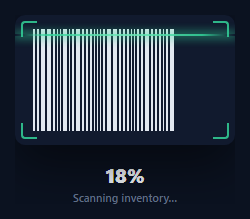
Point-of-sale checkouts, inventory systems, and shipping/receiving tools all share a familiar visual language: a barcode being read by a sweeping laser line inside a viewfinder frame with corner brackets. This loader borrows that exact visual metaphor for a generic loading state — useful specifically wherever the underlying operation is genuinely about looking something up or verifying an item, rather than a generic spinner that carries no domain meaning.
Generating a randomized barcode pattern
Rather than a static image, the bars are generated at runtime: a loop creates BAR_COUNT (34) individual <div class="bar"> elements, each assigned a random width of 1px, 2px, or 4px (weighted so thin bars are most common, matching how real barcodes look — mostly narrow bars with occasional thicker ones) via nested Math.random() checks. Because the pattern is generated in JavaScript rather than baked into a static SVG or image asset, every page load (or every re-mount, in a component context) produces a visually distinct barcode, which keeps repeated use of the loader from looking identical every time.
The laser sweep animation
The .laser element is a thin horizontal bar with a CSS linear-gradient that fades to transparent at both ends and a bright green core, plus a box-shadow glow to sell the "laser" look. A single CSS @keyframes sweep animation moves its top position from the top of the barcode area to the bottom and back, with two brief zero-opacity keyframes (at 50% and 52%) inserted right at the turnaround points — this makes the laser blink off for an instant between passes rather than visibly snapping back to the top, mimicking how a real barcode scanner's beam behaves between sweep cycles.
Scanner corner brackets
Four small absolutely-positioned .corner divs, each with only two of their four border sides visible (via border-right: none/border-bottom: none and the equivalent on each corner), form the classic open-cornered viewfinder frame seen in camera scanning UIs and QR/barcode scanner apps. Because each corner is just a positioned box with two visible border edges and a matching border-radius on the outer corner, the whole frame is four simple elements rather than an SVG or image asset.
Progress simulation with staged status text
A tick() loop increments a progress value by a small random amount each frame (via requestAnimationFrame combined with a short setTimeout throttle, so it advances roughly 18 times per second rather than every single frame, giving a readable but not overly fast count-up), stopping once it reaches 100. Alongside the numeric percentage, a labels array of five status strings is stepped through based on how far progress has advanced — Math.floor((progress / 100) * labels.length) maps the current percentage into an index into the labels array — so the status text advances through a small narrative ("Scanning inventory…" → "Reading item codes…" → … → "Scan complete") that feels like real staged work rather than a single static caption sitting next to a moving number.
Build with AI
Build, Understand, Optimize, and Extend It With AI
Ask an AI coding assistant to walk through why the laser sweep keyframes include brief zero-opacity steps at the animation's turnaround points instead of a simple linear top-to-bottom-and-back movement, since that's the detail that makes the sweep read as a realistic scanner beam rather than a bouncing bar. It's also worth asking for a version where the barcode bars themselves briefly flash or highlight as the laser passes over them, or a variant that turns red and shows an error state if a simulated scan fails partway through, similar to the Retry / Error State Loader.
Prompt to recreate it
Copy this into your AI assistant of choice to build the effect from scratch, or as a jumping-off point for your own variant:
Build a barcode-scanning-style loading indicator in HTML, CSS and vanilla JavaScript — no external libraries, no barcode image asset.

Requirements:
- Generate a row of vertical bars in JavaScript with randomized widths (weighted toward thinner bars with occasional thicker ones) so the barcode pattern looks different on every load, rather than using a static image.
- Add a thin animated horizontal "laser" line with a gradient that fades to transparent at both ends and a glowing box-shadow, that sweeps from the top of the barcode area to the bottom and back on a continuous loop, briefly fading to invisible at each turnaround point so it does not appear to snap back into position.
- Add four small corner-bracket elements (open on two sides each) positioned at the corners of the barcode area to form a scanner viewfinder frame, built from plain CSS borders rather than an image or SVG.
- Below the barcode area, show a live percentage counter that counts up over a few seconds using a randomized per-tick increment (not a fixed linear rate), and a secondary status label that advances through a small sequence of staged status strings as the percentage crosses certain thresholds, finishing with a distinct "complete" state once it reaches 100%.
Want to tighten it up first? Run this prompt through the AI Prompt Studio to score it across 8 quality dimensions, catch anti-patterns, and tune the wording for Claude, ChatGPT, or Gemini before you paste it in.
Source Code
<div class="demo">
  <div class="scan-wrap">
    <div class="bars" id="bars"></div>
    <div class="laser" id="laser"></div>
    <div class="corner tl"></div>
    <div class="corner tr"></div>
    <div class="corner bl"></div>
    <div class="corner br"></div>
  </div>
  <div class="scan-status">
    <span class="scan-pct" id="pct">0%</span>
    <span class="scan-label" id="label">Scanning inventory…</span>
  </div>
</div>
* { box-sizing: border-box; margin: 0; padding: 0; }
body { font-family: system-ui, sans-serif; background: #0b1220; display: flex; align-items: center; justify-content: center; min-height: 100vh; padding: 24px; }
.demo { display: flex; flex-direction: column; align-items: center; gap: 16px; }
.scan-wrap { position: relative; width: 220px; height: 130px; background: #111a2e; border-radius: 10px; overflow: hidden; box-shadow: 0 20px 50px rgba(0,0,0,0.5); }
.bars { position: absolute; inset: 14px 18px; display: flex; align-items: stretch; gap: 2px; }
.bar { background: #e2e8f0; flex: 0 0 auto; }
.laser {
position: absolute; left: 0; right: 0; height: 2px;
background: linear-gradient(90deg, transparent, #34d399 15%, #6ee7b7 50%, #34d399 85%, transparent);
box-shadow: 0 0 10px 2px rgba(52,211,153,0.7);
top: 14px;
animation: sweep 1.8s cubic-bezier(.45,0,.55,1) infinite;
}
@keyframes sweep {
0% { top: 14px; opacity: 0.9; }
48% { top: 112px; opacity: 0.9; }
50% { opacity: 0; }
52% { top: 14px; opacity: 0; }
55% { opacity: 0.9; }
100% { top: 112px; opacity: 0.9; }
}
.corner { position: absolute; width: 16px; height: 16px; border: 2px solid #34d399; opacity: 0.85; }
.corner.tl { top: 6px; left: 6px; border-right: none; border-bottom: none; border-radius: 4px 0 0 0; }
.corner.tr { top: 6px; right: 6px; border-left: none; border-bottom: none; border-radius: 0 4px 0 0; }
.corner.bl { bottom: 6px; left: 6px; border-right: none; border-top: none; border-radius: 0 0 0 4px; }
.corner.br { bottom: 6px; right: 6px; border-left: none; border-top: none; border-radius: 0 0 4px 0; }
.scan-status { display: flex; flex-direction: column; align-items: center; gap: 2px; }
.scan-pct { font-size: 20px; font-weight: 800; color: #f1f5f9; font-variant-numeric: tabular-nums; }
.scan-label { font-size: 11px; font-weight: 600; color: #64748b; }const barsEl = document.getElementById('bars');
const pctEl = document.getElementById('pct');
const labelEl = document.getElementById('label');
const BAR_COUNT = 34;
let widths = [];
for (let i = 0; i < BAR_COUNT; i++) {
widths.push(Math.random() < 0.3 ? 4 : Math.random() < 0.6 ? 2 : 1);
}
widths.forEach(w => {
const bar = document.createElement('div');
bar.className = 'bar';
bar.style.width = w + 'px';
barsEl.appendChild(bar);
});
const labels = [
'Scanning inventory…',
'Reading item codes…',
'Cross-checking stock…',
'Verifying batch…',
'Finalizing scan…',
];
let progress = 0;
let labelIdx = 0;
function tick() {
progress += 0.6 + Math.random() * 1.4;
if (progress >= 100) {
progress = 100;
pctEl.textContent = '100%';
labelEl.textContent = 'Scan complete';
return;
}
pctEl.textContent = Math.round(progress) + '%';
const nextIdx = Math.min(labels.length - 1, Math.floor((progress / 100) * labels.length));
if (nextIdx !== labelIdx) {
labelIdx = nextIdx;
labelEl.textContent = labels[labelIdx];
}
requestAnimationFrame(() => setTimeout(tick, 55));
}
requestAnimationFrame(() => setTimeout(tick, 55));Step by step
How to Use
- 1Adjust the barcode densityChange BAR_COUNT to add or remove bars, and tune the Math.random() thresholds in the generation loop to change the ratio of thin to thick bars.
- 2Edit the status labelsUpdate the labels array with your own staged status strings — the loop maps the current progress percentage to an index in this array automatically.
- 3Tune the fill speedChange the 0.6 + Math.random() * 1.4 increment per tick, or the 55ms setTimeout delay, to make the scan finish faster or slower.
- 4Replace simulated progress with real progressInstead of incrementing progress by a random amount each tick, set it directly from a real operation's reported completion percentage (e.g. items scanned out of items total).
- 5Adjust the sweep speed or colorChange the 1.8s duration on the .laser animation, or its gradient and box-shadow colors, to match your brand palette instead of the default green.
Real-world uses
Common Use Cases
Got questions?
Frequently Asked Questions
No. The bars are generated with weighted-random widths purely for visual effect and do not encode any real data or follow an actual barcode symbology standard — this is a decorative loading indicator, not a functional barcode renderer.
The bar widths are generated with Math.random() in JavaScript at runtime rather than being a static image, so a fresh, differently-arranged pattern of bars is produced on every page load or component mount.
The CSS keyframe animation includes two brief zero-opacity keyframes positioned right at the moment the laser reaches the bottom and jumps back to the top, so it briefly disappears during the reset rather than visibly teleporting upward while still visible.
Replace the random increment inside tick() with an assignment driven by real progress — for example, the number of items successfully scanned or verified divided by the total expected, updated as your actual operation reports progress.
Yes — update the linear-gradient and box-shadow colors on .laser, and optionally the border-color on the .corner elements, to any color that fits your brand rather than the default green "verified" look.