Learn Coding Visually
Learn to code with interactive, live-preview playgrounds — HTML, CSS, JavaScript, React & more.
 HTML Playground42 lessons · Click-based · Live preview
 CSS PlaygroundLearn CSS with a live editor
 JavaScript Playground60 lessons · DOM · Async · Canvas
 React PlaygroundLearn React with a live code editor
 GSAP PlaygroundLearn GSAP animation interactively
 SVG Playground44 lessons · shapes · paths · animation
 SCSS Playground45 lessons · Sass modules · tokens
 Tailwind PlaygroundLearn Tailwind CSS with a live editor
 Bootstrap 5 Playground50 lessons · live preview
Tippy.js Dropdown Menu with Submenus — Free HTML CSS JS Snippet
Tippy.js Dropdown Menu with Submenus · Navigation · Plain HTML, CSS & JS · Live preview
What's included
Features
About this UI Snippet
Tippy.js Dropdown Menu with Submenus — Two Instances, Not One Nested Tree
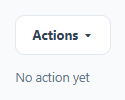
A menu with a submenu (like a real OS context menu's "Move to ›") is tempting to build as one popover containing a hidden nested panel toggled with custom CSS. This snippet takes the structurally simpler route: the submenu is its own independent Tippy instance, anchored to the "Move to" menu item, with its own separate show and hide lifecycle.
Two Tippy instances, two independent lifecycles
mainInstance is anchored to the trigger button; subInstance is anchored to the "Move to" item *inside* the main menu. Because they're genuinely separate instances, hovering away from the submenu closes only the submenu (via its own mouseenter-based trigger), without needing to manually track "is the mouse over the parent, the child, or neither" the way a single hand-rolled nested-menu implementation would have to.
Every content element has to be captured before any tippy() call runs
This is easy to get backwards: passing a DOM node as content doesn't just reference it — Tippy moves that node out of the live page into its own popper structure the instant the instance is created, and that popper isn't attached back into the document until the tooltip first shows. Querying document.getElementById('dmMoveTo') *after* mainInstance has already been constructed would return null, because dmMoveTo lives inside dmMenuTemplate, which mainInstance already detached. The fix is grabbing every element tippy() will need — menuTemplate, subTemplate, and moveToItem — into variables *before* either tippy() call runs, and reusing those variables (never re-querying by id) everywhere afterward, including the click listeners.
The inline display:none has to be cleared, or the box "shows" at zero size
Both templates sit in the page markup with style="display:none" so they're invisible before Tippy ever touches them — but that inline style is part of the element itself, and it travels *with* the element into the tippy-box. Tippy's own show/hide logic only toggles the box wrapper's visibility, never an inner element's pre-existing inline style. Skip clearing it, and mainInstance.show() reports the tooltip as fully shown — data-state="visible", opacity: 1 — while the actual menu inside remains display: none, collapsing the whole box to a couple of pixels with nothing visibly rendered. menuTemplate.style.display = '' and subTemplate.style.display = '', run once right after capturing the references, is what fixes it.
onShow on the main menu proactively closes the submenu
If the main menu is dismissed and reopened, a previously-open submenu shouldn't still be showing underneath it. mainInstance's onShow hook calls subInstance.hide() every time the main menu opens — a small, explicit reset that prevents a stale-looking submenu from a previous interaction persisting into a new one.
placement: 'right-start' with a negative offset positions the submenu like a real OS menu
right-start opens the submenu to the right of its trigger item, top-aligned with it — the standard nested-menu placement. The offset: [-6, 0] nudges it slightly to overlap the parent menu's edge, which is a deliberate detail: a small gap between a menu and its submenu is exactly the gap a moving mouse can slip through and accidentally close the submenu by leaving both elements' hover areas simultaneously.
Selecting any item closes both instances explicitly
Both the main menu's and the submenu's click handlers call subInstance.hide() and mainInstance.hide() regardless of which one the click happened in — so choosing "Rename" from the top level or "Projects" from two levels deep both fully close the entire menu tree, rather than leaving a submenu open behind a now-hidden parent.
Event delegation, not one listener per button
Each menu's clicks are handled by a single listener on the menu container using e.target.closest('[data-action]'), rather than attaching an individual listener to every button — simpler to maintain as items are added or removed, and it works identically for the top-level menu and the submenu without duplicated code.
Reusing it
Add a second or third submenu the same way — a new Tippy instance anchored to its own trigger item — reusing the identical trigger/placement/offset pattern; each submenu instance is independent and doesn't need to know about the others.
Build with AI
Build, Understand, Optimize, and Extend It With AI
You don't have to build custom hover-tracking logic for a nested menu. Paste this snippet's HTML, CSS, and JS into an AI coding assistant like Claude and ask it to explain exactly why using two separate Tippy instances (rather than one nested menu tree) lets each level's hover and click behavior work correctly without manual state tracking, and why the small negative offset on the submenu's placement matters for avoiding an accidental early close. The same assistant can help optimize it — ask whether the event-delegation pattern (one click listener per menu using closest()) scales cleanly if the menu grows to include many more items, or several more submenus. It's also useful for extending the effect: ask it to add keyboard arrow-key navigation between menu items and into/out of the submenu, support a third level of nesting, or add icons to each menu item. Treat the code less like a finished artifact and more like a starting point for a conversation.
Prompt to recreate it
Copy this into your AI assistant of choice to build the effect from scratch, or as a jumping-off point for your own variant:
Build a click-triggered dropdown menu with a hover-triggered nested submenu using the Tippy.js library (load Tippy's CSS and its bundled JS — which includes its positioning engine — from a CDN, no other library), in plain HTML, CSS, and JavaScript.

Requirements:
- Render a trigger button that opens a dropdown menu on click, containing several action items (for example Rename, Duplicate, Delete) and one item that itself opens a submenu (for example "Move to") when hovered.
- Implement the submenu as its own independent tooltip/popover instance anchored to that specific "Move to" menu item, positioned to open to the side of it and overlapping slightly so there's no gap a moving mouse could accidentally pass through and close it — do not implement the submenu as a manually toggled nested panel inside the same popover as the main menu.
- Ensure that reopening the main menu after a previous interaction never shows the submenu already open from before; the submenu should always start closed each time the main menu is freshly opened.
- Clicking any action item, whether in the top-level menu or inside the submenu, should close both the submenu and the main menu completely, and log or display which action was chosen.
- Use event delegation (a single click listener on each menu's container checking which specific button was clicked) rather than attaching a separate click listener to every individual menu item.
- Style both the main menu and the submenu with a consistent custom appearance (rounded corners, a subtle shadow, hover highlighting on items) rather than the library's default unstyled appearance.
Want to tighten it up first? Run this prompt through the AI Prompt Studio to score it across 8 quality dimensions, catch anti-patterns, and tune the wording for Claude, ChatGPT, or Gemini before you paste it in.
Source Code
<div class="dm-wrap">
<button class="dm-trigger" id="dmTrigger" type="button">Actions ▾</button>
<div id="dmMenuTemplate" style="display:none">
<div class="dm-menu">
<button class="dm-item" data-action="rename">Rename</button>
<button class="dm-item" data-action="duplicate">Duplicate</button>
<button class="dm-item dm-has-sub" id="dmMoveTo">Move to ›</button>
<button class="dm-item dm-danger" data-action="delete">Delete</button>
</div>
</div>
<div id="dmSubmenuTemplate" style="display:none">
<div class="dm-menu">
<button class="dm-item" data-action="move-projects">Projects</button>
<button class="dm-item" data-action="move-archive">Archive</button>
<button class="dm-item" data-action="move-trash">Trash</button>
</div>
</div>
<div class="dm-log" id="dmLog">No action yet</div>
</div>*{box-sizing:border-box;margin:0;padding:0}
body{font-family:system-ui,-apple-system,sans-serif;background:#f8fafc;min-height:100vh;display:flex;align-items:center;justify-content:center;padding:24px}
.dm-wrap{display:flex;flex-direction:column;align-items:flex-start;gap:14px}
.dm-trigger{padding:10px 16px;border-radius:9px;border:1.5px solid #e2e8f0;background:#fff;color:#334155;font:700 13px system-ui;cursor:pointer}
.dm-trigger:hover{border-color:#6366f1}
.dm-log{font-size:12.5px;color:#64748b}
.dm-menu{width:180px;background:#fff;border-radius:10px;padding:6px;display:flex;flex-direction:column}
.dm-item{width:100%;text-align:left;padding:9px 10px;border:none;background:none;border-radius:7px;font:600 13px system-ui;color:#334155;cursor:pointer}
.dm-item:hover{background:#f1f5f9}
.dm-danger{color:#dc2626}
.dm-danger:hover{background:#fef2f2}
.tippy-box[data-theme~='fwd-menu']{background:#fff;box-shadow:0 12px 30px rgba(0,0,0,.18);border:1px solid #e2e8f0}
.tippy-box[data-theme~='fwd-menu'] .tippy-content{padding:0}var logEl = document.getElementById('dmLog');
var triggerBtn = document.getElementById('dmTrigger');
function logAction(text) { logEl.textContent = text; }
// Every element Tippy will receive as "content" has to be captured into a
// variable BEFORE any tippy() call runs. Tippy moves a DOM-node content
// value out of the live page into its own (initially detached, in-memory)
// popper structure the moment the instance is created -- so re-querying
// document.getElementById() for that same id afterward returns null, even
// though the element still exists and still works via the reference already
// held in JS. dmMoveTo is nested inside dmMenuTemplate, so it has to be
// captured here too, before mainInstance's construction detaches its parent.
var menuTemplate = document.getElementById('dmMenuTemplate');
var subTemplate = document.getElementById('dmSubmenuTemplate');
var moveToItem = document.getElementById('dmMoveTo');
// Both templates start with inline display:none so they're invisible sitting
// in the page before Tippy adopts them -- but that inline style travels WITH
// the element into the tippy-box, and Tippy's own show/hide only toggles the
// box wrapper, never this inner style. Left in place, the content stays
// collapsed to zero size forever, even while the box itself reports visible.
menuTemplate.style.display = '';
subTemplate.style.display = '';
var mainInstance = tippy(triggerBtn, {
content: menuTemplate,
theme: 'fwd-menu',
interactive: true,
trigger: 'click',
placement: 'bottom-start',
arrow: false,
appendTo: document.body,
onShow: function () { subInstance.hide(); },
});
// The submenu is a SEPARATE Tippy instance anchored to the "Move to" item --
// not a nested menu drawn inside the first one. Two independent instances,
// each with their own show/hide lifecycle, is what makes hovering off the
// submenu close only the submenu rather than the whole menu tree.
var subInstance = tippy(moveToItem, {
content: subTemplate,
theme: 'fwd-menu',
interactive: true,
trigger: 'mouseenter click',
placement: 'right-start',
arrow: false,
appendTo: document.body,
offset: [-6, 0],
});
menuTemplate.addEventListener('click', function (e) {
var btn = e.target.closest('[data-action]');
if (!btn) return;
logAction('Action: ' + btn.getAttribute('data-action'));
subInstance.hide();
mainInstance.hide();
});
subTemplate.addEventListener('click', function (e) {
var btn = e.target.closest('[data-action]');
if (!btn) return;
logAction('Action: ' + btn.getAttribute('data-action'));
subInstance.hide();
mainInstance.hide();
});Step by step
How to Use
- 1Add the Tippy.js CDNLoad tippy.css and tippy-bundle.umd.min.js before the snippet's JS runs.
- 2Paste HTML, CSS, and JSAn "Actions" button renders.
- 3Click the buttonA dropdown menu opens with four items.
- 4Hover "Move to"A submenu opens to the right with three destinations.
- 5Click a submenu itemBoth menus close and the action logs below.
- 6Reopen the menuThe submenu does not reappear on its own.
Real-world uses
Common Use Cases
Got questions?
Frequently Asked Questions
Passing a DOM node as Tippy's content option doesn't just reference it — Tippy moves that node out of its original place in the page and into its own popper structure the moment the instance is created, and that structure isn't reattached to the visible document until the tooltip first shows. Querying document.getElementById for that same id afterward would return null, since the element (though still valid and usable through the reference already saved in JavaScript) is no longer part of the live, attached document tree. Capturing every needed element into a variable before any tippy() call runs, and reusing those variables afterward, avoids this entirely.
The template markup starts with an inline style="display:none" so it doesn't flash visibly in the page before Tippy adopts it. But that inline style is a property of the element itself, and it moves along with the element when Tippy relocates it into the tippy-box — Tippy's show/hide mechanism only toggles the box wrapper's own visibility, it never inspects or clears an inner element's pre-existing inline styles. Without explicitly setting the template's display back to an empty string right after capturing it, the tooltip would report itself as fully shown while the actual content inside stayed invisible, collapsing the whole box to zero visible size.
Using two independent instances means each one manages its own show/hide state and hover detection natively — the submenu's own mouseenter trigger and Tippy's built-in interactive handling already solve "close when the mouse truly leaves this element," without needing custom logic to track whether the cursor is over the parent menu, the submenu, or the gap between them. A single hand-built nested menu would need to reimplement that hover-tracking logic manually.
Without it, a submenu left open from a previous interaction (opened, then the main menu was dismissed without closing the submenu explicitly) could still be showing the next time the main menu opens, creating a confusing, stale-looking state. Calling subInstance.hide() inside the main menu's onShow hook guarantees every fresh opening of the main menu starts with the submenu definitively closed.
A small gap between a menu item and its submenu is exactly the space a diagonally-moving mouse can pass through, leaving both the item's and the submenu's hover areas at the same moment and causing the submenu to close before the cursor actually reaches it. The offset: [-6, 0] value pulls the submenu slightly toward and overlapping its trigger item, closing that gap the same way real operating system context menus avoid it.
Selecting an action, whether from the top-level menu or two levels deep in the submenu, represents a completed choice — the entire menu tree should close, not just the specific panel the click happened in. Calling both subInstance.hide() and mainInstance.hide() from either handler ensures choosing "Rename" at the top level and choosing "Projects" inside the submenu both fully dismiss the whole menu, rather than leaving a parent or child panel open behind the other.
Create another Tippy instance anchored to that item's element (the same way subInstance is anchored to the "Move to" button), using the same interactive, trigger, placement, and offset configuration, with its own content element and its own click handler. Each submenu instance is fully independent, so adding more doesn't require changing the existing ones — just remember to also call its hide() method from the main menu's onShow and from every item's click handler that should close the full tree.