Learn Coding Visually
Learn to code with interactive, live-preview playgrounds — HTML, CSS, JavaScript, React & more.
 HTML Playground42 lessons · Click-based · Live preview
 CSS PlaygroundLearn CSS with a live editor
 JavaScript Playground60 lessons · DOM · Async · Canvas
 React PlaygroundLearn React with a live code editor
 GSAP PlaygroundLearn GSAP animation interactively
 SVG Playground44 lessons · shapes · paths · animation
 SCSS Playground45 lessons · Sass modules · tokens
 Tailwind PlaygroundLearn Tailwind CSS with a live editor
 Bootstrap 5 Playground50 lessons · live preview
Leaflet Side-by-Side Layer Comparison — Free HTML CSS JS Snippet
Leaflet Side-by-Side Layer Comparison · Misc · Plain HTML, CSS & JS · Live preview
What's included
Features
About this UI Snippet
Leaflet Side-by-Side Layer Comparison — a Swipe Divider Built on CSS clip-path
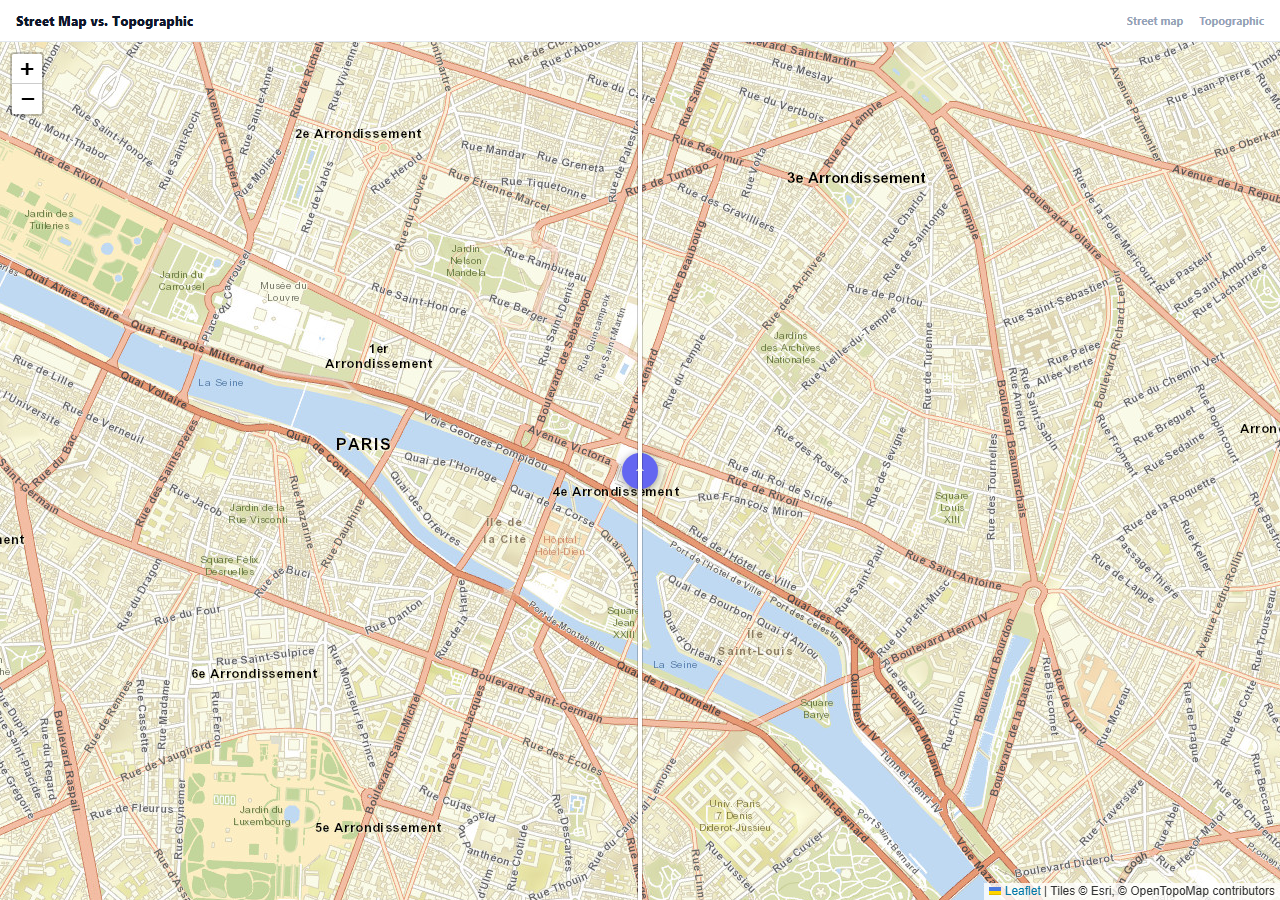
Comparing two map layers — a street map against a topographic one, old imagery against new, one data source against another — is most intuitive as a draggable divider you swipe across, revealing one layer on each side. The well-known way to build this is the leaflet-side-by-side plugin; this snippet reimplements the same interaction from first principles with a single CSS property, so the technique itself — not just the plugin's API — is what's actually being taught.
Both layers render on the same map, stacked
Both tile layers are added to the same L.map instance with addTo(map), which stacks them in DOM order — the second one added (after) sits visually on top of the first. Without any further styling, only the top layer would ever be visible; the entire trick is controlling how much of that top layer is actually painted.
clip-path does the reveal, not opacity or z-index tricks
The core technique is one line: after.getContainer().style.clipPath = 'inset(0 0 0 ' + pct + '%)'. inset()'s four values are top/right/bottom/left, so clipping pct% from the left means the top layer's pane is only actually painted from that percentage rightward — the bottom layer shows through everywhere to the left of it, with a hard, crisp edge and zero performance cost, since clip-path is a compositor-level CSS property, not a JavaScript-computed pixel mask.
The range input is invisible except for its thumb
The slider itself is a real <input type="range"> for genuine accessibility and touch support, but its track is made invisible (height: 0) and only its thumb is styled into a visible drag handle — the actual visual divider line is a separate, purely decorative <div> positioned at the same percentage, kept in sync by the same updateClip function that sets the clip-path.
One function updates everything, on input and on resize
updateClip positions the divider line, sets the clip-path, and is called both on the slider's input event and on window resize — since it always works in percentages rather than pixels, a resize needs only a redraw at the same percentage, not any recalculated coordinate math.
Reusing it
Swap either tile layer's URL for any other XYZ tile source — a different date's imagery, a different data provider, a labeled vs. unlabeled basemap — and the comparison mechanism itself needs no changes.
Build with AI
Build, Understand, Optimize, and Extend It With AI
You don't have to reach for an extra plugin dependency to build this. Paste this snippet's HTML, CSS, and JS into an AI coding assistant like Claude and ask it to explain exactly how the CSS clip-path inset() function reveals only part of the top map layer, and why that approach is cheaper to keep smooth during dragging than a JavaScript-computed pixel mask or canvas overlay would be. The same assistant can help optimize it — ask whether the resize listener should be debounced for a page with frequent layout shifts, and whether the same clip-path technique could be applied vertically instead of horizontally for a top/bottom comparison layout. It's also useful for extending the effect: ask it to add labels that fade in/out based on which side is currently more revealed, keyboard arrow-key support for nudging the divider, or a way to lock the comparison at specific preset positions. Treat the code less like a finished artifact and more like a starting point for a conversation.
Prompt to recreate it
Copy this into your AI assistant of choice to build the effect from scratch, or as a jumping-off point for your own variant:
Build a draggable side-by-side comparison slider for two map tile layers using Leaflet.js (load Leaflet's CSS and JS from a CDN, no other library), in plain HTML, CSS, and JavaScript, without using any dedicated comparison plugin.

Requirements:
- Add two different tile layers to the same map instance, stacked so one renders visually on top of the other.
- Implement the comparison reveal using a CSS clip-path applied directly to the top layer's DOM container, clipping it based on a percentage value so only the portion to one side of a divider position is actually visible, letting the bottom layer show through on the other side — do not use a canvas-based mask or per-pixel JavaScript computation for the reveal itself.
- Overlay a real, accessible range input (type="range") on top of the map that controls the divider's percentage position, styled so its track is invisible and only its thumb appears as a draggable circular handle.
- Render a separate, purely visual thin divider line positioned at the same percentage as the range input's current value, kept in sync with it on every input event.
- Ensure the divider and the clip-path both use percentage-based positioning (not fixed pixel values) so the comparison continues to work correctly if the browser window or map container is resized, without needing to recalculate any pixel coordinates.
- The map underneath should support normal panning and zooming with both layers moving together in sync.
Want to tighten it up first? Run this prompt through the AI Prompt Studio to score it across 8 quality dimensions, catch anti-patterns, and tune the wording for Claude, ChatGPT, or Gemini before you paste it in.
Source Code
<div class="lc-wrap">
  <div class="lc-bar">
    <div class="lc-title">Street Map vs. Topographic</div>
    <div class="lc-labels"><span>Street map</span><span>Topographic</span></div>
  </div>
  <div class="lc-map" id="lcMap"></div>
</div>*{box-sizing:border-box;margin:0;padding:0}
body{font-family:system-ui,-apple-system,sans-serif}
.lc-wrap{height:100vh;min-height:480px;display:flex;flex-direction:column}
.lc-bar{padding:12px 16px;background:#fff;border-bottom:1px solid #e2e8f0;display:flex;justify-content:space-between;align-items:center;flex-wrap:wrap;gap:8px}
.lc-title{font-size:13px;font-weight:800;color:#0f172a}
.lc-labels{display:flex;gap:16px;font-size:11px;font-weight:700;color:#94a3b8}
.lc-map{flex:1;position:relative}
.leaflet-sbs-range{position:absolute;top:50%;z-index:999;-webkit-appearance:none;width:100%;height:0}
.leaflet-sbs-divider{position:absolute;top:0;bottom:0;left:50%;width:4px;margin-left:-2px;background:#fff;box-shadow:0 0 0 1px rgba(0,0,0,.2);z-index:999;pointer-events:none}
.leaflet-sbs-range::-webkit-slider-thumb{-webkit-appearance:none;pointer-events:auto;width:36px;height:36px;border-radius:50%;background:#6366f1 url("data:image/svg+xml,%3Csvg xmlns='http://www.w3.org/2000/svg' width='16' height='16' fill='white' viewBox='0 0 16 16'%3E%3Cpath d='M8 3l-4 5h3v5h2V8h3z'/%3E%3C/svg%3E") center/16px no-repeat;box-shadow:0 2px 8px rgba(0,0,0,.4);cursor:ew-resize}var map = L.map('lcMap', { zoomControl: true }).setView([48.8566, 2.3522], 15);
// Two visually distinct basemaps standing in for "before" and "after" --
// the technique works identically for any two layers you want to compare,
// including two dates of imagery from the same provider.
var before = L.tileLayer('https://server.arcgisonline.com/ArcGIS/rest/services/World_Street_Map/MapServer/tile/{z}/{y}/{x}', {
attribution: 'Tiles © Esri', maxZoom: 19,
}).addTo(map);
var after = L.tileLayer('https://{s}.tile.opentopomap.org/{z}/{x}/{y}.png', {
attribution: '© OpenTopoMap contributors', maxZoom: 17,
}).addTo(map);
// A minimal, dependency-free reimplementation of the classic
// leaflet-side-by-side plugin: a range input plus a divider line, both
// absolutely positioned over the map, and a CSS clip-path applied to the
// "after" layer's DOM pane so it's only visible to the right of the handle.
var container = document.getElementById('lcMap');
var range = document.createElement('input');
range.type = 'range';
range.min = 0; range.max = 100; range.value = 50;
range.className = 'leaflet-sbs-range';
container.appendChild(range);
var divider = document.createElement('div');
divider.className = 'leaflet-sbs-divider';
container.appendChild(divider);
function updateClip() {
var pct = range.value;
divider.style.left = pct + '%';
// clip-path inset(top right bottom left) -- clipping from the LEFT edge
// reveals the "after" pane only to the right of the handle, leaving the
// "before" pane (underneath, unclipped) visible on the left side.
after.getContainer().style.clipPath = 'inset(0 0 0 ' + pct + '%)';
}
range.addEventListener('input', updateClip);
updateClip();
// Keep both panes' pointer targets correct after a resize -- the clip-path
// approach doesn't need any coordinate math on resize, only a redraw of the
// same percentage, which is one of its advantages over a JS-computed mask.
window.addEventListener('resize', updateClip);Step by step
How to Use
- 1Add the Leaflet CDNLoad leaflet.css and leaflet.js before the snippet's JS runs.
- 2Paste HTML, CSS, and JSTwo tile layers render with a draggable divider at the center.
- 3Drag the round handleThe divider moves and reveals more of either layer.
- 4Drag it fully left or rightSee either layer in full, edge to edge.
- 5Pan or zoom the mapBoth layers move together, the comparison stays intact.
- 6Resize the browser windowThe divider stays at the same relative percentage.
Real-world uses
Common Use Cases
Got questions?
Frequently Asked Questions
Both tile layers are stacked on the same map, with the "after" layer rendered on top. A CSS clip-path with an inset() value is applied to the after layer's DOM container, clipping away everything to the left of the divider's percentage position — so only the region to the right of the handle actually gets painted from that top layer, letting the layer underneath show through everywhere to the left.
clip-path is a compositor-level CSS property, meaning the browser's rendering engine handles the clipping during compositing without re-running any JavaScript or recalculating pixel data on every frame. A JS-based approach (drawing to a canvas, computing a clip region manually) would need to recompute and repaint on every drag movement and every map interaction, which is both more code and meaningfully more expensive to keep smooth.
Using a real <input type="range"> preserves genuine keyboard and touch accessibility that a custom-built drag handler would have to reimplement from scratch. Its default track visual isn't wanted here since a separate, purely decorative divider line already shows the split position, so the track's height is set to zero and only the thumb (the actual draggable circle) is given custom styling.
The divider position and the clip-path value are both expressed as a percentage, not a fixed pixel offset. Because percentages are relative to the container's current size, redrawing at the same percentage value after a resize automatically produces the correct new pixel position — no coordinate recalculation or resize-specific math is needed, only re-running the same update function.
Replace either tile layer's URL template with any other XYZ tile source — a different date's imagery, a different map provider, or a labeled versus unlabeled basemap variant. The comparison mechanism (the clip-path reveal, the synced divider, the range input) works identically regardless of what the two tile layers actually show.