

Learn Coding Visually
Learn to code with interactive, live-preview playgrounds — HTML, CSS, JavaScript, React & more.
 HTML Playground42 lessons · Click-based · Live preview
 CSS PlaygroundLearn CSS with a live editor
 JavaScript Playground60 lessons · DOM · Async · Canvas
 React PlaygroundLearn React with a live code editor
 GSAP PlaygroundLearn GSAP animation interactively
 SVG Playground44 lessons · shapes · paths · animation
 SCSS Playground45 lessons · Sass modules · tokens
 Tailwind PlaygroundLearn Tailwind CSS with a live editor
 Bootstrap 5 Playground50 lessons · live preview
Image Magnifier — Free HTML CSS JS Zoom Snippet
Image Magnifier · Cards · Plain HTML, CSS & JS · Live preview
What's included
Features
About this UI Snippet
Image Magnifier — Hover Zoom Lens, Side Preview Panel, Thumbnail Strip & Background-Position Zoom
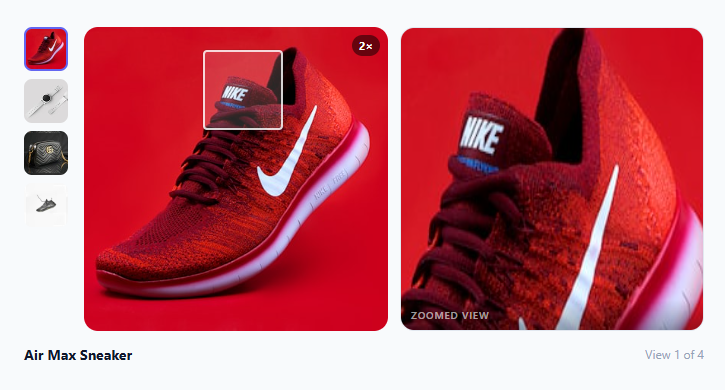
Squint at a thumbnail-sized product photo and you can't tell a cotton weave from a linen one — which is exactly the moment a shopper abandons the page for a competitor's listing with a better zoom. The hover-to-magnify interaction on Amazon, Shopify, and virtually every fashion storefront exists to close that gap, and it's built from a surprisingly small piece of math rather than any image-processing library. This snippet recreates the full pattern: a thumbnail strip for switching between product shots, a crosshair-cursor lens that tracks the pointer over the main image, and a side preview panel that mirrors the lens's position back at 2.5× scale in real time — all driven by CSS background-position, the same property powering the Before / After Slider.
Why background-position instead of canvas or a scaled `<img>`
The obvious-seeming approaches — drawing the zoomed region to a <canvas>, or scaling and translating an <img> with CSS transform — both force the browser to repaint or recompute layout on every single mousemove event, which on a busy product page can visibly stutter. Setting background-position and background-size, by contrast, is a property the compositor can update on its own thread without touching layout or paint at all. The preview panel shares the *exact same* background image as the main photo, just scaled up by the ZOOM constant (2.5), so panning the lens is really just sliding that shared background around behind a fixed-size window.
The formula that links lens position to zoomed view
The whole effect comes down to one line: bx = -(lx / rect.width) * rect.width * ZOOM. lx / rect.width expresses the lens's horizontal position as a fraction — say, 0.3 for "30% of the way across." Multiplying that fraction by the *scaled-up* image width gives the pixel offset the background needs to shift by, and the negative sign flips the direction: moving the lens right should reveal content further right, which means sliding the background image *left* underneath the fixed preview window. The same formula runs independently for the vertical axis, and because it's pure ratio math, it produces a perfectly proportional zoom at any ZOOM value or image size — no hardcoded pixel constants anywhere.
Clamping the lens to the image bounds
A lens that's allowed to drift past the edge of the photo would expose empty background or distort the math, so its position is clamped on both axes: Math.min(Math.max(0, x - lw/2), rect.width - lw). The inner Math.max stops it sliding off the top-left edge; the outer Math.min stops it sliding off the bottom-right. Subtracting half the lens's own width and height first centers it on the cursor rather than anchoring its corner there — a small detail that makes the lens feel like it's "held" by the pointer rather than dragged by a corner.
Keeping the lens and preview in lockstep
Switching products via the thumbnail strip calls setImage(idx, thumb), which updates the main image's background, the preview panel's background, and the active thumbnail's border in one pass — so the zoomed view is never showing a different product than the one currently displayed. Swapping the placeholder gradients for real photography is a one-line change per element: set background-image: url("product.jpg") on both .main-img and .zoom-inner, and the same ratio-based formula continues to work without any adjustment, because it never assumed anything about *what* the background contained — only how big it is relative to the lens. For full-screen image viewing once a user wants more than a hover-zoom, the Image Lightbox pairs naturally with this snippet.
Build with AI
Build, Understand, Optimize, and Extend It With AI
Instead of reverse engineering the zoom math from scratch, paste this snippet's HTML, CSS, and JS into an AI coding assistant like Claude and ask it to explain exactly why the preview panel's background offset is computed as the negative of the lens position's fraction of the image width multiplied by the scaled image width, and why that negative sign is what makes moving the lens right reveal content further right in the preview. The same assistant is useful for optimizing it — ask whether recalculating getBoundingClientRect on every single mousemove event is worth caching, or whether the whole interaction should be throttled with requestAnimationFrame for smoother tracking on lower-end hardware. It's also a good way to extend the feature: ask it to add pinch-to-zoom or touch support for mobile, animate the zoom level in on hover rather than snapping instantly, or let the ZOOM constant scale dynamically based on the source image's real resolution. Treat the code less like a finished artifact and more like a starting point for a conversation.
Prompt to recreate it
Copy this into your AI assistant of choice to build the effect from scratch, or as a jumping-off point for your own variant:
Build a product image magnifier with a hover lens and a side zoom preview panel in plain HTML, CSS, and vanilla JavaScript, driven entirely by background-position, no canvas.

Requirements:
- A main image container using background-image and background-size: cover, with cursor: crosshair, and a thumbnail strip beside it where clicking a thumbnail swaps both the main image's and the preview panel's background-image to match, and marks that thumbnail active.
- A square lens overlay element, hidden by default and shown only while hovering the main image container, that follows the pointer: on every mousemove, compute the lens's target left and top as the pointer position minus half the lens's own width and height, so the lens is centered on the cursor rather than anchored by a corner.
- Clamp the lens position on both axes so it can never move past the image container's edges, using a formula like the minimum of (maximum of 0 and position) and (containerSize minus lensSize).
- A separate preview panel element whose background-image is the same image as the main photo, whose background-size is set to the container's width and height each multiplied by a ZOOM constant, and whose background-position is computed as the negative of the lens's fractional position along each axis multiplied by that same scaled dimension — so panning the lens slides the shared background behind the fixed-size preview window.
- The ZOOM constant, the lens's pixel dimensions, and the image URLs must all be easily swappable constants, and swapping in real photograph URLs must require no changes to the position or scaling formulas.
Want to tighten it up first? Run this prompt through the AI Prompt Studio to score it across 8 quality dimensions, catch anti-patterns, and tune the wording for Claude, ChatGPT, or Gemini before you paste it in.
Source Code
<div class="page">
  <div class="product-layout">

    <!-- Thumbnail strip -->
    <div class="thumbs" id="thumbs">
      <div class="thumb active" style="--bg:url('https://images.unsplash.com/photo-1542291026-7eec264c27ff?w=120&q=80')" onclick="setImage(0,this)"></div>
      <div class="thumb" style="--bg:url('https://images.unsplash.com/photo-1523275335684-37898b6baf30?w=120&q=80')" onclick="setImage(1,this)"></div>
      <div class="thumb" style="--bg:url('https://images.unsplash.com/photo-1548036328-c9fa89d128fa?w=120&q=80')" onclick="setImage(2,this)"></div>
      <div class="thumb" style="--bg:url('https://images.unsplash.com/photo-1491553895911-0055eca6402d?w=120&q=80')" onclick="setImage(3,this)"></div>
    </div>

    <!-- Main image with zoom -->
    <div class="img-wrap" id="img-wrap">
      <div class="main-img" id="main-img" style="background-image:url('https://images.unsplash.com/photo-1542291026-7eec264c27ff?w=600&q=80')">
        <div class="img-label">Hover to zoom</div>
      </div>
      <div class="zoom-lens" id="lens"></div>
      <div class="zoom-hint" id="zoom-hint">2×</div>
    </div>

    <!-- Zoom preview -->
    <div class="zoom-preview" id="zoom-preview">
      <div class="zoom-inner" id="zoom-inner"></div>
      <div class="zoom-label">Zoomed view</div>
    </div>

  </div>

  <div class="product-info">
    <p class="product-name" id="product-name">Air Max Sneaker</p>
    <p class="product-meta" id="product-meta">View 1 of 4</p>
  </div>
</div>
* { box-sizing: border-box; margin: 0; padding: 0; }
body { font-family: system-ui, sans-serif; background: #f8fafc; min-height: 100vh; display: flex; align-items: center; justify-content: center; padding: 32px 24px; }
.page { width: 100%; max-width: 680px; display: flex; flex-direction: column; gap: 14px; }
.product-layout { display: grid; grid-template-columns: 48px 1fr 1fr; gap: 12px; align-items: start; }
@media (max-width: 560px) { .product-layout { grid-template-columns: 1fr; } .zoom-preview { display: none; } }
/* Thumbnail strip */
.thumbs { display: flex; flex-direction: column; gap: 8px; }
.thumb { width: 44px; height: 44px; border-radius: 8px; background: var(--bg) center/cover; cursor: pointer; border: 2px solid transparent; transition: border-color 0.15s, transform 0.12s; flex-shrink: 0; }
.thumb:hover { transform: scale(1.08); }
.thumb.active { border-color: #6366f1; }
/* Main image */
.img-wrap { position: relative; border-radius: 14px; overflow: hidden; aspect-ratio: 1; cursor: crosshair; user-select: none; }
.main-img { width: 100%; height: 100%; display: flex; align-items: center; justify-content: center; background-size: cover; background-position: center; transition: background-image 0.3s; }
.img-label { font-size: 13px; color: rgba(255,255,255,0.7); font-weight: 600; pointer-events: none; }
/* Zoom lens */
.zoom-lens { position: absolute; width: 80px; height: 80px; border: 2px solid rgba(255,255,255,0.8); border-radius: 4px; background: rgba(255,255,255,0.15); pointer-events: none; display: none; box-shadow: 0 0 0 1px rgba(0,0,0,0.1); }
.img-wrap:hover .zoom-lens { display: block; }
.img-wrap:hover .img-label { display: none; }
/* Zoom hint badge */
.zoom-hint { position: absolute; top: 8px; right: 8px; background: rgba(0,0,0,0.5); color: #fff; font-size: 11px; font-weight: 700; padding: 3px 7px; border-radius: 20px; pointer-events: none; }
/* Zoom preview */
.zoom-preview { border-radius: 14px; overflow: hidden; aspect-ratio: 1; border: 1.5px solid #e2e8f0; position: relative; display: flex; align-items: flex-end; }
.zoom-inner { position: absolute; inset: 0; background-repeat: no-repeat; }
.zoom-label { position: relative; z-index: 1; font-size: 10px; font-weight: 600; text-transform: uppercase; letter-spacing: 0.8px; color: rgba(255,255,255,0.6); padding: 8px 10px; background: linear-gradient(to top, rgba(0,0,0,0.3), transparent); width: 100%; }
/* Product info */
.product-info { display: flex; align-items: center; justify-content: space-between; }
.product-name { font-size: 14px; font-weight: 700; color: #0f172a; }
.product-meta { font-size: 12px; color: #94a3b8; }const IMAGES = [
{ url: 'https://images.unsplash.com/photo-1542291026-7eec264c27ff?w=600&q=80', name: 'Air Max Sneaker' },
{ url: 'https://images.unsplash.com/photo-1523275335684-37898b6baf30?w=600&q=80', name: 'Classic Watch' },
{ url: 'https://images.unsplash.com/photo-1548036328-c9fa89d128fa?w=600&q=80', name: 'Leather Bag' },
{ url: 'https://images.unsplash.com/photo-1491553895911-0055eca6402d?w=600&q=80', name: 'Running Shoe' },
];
const ZOOM = 2.5;
let current = 0;
const wrap = document.getElementById('img-wrap');
const lens = document.getElementById('lens');
const preview = document.getElementById('zoom-inner');
function setImage(idx, thumb) {
current = idx;
const img = IMAGES[idx];
const src = 'url("' + img.url + '")';
document.getElementById('main-img').style.backgroundImage = src;
preview.style.backgroundImage = src;
document.getElementById('product-name') && (document.getElementById('product-name').textContent = img.name);
document.getElementById('product-meta').textContent = 'View ' + (idx + 1) + ' of ' + IMAGES.length;
document.querySelectorAll('.thumb').forEach((t,i) => t.classList.toggle('active', i === idx));
}
wrap.addEventListener('mousemove', e => {
const rect = wrap.getBoundingClientRect();
const x = e.clientX - rect.left;
const y = e.clientY - rect.top;
const lw = lens.offsetWidth, lh = lens.offsetHeight;
const lx = Math.min(Math.max(0, x - lw/2), rect.width - lw);
const ly = Math.min(Math.max(0, y - lh/2), rect.height - lh);
lens.style.left = lx + 'px';
lens.style.top = ly + 'px';
// Position background in preview
const bx = -(lx / rect.width) * rect.width * ZOOM;
const by = -(ly / rect.height) * rect.height * ZOOM;
preview.style.backgroundSize = (rect.width * ZOOM) + 'px ' + (rect.height * ZOOM) + 'px';
preview.style.backgroundPosition = bx + 'px ' + by + 'px';
});
// Initialise preview with first image
preview.style.backgroundImage = 'url("' + IMAGES[0].url + '")';Step by step
How to Use
- 1Hover over the main image to activate the zoom lensThe crosshair cursor activates the zoom lens overlay and the right preview panel shows the zoomed area. Move the cursor to pan around the image.
- 2Click thumbnails to switch between imagesEach thumbnail loads a different gradient/image into the main view and resets the preview panel background. The active thumbnail gets an indigo border.
- 3Replace gradients with real product imagesIn the IMAGES array, replace each bg value with your image URL. In the CSS, set background-image: url() instead of background: gradient on .main-img and .zoom-inner.
- 4Change the zoom levelUpdate const ZOOM = 2.5 to any value. 1.5 for subtle zoom, 3 for high magnification. The background-position calculation adapts automatically.
- 5Change the lens sizeUpdate width: 80px; height: 80px on .zoom-lens. A larger lens shows more context; a smaller one gives finer control. The zoom calculation reads lens.offsetWidth dynamically.
- 6Export in your formatClick "HTML" for a standalone file, "JSX" for a React component with onMouseMove handler, or "Tailwind" for a React + Tailwind CSS version.
Real-world uses
Common Use Cases
Got questions?
Frequently Asked Questions
The lens position (lx, ly) as a fraction of the image size (lx/width) tells us what percentage of the image is to the left of the lens. Multiplying by image size × ZOOM gives the pixel offset needed in the preview: bx = -(lx / width) × width × ZOOM. The negative sign moves the background in the opposite direction of the lens position — moving the lens right shows content further to the right in the preview. background-size: width×ZOOM keeps the image scaled correctly.
Update the IMAGES array to use actual image paths: { img: "/products/shoe-blue.jpg", name: "Blue" }. In setImage(), set element.style.backgroundImage = "url(" + img.img + ")"; element.style.backgroundSize = "cover". In CSS, change .main-img from having background: gradient to having no background — the JS sets it. Add background-size: cover initially and let the JS override with the exact pixel size on mousemove for the zoom panel.
Change cursor: crosshair on .img-wrap to cursor: zoom-in when not zoomed and cursor: zoom-out when zoomed (or always zoom-in). For a custom magnifying glass SVG cursor: cursor: url("magnify.svg") 12 12, crosshair — the numbers are the hotspot offset (where the tip of the cursor should point within the SVG).
Click "JSX" to download. Use useRef for the wrap, lens, and preview elements. Add a onMouseMove handler on the main image container that reads rect from ref.current.getBoundingClientRect(). Derive lx, ly, bx, by in the handler and set them as state variables. Apply them as inline style to the lens and preview elements. Use useState for the current image index and update it from thumbnail onClick.