

Learn Coding Visually
Learn to code with interactive, live-preview playgrounds — HTML, CSS, JavaScript, React & more.
 HTML Playground42 lessons · Click-based · Live preview
 CSS PlaygroundLearn CSS with a live editor
 JavaScript Playground60 lessons · DOM · Async · Canvas
 React PlaygroundLearn React with a live code editor
 GSAP PlaygroundLearn GSAP animation interactively
 SVG Playground44 lessons · shapes · paths · animation
 SCSS Playground45 lessons · Sass modules · tokens
 Tailwind PlaygroundLearn Tailwind CSS with a live editor
 Bootstrap 5 Playground50 lessons · live preview
AutoAnimate Kanban Column — Drag-Free Reorder Snippet
AutoAnimate Kanban Column · Dashboards · Plain HTML & CSS · Live preview
What's included
Features
About this UI Snippet
AutoAnimate Kanban Column — How Zero-Config FLIP Reordering Works
Reordering a list smoothly is usually the kind of thing that eats an afternoon: you have to measure every item's position before the change, apply the change, measure again, then animate the delta yourself with transform and transition. That technique has a name — FLIP (First, Last, Invert, Play) — and it is exactly what @formkit/auto-animate automates so you never have to hand-write it.
What autoAnimate actually watches
The entire integration is one line:
autoAnimate(list);
That call attaches a MutationObserver to the list element. From then on, autoAnimate does not care *how* the children changed — whether you spliced an array and called render() from scratch (as this snippet does), used appendChild, or removed a node directly. Whenever the observer fires, it runs its own FLIP pass:
1. First — it already has each child's previous bounding box, captured on the last observed frame.
2. Last — it reads the new bounding boxes right after the mutation lands in the DOM.
3. Invert — for every element that moved, it applies an inverse transform so the element visually stays exactly where it was.
4. Play — it removes that inverse transform on the next frame with a transition, so the element animates from its old position to its new one.
Because this all happens on transform, it's compositor-only work — no layout thrashing — and it works even though this snippet destroys and rebuilds every <li> on each click.
Why full re-renders don't break the animation
The click handler in this snippet does the least clever thing possible: mutate the tasks array (swap two entries for up/down, splice one out for done), then call render(), which does list.innerHTML = '' and rebuilds every card from scratch. Normally that would be an animation killer — the old nodes are gone, so there's nothing to interpolate from.
autoAnimate sidesteps this because its MutationObserver callback runs synchronously before the browser paints the new frame. It captures "before" boxes on every prior render, and when the observer fires after innerHTML = '' plus the rebuild, it already has the previous positions cached against the *previous* set of elements and diffs them against the new set using each element's DOM position, not object identity. New elements crossfade in with a scale/opacity tween; elements that occupy a slot a sibling used to occupy get the position delta applied as a transform. The practical result: even a brute-force re-render animates like a careful list diff.
Enable/disable state prevents dead clicks
Each card's up/down buttons are conditionally given the disabled attribute based on index === 0 and index === tasks.length - 1. Without this, clicking "move up" on the first card would be a no-op that still fires a render() call — and because the array didn't actually change, autoAnimate would (harmlessly) diff an identical list. Disabling the button is a UX signal more than a technical requirement, but it keeps the DOM stable on ambiguous input.
Reusing it
Anywhere you show a reorderable list — a task queue, a leaderboard, a draft order — wrap the container in one autoAnimate() call and keep rendering however you already render. Pair it with an AutoAnimate Filter Grid to see the same primitive animate insertion/removal instead of reordering, or an Interact.js Drag-Drop Kanban when you need real pointer-drag between columns instead of buttons.
Build with AI
Build, Understand, Optimize, and Extend It With AI
This snippet is a good jumping-off point for understanding FLIP animation without writing it by hand. Paste the code into an AI assistant like Claude and ask it to trace exactly what autoAnimate does inside its MutationObserver callback — when it captures "before" boxes, when it reads "after" boxes, and why applying an inverse transform first and releasing it on the next frame produces a smooth animation instead of a jump cut. Then ask what would happen if render() patched only the changed nodes instead of wiping innerHTML each time, and whether that would change the animation at all (it should not — autoAnimate only cares about the DOM state at mutation time). To extend it: ask it to add drag-to-reorder with pointer events feeding the same tasks array and render() call, add a WIP limit that visually caps the column, or split this into three linked columns (To Do / In Progress / Done) where "done" moves a card to a different list instead of removing it, animated with the same single autoAnimate call per column.
Prompt to recreate it
Copy this into your AI assistant of choice to build the effect from scratch, or as a jumping-off point for your own variant:
Build a single kanban column with reorder controls using @formkit/auto-animate (v0.8). This package ships no UMD/global CDN build — only an ES module — so import it with `import autoAnimate from 'https://cdn.jsdelivr.net/npm/@formkit/auto-animate@0.8.1/index.mjs'` inside a <script type="module"> tag rather than loading a separate CDN <script src> and using a global, in plain HTML, CSS, and JavaScript.

Requirements:
- Maintain an array of task objects (id, title, priority: high/medium/low, assignee initials) in JS state.
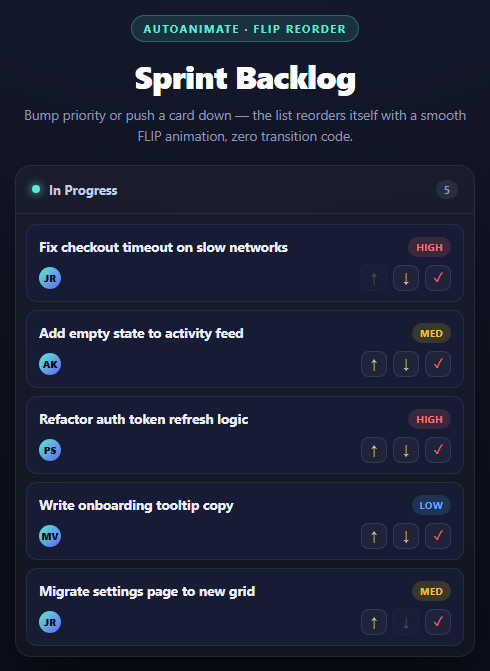
- Render the array into a <ul> as <li class="card"> elements showing the title, a colored priority badge, an avatar initial, and three buttons: move up, move down, mark done.
- Call autoAnimate(listElement) exactly once, on the parent <ul>, right after it is created. Do not write any manual transition or transform CSS for reordering — autoAnimate must be the only thing producing the animation.
- On button click, mutate the array directly (swap adjacent entries for up/down, splice for done) and then fully re-render the list by clearing innerHTML and rebuilding every <li> from scratch — demonstrate that autoAnimate still animates smoothly even though every node is destroyed and recreated on each change.
- Disable the up button on the first card and the down button on the last card so edge moves are inert.
- Style it as a dark, card-based kanban column with a header showing a live card count, rounded cards, and colored priority pills (red/high, yellow/medium, blue/low).
- Explain in a code comment above the autoAnimate() call what FLIP (First-Last-Invert-Play) means and why a MutationObserver is what lets it work without being told which elements changed.
Want to tighten it up first? Run this prompt through the AI Prompt Studio to score it across 8 quality dimensions, catch anti-patterns, and tune the wording for Claude, ChatGPT, or Gemini before you paste it in.
Source Code
<div class="akc-stage">
  <div class="akc-head">
    <span class="akc-tag">AutoAnimate · FLIP reorder</span>
    <h2>Sprint Backlog</h2>
    <p>Bump priority or push a card down — the list reorders itself with a smooth FLIP animation, zero transition code.</p>
  </div>
  <div class="akc-column">
    <div class="akc-column-head">
      <span class="akc-dot"></span>
      <span>In Progress</span>
      <span class="akc-count" id="akcCount">0</span>
    </div>
    <ul class="akc-list" id="akcList"></ul>
  </div>
</div>
<script type="module">
import autoAnimate from 'https://cdn.jsdelivr.net/npm/@formkit/auto-animate@0.8.1/index.mjs';

var tasks = [
  { id: 1, title: 'Fix checkout timeout on slow networks', priority: 'high', initials: 'JR' },
  { id: 2, title: 'Add empty state to activity feed', priority: 'med', initials: 'AK' },
  { id: 3, title: 'Refactor auth token refresh logic', priority: 'high', initials: 'PS' },
  { id: 4, title: 'Write onboarding tooltip copy', priority: 'low', initials: 'MV' },
  { id: 5, title: 'Migrate settings page to new grid', priority: 'med', initials: 'JR' },
];

var list = document.getElementById('akcList');
var countEl = document.getElementById('akcCount');

// autoAnimate watches this parent element. Any time its children are added,
// removed, or reordered, it diffs the before/after DOM and animates the
// transition (FLIP: First-Last-Invert-Play) automatically -- no manual
// transition/transform code needed on our end.
autoAnimate(list);

function render() {
  list.innerHTML = '';
  countEl.textContent = tasks.length;
  tasks.forEach(function (task, index) {
    var li = document.createElement('li');
    li.className = 'akc-card';
    li.innerHTML =
      '<div class="akc-card-top">' +
        '<span class="akc-card-title">' + task.title + '</span>' +
        '<span class="akc-badge ' + task.priority + '">' + task.priority + '</span>' +
      '</div>' +
      '<div class="akc-card-bottom">' +
        '<span class="akc-avatar">' + task.initials + '</span>' +
        '<div class="akc-actions">' +
          '<button class="akc-btn" data-act="up" ' + (index === 0 ? 'disabled' : '') + ' title="Move up">↑</button>' +
          '<button class="akc-btn" data-act="down" ' + (index === tasks.length - 1 ? 'disabled' : '') + ' title="Move down">↓</button>' +
          '<button class="akc-btn akc-done" data-act="done" title="Mark done">✓</button>' +
        '</div>' +
      '</div>';
    li.dataset.id = task.id;
    list.appendChild(li);
  });
}

list.addEventListener('click', function (e) {
  var btn = e.target.closest('.akc-btn');
  if (!btn) return;
  var card = btn.closest('.akc-card');
  var id = Number(card.dataset.id);
  var index = tasks.findIndex(function (t) { return t.id === id; });
  var act = btn.dataset.act;

  if (act === 'up' && index > 0) {
    var tmp = tasks[index - 1];
    tasks[index - 1] = tasks[index];
    tasks[index] = tmp;
  } else if (act === 'down' && index < tasks.length - 1) {
    var tmp2 = tasks[index + 1];
    tasks[index + 1] = tasks[index];
    tasks[index] = tmp2;
  } else if (act === 'done') {
    tasks.splice(index, 1);
  }
  // We just mutate the array and re-render the full list every time. autoAnimate
  // is what makes that safe: it does not care that we nuked innerHTML, it
  // matches surviving nodes by identity (we keep the same li per task id is not
  // even required here since we rebuild fresh nodes) via its MutationObserver
  // and animates size/position deltas between the previous and next frame.
  render();
});

render();
</script>*{box-sizing:border-box;margin:0;padding:0}
body{font-family:system-ui,-apple-system,sans-serif;background:radial-gradient(120% 100% at 50% 0%,#151a2e,#0a0c16);color:#fff;min-height:100vh;display:flex;align-items:center;justify-content:center;padding:24px}
.akc-stage{width:min(460px,94vw);display:flex;flex-direction:column;align-items:center;gap:20px}
.akc-head{text-align:center}
.akc-tag{display:inline-block;font-size:11px;font-weight:700;letter-spacing:.14em;text-transform:uppercase;color:#5eead4;background:rgba(94,234,212,.12);border:1px solid rgba(94,234,212,.3);padding:5px 12px;border-radius:99px;margin-bottom:12px}
.akc-head h2{font-size:clamp(24px,5vw,32px);font-weight:800;letter-spacing:-.02em}
.akc-head p{font-size:13.5px;color:#8e97b8;margin-top:7px;line-height:1.5}
.akc-column{width:100%;background:rgba(255,255,255,.03);border:1px solid rgba(255,255,255,.08);border-radius:16px;overflow:hidden;box-shadow:0 24px 60px -24px rgba(0,0,0,.8)}
.akc-column-head{display:flex;align-items:center;gap:9px;padding:14px 16px;font-size:13px;font-weight:700;color:#c3cbe8;border-bottom:1px solid rgba(255,255,255,.08)}
.akc-dot{width:8px;height:8px;border-radius:50%;background:#5eead4;box-shadow:0 0 10px #5eead4}
.akc-count{margin-left:auto;background:rgba(255,255,255,.08);color:#8e97b8;font-size:11px;font-weight:700;padding:2px 8px;border-radius:99px}
.akc-list{list-style:none;padding:10px;display:flex;flex-direction:column;gap:8px;min-height:120px}
.akc-card{background:#161c34;border:1px solid rgba(255,255,255,.07);border-radius:11px;padding:12px 12px 10px;display:flex;flex-direction:column;gap:8px}
.akc-card-top{display:flex;align-items:flex-start;justify-content:space-between;gap:10px}
.akc-card-title{font-size:13.5px;font-weight:650;color:#eef0fb;line-height:1.35}
.akc-badge{flex-shrink:0;font-size:10px;font-weight:700;letter-spacing:.03em;padding:3px 8px;border-radius:99px;text-transform:uppercase}
.akc-badge.high{background:rgba(248,113,113,.16);color:#f87171}
.akc-badge.med{background:rgba(250,204,21,.16);color:#fbbf24}
.akc-badge.low{background:rgba(96,165,250,.16);color:#60a5fa}
.akc-card-bottom{display:flex;align-items:center;justify-content:space-between}
.akc-avatar{width:22px;height:22px;border-radius:50%;background:linear-gradient(135deg,#5eead4,#6366f1);font-size:10px;font-weight:800;color:#0a0c16;display:flex;align-items:center;justify-content:center}
.akc-actions{display:flex;gap:6px}
.akc-btn{width:26px;height:26px;border-radius:8px;border:1px solid rgba(255,255,255,.1);background:rgba(255,255,255,.04);color:#c3cbe8;font-size:13px;line-height:1;cursor:pointer;display:flex;align-items:center;justify-content:center;transition:background .15s,color .15s}
.akc-btn:hover{background:rgba(94,234,212,.14);color:#5eead4}
.akc-btn:disabled{opacity:.3;cursor:not-allowed}
.akc-btn:disabled:hover{background:rgba(255,255,255,.04);color:#c3cbe8}
.akc-btn.akc-done{color:#f87171}
.akc-btn.akc-done:hover{background:rgba(248,113,113,.14);color:#f87171}Step by step
How to Use
- 1No CDN script tag needed@formkit/auto-animate ships no UMD/global build — the demo imports it directly as an ES module inside a <script type="module"> tag instead.
- 2Paste HTML, CSS, and JSA five-card backlog column renders with priority badges and reorder controls.
- 3Call autoAnimate on the listOne line, autoAnimate(list), attaches a MutationObserver that animates every future DOM change.
- 4Click the up/down arrowsSwap two entries in the tasks array and call render() — the FLIP animation happens automatically.
- 5Click the check to mark doneSplicing a card out of the array animates its removal and the resulting gap-close.
- 6Swap in your own dataReplace the tasks array with real backlog items; the render/animate pattern needs no changes.
Real-world uses
Common Use Cases
Got questions?
Frequently Asked Questions
No. It works purely off DOM structure and position at the time the MutationObserver fires, not element identity or keys. That is why this snippet can destroy every node with innerHTML = "" and rebuild fresh ones on each click and still get a smooth animation — autoAnimate is diffing rendered boxes, not a virtual DOM tree.
You call it once on the parent whose children change. autoAnimate attaches one MutationObserver to that parent and animates whichever children were added, removed, or reordered inside it on each mutation — it does not need to be told about individual cards.
It can if those transitions animate the same properties (transform, in particular) that autoAnimate is trying to control. Keep your own hover/focus transitions on opacity, color, or box-shadow, and let autoAnimate own position and size changes exclusively.
For a few dozen items, no — reflow cost is trivial. For hundreds of items rebuilding the whole list on every click, prefer patching only the changed nodes (moving the existing li instead of recreating it); autoAnimate will still animate correctly either way, but DOM churn scales with list size regardless of the animation layer.
Yes — autoAnimate exposes a second "disable" mechanism via calling the returned controller's .disable()/.enable() methods, or you can simply call autoAnimate() after the first render() so there is no observed "before" state to diff against.
Call autoAnimate(ref.current) inside a useEffect (or a Vue onMounted) once the list ref is attached, and keep rendering your items from state/array as normal — you do not manage the animation, only the array. The library also ships a React hook (useAutoAnimate) and a Vue directive (vAutoAnimate) for even less boilerplate.
@formkit/auto-animate publishes no UMD/IIFE build on npm — only an ES module (index.mjs), which ends in a real export statement that throws a syntax error if loaded as a classic script. Importing it requires the importing <script> tag itself to be type="module", which is why this demo's whole script lives inline in the HTML instead of a separate CDN <script src> plus a global function.