Learn Coding Visually
Learn to code with interactive, live-preview playgrounds — HTML, CSS, JavaScript, React & more.
 HTML Playground42 lessons · Click-based · Live preview
 CSS PlaygroundLearn CSS with a live editor
 JavaScript Playground60 lessons · DOM · Async · Canvas
 React PlaygroundLearn React with a live code editor
 GSAP PlaygroundLearn GSAP animation interactively
 SVG Playground44 lessons · shapes · paths · animation
 SCSS Playground45 lessons · Sass modules · tokens
 Tailwind PlaygroundLearn Tailwind CSS with a live editor
 Bootstrap 5 Playground50 lessons · live preview
Scroll Weather Scene Transition — Free HTML CSS JS Snippet
Scroll Weather Scene Transition · Scroll · Plain HTML, CSS & JS · Live preview
What's included
Features
About this UI Snippet
Scroll Weather Scene Transition — Multi-Property Scrub Timeline & CSS Keyframe Precipitation
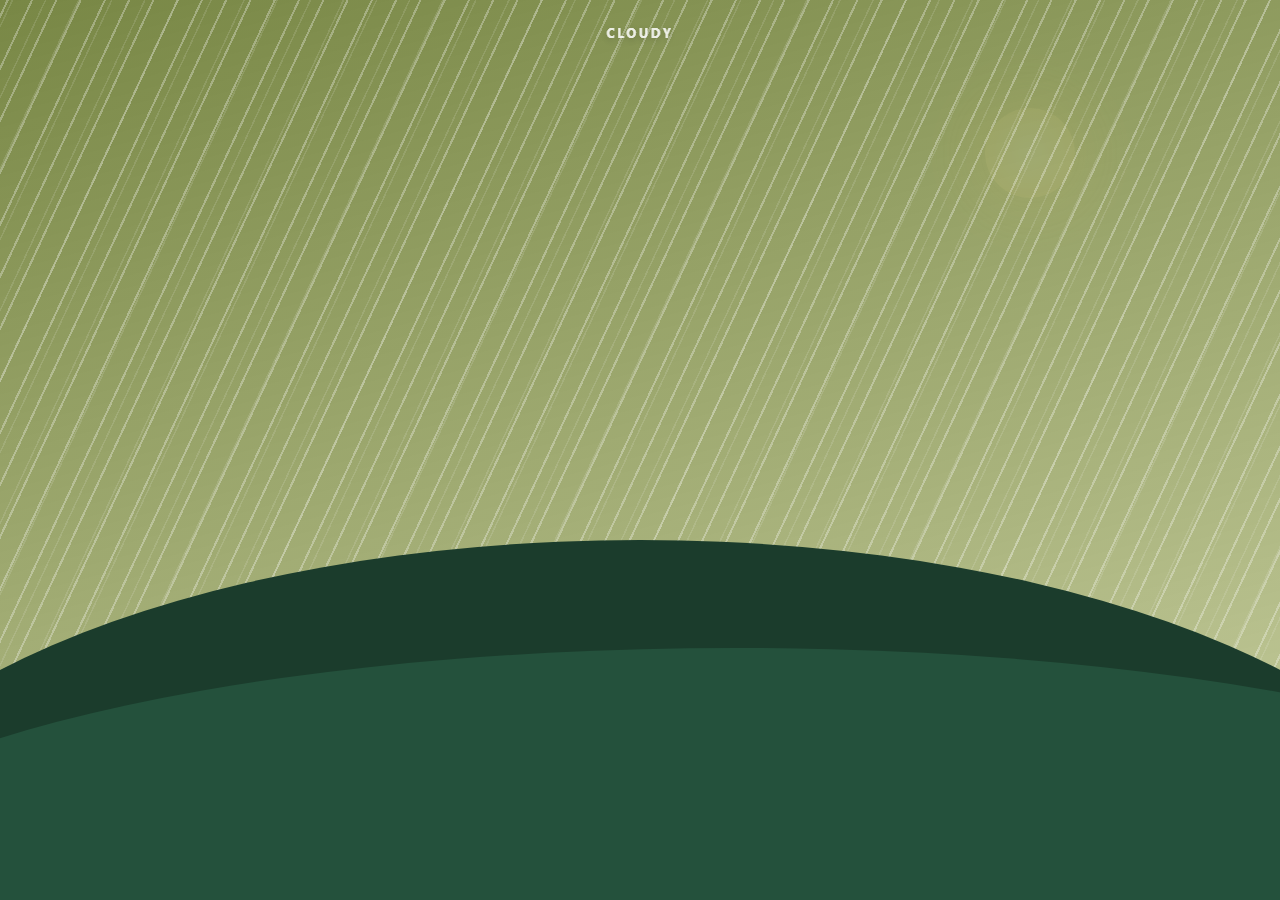
This snippet drives a single sticky scene through four distinct weather states — clear, cloudy, rain, and sunset — by tweening several layered elements' colors, opacities and positions together on one GSAP scrub timeline keyed to scroll progress, while an independent CSS @keyframes loop handles the constant motion of falling rain drops.
A states array as the single source of truth
Rather than hand-writing four separate ScrollTrigger blocks, a states array defines each weather state's target values (sky gradient colors, sun opacity, cloud opacity/position, rain opacity, hill darkness, label text) at a given timeline progress p. A loop walks consecutive pairs of states and adds a .to() tween for each property between them at the correct timeline position — this keeps every layer's transition perfectly synchronized and makes adding a fifth weather state a one-line array edit.
Cross-fading the sky gradient
The sky background is a CSS linear-gradient; GSAP directly tweens the backgroundImage string between each state's two-color gradient. GSAP can interpolate gradient color stops when the gradient syntax structure matches between the from and to values, producing a smooth color-temperature shift that reads as time-of-day/weather lighting change.
Independent rain animation
The falling rain streaks are a separate, always-running CSS @keyframes rainfall animation using repeating-linear-gradient diagonal streaks translated vertically in a loop. GSAP only ever tweens the rain layer's opacity, letting the CSS keyframe loop continue underneath — so rain simply fades in and out rather than restarting, avoiding any visible animation "pop."
A live state label
A separate ScrollTrigger.create with an onUpdate callback reads self.progress on every scroll tick and finds the most recent state whose p threshold has been passed, updating a text label ("CLEAR" / "CLOUDY" / "RAIN" / "SUNSET") — demonstrating how to read raw scrub progress outside of a tween for driving non-animatable UI like text content.
Fully reversible
Every property lives on the same scrub: true timeline, so scrolling back up smoothly reverses the sky, sun, clouds and rain in the correct order back to the clear starting state.
This is a deliberately different technique from Scroll Parallax Layers — here layered elements cross-fade and recolor in place rather than moving at different depths.
Build with AI
Build, Understand, Optimize, and Extend It With AI
Give this snippet's HTML, CSS and JS to an AI coding assistant and ask it to explain how the states array and the pairwise-loop of .to() tweens work together to keep four separate weather transitions synchronized on one timeline — and why that's more maintainable than writing four hand-rolled ScrollTrigger blocks. It's also a strong candidate to extend: ask the assistant to add a fog state using a semi-transparent white overlay layer, to add wind-driven cloud drift speed that varies per state, or to replace the CSS-drawn hills with an inline SVG skyline silhouette that also shifts color per weather state.
Prompt to recreate it
Copy this into your AI assistant of choice to build the effect from scratch, or as a jumping-off point for your own variant:
Build a scroll-driven weather scene transition in HTML, CSS and JavaScript using GSAP and ScrollTrigger — no canvas, no WebGL, no external images.

Requirements:
- Create one sticky-positioned scene containing a full-bleed sky background (CSS gradient), a sun element, a group of CSS-drawn cloud shapes, a rain layer using repeating-linear-gradient diagonal streaks with a continuous CSS @keyframes vertical translation loop, and a simple two-tone landscape silhouette at the bottom.
- Define a small ordered array of weather "states" (at least: clear, cloudy, rain, sunset), each specifying a target sky gradient, sun opacity, cloud opacity/position, rain opacity, and a landscape brightness filter, along with a progress value between 0 and 1 marking where in the overall scroll range that state should be fully reached.
- Wrap the scene in a tall multi-viewport-height section and, using one GSAP timeline attached via ScrollTrigger with scrub: true spanning the whole section, loop through consecutive pairs of states and add a tween for every layer's property from one state's values to the next, positioned on the timeline at that pair's progress range, so all layers transition together in sync.
- Keep the rain's falling motion as an independent always-running CSS keyframe animation; GSAP should only ever tween that layer's opacity in and out, never restart the keyframe loop.
- Add a live text label showing the current weather name, updated via a ScrollTrigger onUpdate callback that reads scroll progress directly rather than via a tween.
- The whole scene must transition forward and reverse cleanly and smoothly as the user scrolls down and back up.
Want to tighten it up first? Run this prompt through the AI Prompt Studio to score it across 8 quality dimensions, catch anti-patterns, and tune the wording for Claude, ChatGPT, or Gemini before you paste it in.
Source Code
<div class="hint">Scroll ↓ to change the weather</div>
<div class="weather-wrap">
  <div class="weather-stage">
    <div class="sky" id="sky"></div>
    <div class="sun" id="sun"></div>
    <div class="clouds" id="clouds">
      <div class="cloud c1"></div>
      <div class="cloud c2"></div>
      <div class="cloud c3"></div>
    </div>
    <div class="rain" id="rain"></div>
    <div class="hills">
      <div class="hill h1"></div>
      <div class="hill h2"></div>
    </div>
    <div class="label" id="weatherLabel">CLEAR</div>
  </div>
</div>
* { box-sizing: border-box; }
body { margin: 0; font-family: system-ui, sans-serif; }
.hint { text-align: center; padding: 28px 16px; font-size: 14px; letter-spacing: 0.04em; color: #64748b; }
.weather-wrap { height: 500vh; position: relative; }
.weather-stage { position: sticky; top: 0; height: 100vh; overflow: hidden; }
.sky { position: absolute; inset: 0; background: linear-gradient(180deg, #6ec6f5, #cdeeff 70%); transition: none; }
.sun { position: absolute; top: 12%; right: 16%; width: 90px; height: 90px; border-radius: 50%; background: radial-gradient(circle, #fff6d0, #ffd76a); box-shadow: 0 0 60px 20px rgba(255,215,106,0.6); }
.clouds { position: absolute; inset: 0; }
.cloud { position: absolute; background: #fff; border-radius: 50px; opacity: 0.85; filter: blur(0.5px); }
.cloud::before, .cloud::after { content: ''; position: absolute; background: inherit; border-radius: 50%; }
.c1 { width: 140px; height: 46px; top: 16%; left: -20%; }
.c1::before { width: 70px; height: 70px; top: -34px; left: 20px; }
.c1::after { width: 50px; height: 50px; top: -22px; left: 80px; }
.c2 { width: 110px; height: 38px; top: 30%; left: -30%; }
.c2::before { width: 56px; height: 56px; top: -28px; left: 14px; }
.c2::after { width: 40px; height: 40px; top: -18px; left: 62px; }
.c3 { width: 160px; height: 50px; top: 8%; left: -40%; }
.c3::before { width: 80px; height: 80px; top: -40px; left: 24px; }
.c3::after { width: 56px; height: 56px; top: -24px; left: 96px; }
.rain { position: absolute; inset: 0; opacity: 0; pointer-events: none; }
.rain::before, .rain::after { content: ''; position: absolute; inset: -20% 0 0 0; background-image: repeating-linear-gradient(115deg, rgba(255,255,255,0.5) 0 2px, transparent 2px 22px); animation: rainfall 0.6s linear infinite; }
.rain::after { animation-duration: 0.4s; opacity: 0.5; background-image: repeating-linear-gradient(115deg, rgba(255,255,255,0.4) 0 1.5px, transparent 1.5px 30px); }
@keyframes rainfall { from { transform: translateY(-10%); } to { transform: translateY(10%); } }
.hills { position: absolute; bottom: 0; left: 0; right: 0; height: 40%; }
.hill { position: absolute; bottom: 0; left: 0; right: 0; border-radius: 50% 50% 0 0 / 100% 100% 0 0; background: #2f6b4f; }
.h1 { height: 100%; background: #234f3a; transform: scaleX(1.3); }
.h2 { height: 70%; background: #2f6b4f; transform: scaleX(1.5) translateX(5%); }
.label { position: absolute; top: 24px; left: 50%; transform: translateX(-50%); font-size: 13px; letter-spacing: 0.2em; font-weight: 700; color: rgba(255,255,255,0.85); text-shadow: 0 2px 6px rgba(0,0,0,0.2); }
@media (max-width: 640px) { .sun { width: 64px; height: 64px; } }gsap.registerPlugin(ScrollTrigger);
const sky = document.getElementById('sky');
const sun = document.getElementById('sun');
const clouds = document.getElementById('clouds');
const rain = document.getElementById('rain');
const label = document.getElementById('weatherLabel');
const hills = gsap.utils.toArray('.hill');
const states = [
{ p: 0, sky: ['#6ec6f5', '#cdeeff'], sunOp: 1, cloudOp: 0.2, cloudX: -10, rainOp: 0, hillDark: 0, text: 'CLEAR' },
{ p: 0.32, sky: ['#8fa6b8', '#c3cdd6'], sunOp: 0.25, cloudOp: 1, cloudX: 40, rainOp: 0, hillDark: 0.25, text: 'CLOUDY' },
{ p: 0.62, sky: ['#5a6672', '#8a97a3'], sunOp: 0, cloudOp: 1, cloudX: 60, rainOp: 1, hillDark: 0.5, text: 'RAIN' },
{ p: 1, sky: ['#ff9a6c', '#3b2a52'], sunOp: 0.7, cloudOp: 0.5, cloudX: 90, rainOp: 0, hillDark: 0.7, text: 'SUNSET' },
];
const tl = gsap.timeline({
scrollTrigger: {
trigger: '.weather-wrap',
start: 'top top',
end: 'bottom bottom',
scrub: true,
},
});
for (let i = 0; i < states.length - 1; i++) {
const from = states[i];
const to = states[i + 1];
const dur = to.p - from.p;
tl.to(sky, {
backgroundImage: 'linear-gradient(180deg, ' + to.sky[0] + ', ' + to.sky[1] + ')',
duration: dur,
ease: 'none',
}, from.p)
.to(sun, { opacity: to.sunOp, duration: dur, ease: 'none' }, from.p)
.to(clouds, { opacity: to.cloudOp, x: to.cloudX, duration: dur, ease: 'none' }, from.p)
.to(rain, { opacity: to.rainOp, duration: dur, ease: 'none' }, from.p)
.to(hills, { filter: 'brightness(' + (1 - to.hillDark * 0.6) + ')', duration: dur, ease: 'none' }, from.p);
}
ScrollTrigger.create({
trigger: '.weather-wrap',
start: 'top top',
end: 'bottom bottom',
scrub: true,
onUpdate: (self) => {
const p = self.progress;
let current = states[0];
for (const s of states) { if (p >= s.p) current = s; }
label.textContent = current.text;
},
});
ScrollTrigger.refresh();Step by step
How to Use
- 1Scroll through the previewScroll down slowly through the tall section to watch the scene shift from clear sky, through clouds and rain, into a sunset — all in one continuous sticky stage.
- 2Edit the states arrayIn the JS panel, edit the states array's sky colors, sunOp, cloudOp, rainOp and text values, or add a new object with its own p (progress 0–1) to insert another weather state.
- 3Adjust transition timingChange each state's p value to make a transition happen earlier/later or take a larger/smaller share of the scroll distance.
- 4Swap the rain effectEdit the repeating-linear-gradient angle and spacing in .rain::before/::after, or the rainfall keyframe duration, to change drop density and fall speed.
- 5Restyle the landscapeThe .hill elements are simple rounded divs — replace with an inline SVG skyline for a more detailed silhouette.
- 6Export in your formatClick "HTML" for a standalone file, "JSX" for a React component, or "Tailwind" for a React + Tailwind version.
Real-world uses
Common Use Cases
Got questions?
Frequently Asked Questions
A states array defines target values for every layer at specific timeline progress points, and a loop adds a .to() tween per property per consecutive pair of states at the correct timeline position — one timeline drives everything together.
Yes — when the from and to gradient strings share the same structure (same function, same number of color stops), GSAP's CSSPlugin can interpolate each color channel between them, producing a smooth cross-fade.
The falling motion is a separate, continuously looping CSS @keyframes animation on the .rain pseudo-elements. GSAP only tweens the container's opacity, so the underlying animation loop is never interrupted or reset.
Add a new object to the states array with its own p between two existing values (e.g. 0.45) and its target sky/sun/cloud/rain/text values — the pairwise loop automatically inserts the new transition.
No — the stage uses position: sticky rather than ScrollTrigger's pin: true, which keeps the implementation simpler while achieving the same fixed-in-viewport visual effect for this use case.