


Learn Coding Visually
Learn to code with interactive, live-preview playgrounds — HTML, CSS, JavaScript, React & more.
 HTML Playground42 lessons · Click-based · Live preview
 CSS PlaygroundLearn CSS with a live editor
 JavaScript Playground60 lessons · DOM · Async · Canvas
 React PlaygroundLearn React with a live code editor
 GSAP PlaygroundLearn GSAP animation interactively
 SVG Playground44 lessons · shapes · paths · animation
 SCSS Playground45 lessons · Sass modules · tokens
 Tailwind PlaygroundLearn Tailwind CSS with a live editor
 Bootstrap 5 Playground50 lessons · live preview
AutoAnimate Todo List — FLIP Technique Explained
AutoAnimate Todo List · Misc · Plain HTML & CSS · Live preview
What's included
Features
About this UI Snippet
AutoAnimate Todo List — What FLIP Is and Why One Call Covers Every Future Mutation
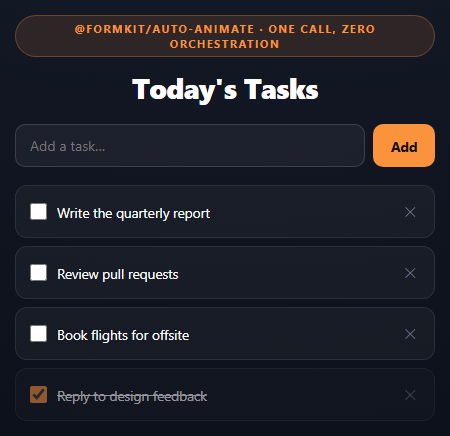
Most "animate my list" solutions require wrapping every mutation — every add, remove, and reorder gets its own explicit before/after animation call. @formkit/auto-animate takes a fundamentally different approach: you call autoAnimate(parentElement) once, and it transparently animates *any* direct-child DOM mutation that happens afterward, forever, without you writing a single animation call anywhere else. This snippet's entire animation code is one line: autoAnimate(list).
The FLIP technique, in plain terms
FLIP stands for First, Last, Invert, Play, and it's the standard technique for animating layout changes that can't be expressed as a simple CSS transition (like a list item reordering, which changes an element's actual position in the DOM/layout, not just a style property). The steps:
1. First — record every affected element's current bounding box (position, size) before the mutation happens. 2. Last — let the mutation actually happen (the DOM add/remove/reorder), then immediately record each element's *new* bounding box. 3. Invert — for each element, compute the delta between First and Last, and apply an inverse CSS transform so the element is instantly repositioned to *look* exactly like it did before the mutation, even though it's now actually in its new DOM position. 4. Play — remove the inverse transform with a CSS transition, letting the element animate smoothly from its old apparent position to its real new one.
The trick is that steps 1-3 all happen synchronously with no visible flash, so the only thing the user perceives is step 4: a smooth animated transition from old position to new. autoAnimate implements exactly this loop internally.
Why one autoAnimate() call is enough for arbitrary future mutations
js
autoAnimate(list);
This one call attaches a MutationObserver to list. A MutationObserver is a native browser API that fires a callback whenever a DOM subtree changes — child added, removed, reordered, or an attribute/text changed. Because autoAnimate hooks the observer once at the parent level rather than instrumenting individual operations, it doesn't matter *how* a child gets added, removed, or moved later — whether it's this snippet's appendChild, a completely different piece of code added six months from now, or a totally different framework's rendering pass touching the same DOM node. Any of those trigger the same observer callback, which runs the same FLIP measurement-and-transform sequence automatically. You never call an animation function directly; you only ever mutate the DOM normally, and autoAnimate intercepts the *effect* of that mutation.
Completing a task is a reorder, not a special case
js
if (e.target.checked) list.appendChild(item);
Calling appendChild on a node that's already in the document doesn't clone it — it *moves* it to the end of its new parent (which, since it's the same parent here, is just a reorder to the last position). This is a completely ordinary DOM operation with zero autoAnimate-specific code, and autoAnimate animates it exactly the same way it animates an add or a delete: it's just another mutation the observer sees.
Reusing it
Anything you'd build with plain DOM mutation — a Kanban column, a leaderboard whose rows re-sort, a notification tray — gets List-animation for free the moment its container is wrapped in autoAnimate(). There's no API to learn beyond that one function call.
Build with AI
Build, Understand, Optimize, and Extend It With AI
This snippet is a good vehicle for learning FLIP, a technique that shows up under the hood of many animation libraries even when they don't expose it directly. Paste it into an AI assistant like Claude and ask it to walk through, step by step, what autoAnimate's MutationObserver callback actually measures and applies when a task is deleted from the middle of the list — specifically how the remaining items below it know to animate upward rather than just snapping to their new position. Then ask what would happen if you called autoAnimate() on a grandparent element instead of the direct list — it would stop working, because autoAnimate only animates DIRECT children of the element you pass it, which is worth confirming. For extension, ask it to add drag-to-reorder (a manual DOM move triggered by drag events, which autoAnimate would animate automatically), animate a due-date badge separately from the row move, or build a second list ("Done") that completed items visually migrate into via a real DOM move between two different animated containers.
Prompt to recreate it
Copy this into your AI assistant of choice to build the effect from scratch, or as a jumping-off point for your own variant:
Build an "auto-animating todo list" using @formkit/auto-animate (v0.8) in plain HTML, CSS, and JavaScript. This package ships no UMD/global CDN build — only an ES module — so import it with `import autoAnimate from 'https://cdn.jsdelivr.net/npm/@formkit/auto-animate@0.8.1/index.mjs'` inside a <script type="module"> tag rather than loading a separate CDN <script src> and using a global.

Requirements:
- A todo list UI: a text input + Add button form, and a <ul> containing a few starter <li> tasks each with a checkbox, a label text span, and a delete button. One starter task should start already checked off (struck-through, dimmed).
- Call autoAnimate(listElement) exactly ONCE, right after selecting the list element, and add a code comment explaining that this single call is sufficient to animate every future add/remove/reorder mutation on that list's direct children, because autoAnimate attaches a MutationObserver to the parent rather than requiring per-action animation calls.
- Adding a task: on form submit, create a new <li> with the same structure as the starter items and appendChild it to the list — no manual animation code, just the plain DOM mutation.
- Completing a task: toggling its checkbox should add a "done" CSS class (strikethrough + dimmed) AND move that <li> to the end of the list via a plain appendChild call on the already-existing node (which relocates rather than duplicates it) — add a comment noting this reorder is animated by the same autoAnimate observer with no special-case code.
- Deleting a task: clicking its delete button removes the <li> from the DOM with .remove() — also with no manual animation code.
- Style it as a dark theme with an orange accent color, rounded list items with subtle borders, and a clean input/button form row at the top.
Want to tighten it up first? Run this prompt through the AI Prompt Studio to score it across 8 quality dimensions, catch anti-patterns, and tune the wording for Claude, ChatGPT, or Gemini before you paste it in.
Source Code
<div class="aat-stage">
  <div class="aat-head">
    <span class="aat-tag">@formkit/auto-animate · one call, zero orchestration</span>
    <h2>Today's Tasks</h2>
  </div>
  <form class="aat-form" id="aatForm">
    <input class="aat-input" id="aatInput" type="text" placeholder="Add a task…" autocomplete="off" />
    <button class="aat-add" type="submit">Add</button>
  </form>
  <ul class="aat-list" id="aatList">
    <li class="aat-item" data-id="1"><label><input type="checkbox" /><span>Write the quarterly report</span></label><button class="aat-del" aria-label="Delete">✕</button></li>
    <li class="aat-item" data-id="2"><label><input type="checkbox" /><span>Review pull requests</span></label><button class="aat-del" aria-label="Delete">✕</button></li>
    <li class="aat-item" data-id="3"><label><input type="checkbox" /><span>Book flights for offsite</span></label><button class="aat-del" aria-label="Delete">✕</button></li>
    <li class="aat-item is-done" data-id="4"><label><input type="checkbox" checked /><span>Reply to design feedback</span></label><button class="aat-del" aria-label="Delete">✕</button></li>
  </ul>
</div>
<script type="module">
import autoAnimate from 'https://cdn.jsdelivr.net/npm/@formkit/auto-animate@0.8.1/index.mjs';

var list = document.getElementById('aatList');

// The entire animation system is this one call. autoAnimate watches the
// parent element with a MutationObserver; whenever a direct child is added,
// removed, or reordered by ANY future code — this file's, or code you add
// later — it automatically animates the change. No callback, no per-action
// wiring, ever needed again below this line.
autoAnimate(list);

var nextId = 5;

document.getElementById('aatForm').addEventListener('submit', function (e) {
  e.preventDefault();
  var input = document.getElementById('aatInput');
  var text = input.value.trim();
  if (!text) return;

  var li = document.createElement('li');
  li.className = 'aat-item';
  li.dataset.id = String(nextId++);
  li.innerHTML = '<label><input type="checkbox" /><span></span></label><button class="aat-del" aria-label="Delete">✕</button>';
  li.querySelector('span').textContent = text;
  list.appendChild(li);

  input.value = '';
});

list.addEventListener('click', function (e) {
  if (e.target.matches('.aat-del')) {
    e.target.closest('.aat-item').remove();
    return;
  }
  if (e.target.matches('input[type="checkbox"]')) {
    var item = e.target.closest('.aat-item');
    item.classList.toggle('is-done', e.target.checked);
    // Moving the completed item to the end of the list is a plain DOM
    // mutation (appendChild on an existing node moves it) — autoAnimate
    // treats this reorder exactly like an add or remove and animates it.
    if (e.target.checked) list.appendChild(item);
  }
});
</script>*{box-sizing:border-box;margin:0;padding:0}
body{font-family:system-ui,-apple-system,sans-serif;background:radial-gradient(120% 100% at 50% 0%,#161c2b,#0a0d15);color:#fff;min-height:100vh;display:flex;align-items:center;justify-content:center;padding:24px}
.aat-stage{width:min(420px,94vw);display:flex;flex-direction:column;gap:18px}
.aat-head{text-align:center}
.aat-tag{display:inline-block;font-size:11px;font-weight:700;letter-spacing:.14em;text-transform:uppercase;color:#fb923c;background:rgba(251,146,60,.12);border:1px solid rgba(251,146,60,.3);padding:5px 12px;border-radius:99px;margin-bottom:12px}
.aat-head h2{font-size:clamp(22px,5vw,28px);font-weight:800;letter-spacing:-.02em}
.aat-form{display:flex;gap:8px}
.aat-input{flex:1;padding:11px 14px;border-radius:10px;border:1px solid rgba(255,255,255,.14);background:rgba(255,255,255,.05);color:#fff;font:14px system-ui}
.aat-input:focus{outline:none;border-color:#fb923c}
.aat-add{padding:11px 18px;border-radius:10px;border:none;background:#fb923c;color:#1a1000;font:700 13.5px system-ui;cursor:pointer}
.aat-list{list-style:none;display:flex;flex-direction:column;gap:8px}
.aat-item{display:flex;align-items:center;justify-content:space-between;gap:10px;background:rgba(255,255,255,.04);border:1px solid rgba(255,255,255,.09);border-radius:12px;padding:12px 14px}
.aat-item label{display:flex;align-items:center;gap:10px;flex:1;cursor:pointer}
.aat-item input[type="checkbox"]{width:17px;height:17px;accent-color:#fb923c}
.aat-item span{font-size:13.5px}
.aat-item.is-done{opacity:.55}
.aat-item.is-done span{text-decoration:line-through}
.aat-del{background:none;border:none;color:#6b7280;font-size:14px;cursor:pointer;padding:4px}
.aat-del:hover{color:#f87171}Step by step
How to Use
- 1No CDN script tag needed@formkit/auto-animate ships no UMD/global build — the demo imports it directly as an ES module inside a <script type="module"> tag instead.
- 2Paste HTML, CSS, and JSA todo list renders with a few starter tasks, one already checked off.
- 3Add a taskType into the input and submit — the new item animates in at the bottom.
- 4Check a task offIt strikes through, dims, and smoothly slides to the end of the list — a plain appendChild move.
- 5Delete a taskThe remaining items smoothly slide up to fill the gap, with no manual animation code for that either.
- 6Read the one setup lineautoAnimate(list) is the entire animation system — every future mutation is covered automatically.
Real-world uses
Common Use Cases
Got questions?
Frequently Asked Questions
First, Last, Invert, Play. First and Last record an element's bounding box before and after a DOM mutation. Invert applies a CSS transform that makes the element instantly LOOK like it's still in its old position even though it has actually moved. Play removes that transform with a CSS transition, so the element visibly animates from the old apparent position to its real new one.
autoAnimate attaches a native MutationObserver to the parent element, which is a browser API that fires whenever the DOM subtree changes — regardless of what caused the change. Because the observer watches the PARENT, not specific operations, any code that later adds, removes, or reorders a direct child of that parent triggers the same observer callback and gets the same FLIP animation, with no additional setup.
Calling appendChild on a DOM node that already exists in the document does not clone it — it relocates the existing node to the end of its parent. Since autoAnimate is already observing that parent for any child mutation, this ordinary move is automatically detected and animated with the exact same FLIP sequence as an add or delete, with zero autoAnimate-specific API used.
Yes — since it operates on the actual DOM via a MutationObserver rather than intercepting your code's API calls, it doesn't care whether the mutations come from vanilla DOM methods, React's reconciler, or Vue's renderer. You still only need to call autoAnimate() once on the parent element (typically via a ref in React or a directive in Vue).
Your plain DOM calls (appendChild, remove(), insertBefore, etc.) are what CHANGE the DOM; autoAnimate's MutationObserver callback is what OBSERVES that change and runs the FLIP sequence in response. You never call an animation function yourself — you just mutate the DOM as you normally would, and the observer does the rest.
No — autoAnimate applies its own inline transform and transition styles temporarily during the FLIP sequence and removes them afterward. You don't need to define enter/exit CSS classes the way you would with a typical transition-group style animation library.
@formkit/auto-animate publishes no UMD/IIFE build on npm — only an ES module (index.mjs) and its minified ESM equivalent, both ending in a real export statement, which throws a syntax error if loaded as a classic script. The fix is to import it directly, which requires the importing <script> tag itself to be type="module" — that's why this demo's whole script lives inline in the HTML instead of a separate CDN <script src> plus a global function.