You Might Also Like
Learn Coding Visually
Learn to code with interactive, live-preview playgrounds — HTML, CSS, JavaScript, React & more.
 HTML Playground42 lessons · Click-based · Live preview
 CSS PlaygroundLearn CSS with a live editor
 JavaScript Playground60 lessons · DOM · Async · Canvas
 React PlaygroundLearn React with a live code editor
 GSAP PlaygroundLearn GSAP animation interactively
 SVG Playground44 lessons · shapes · paths · animation
 SCSS Playground45 lessons · Sass modules · tokens
 Tailwind PlaygroundLearn Tailwind CSS with a live editor
 Bootstrap 5 Playground50 lessons · live preview
Table Density Toggle — Free Compact Row Spacing JS Snippet
Table Density Toggle · Tables · Plain HTML, CSS & JS · Live preview
What's included
Features
About this UI Snippet
Table Density Toggle — Compact / Cozy / Comfortable Rows
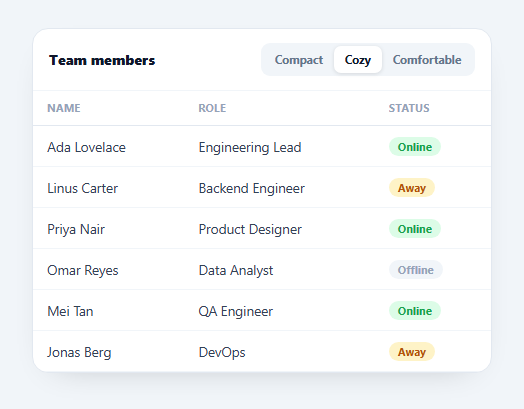
A density toggle lets users switch a data table between compact, cozy, and comfortable row spacing — the control Gmail, Notion, Linear, and admin dashboards offer so power users can fit more rows on screen while others get breathing room. This snippet builds one in plain HTML, CSS, and vanilla JavaScript: a segmented control with a sliding highlight that swaps a single class on the table to change padding and font size. No dependency.
Density as a single class swap
All three densities are defined in CSS as classes — .compact, .cozy, .comfy — each setting the th/td padding and, for the extremes, a font size. Changing density is just removing the others and adding one: setDensity() does exactly that. Because the spacing lives entirely in CSS, the JavaScript never touches per-cell styles, so the table re-flows instantly and the rule stays the single source of truth for how each mode looks.
A sliding segmented control
The segmented control is the buttons plus one absolutely-positioned .dt-glide pill behind them. On selection, moveGlide() reads the active button's offsetLeft and offsetWidth and sets the pill's left and width, which animate via a CSS transition — so the highlight glides under whichever button you pick rather than snapping. Measuring the real button geometry means it adapts automatically if the labels change width or the control is resized.
Accessible toggle semantics
Each option is a real <button> with aria-pressed reflecting the active density, grouped in a role="group" labelled "Row density". That makes the control keyboard-operable and announces which mode is selected, without needing radio inputs or custom roles. The text color also shifts on the active button so the state is visible as well as audible.
Initial position with rAF
The glide pill needs the active button's measurements, which are only correct after layout. A single requestAnimationFrame defers the first moveGlide() until the browser has laid the buttons out, so the highlight starts under the default "Cozy" option instead of at left: 0.
Persisting the preference
Density is a per-user preference, so in production you'd save the chosen class to localStorage (or a user setting) and apply it on load before first paint to avoid a flash. Since the whole state is one class name on the table, persisting and restoring it is a two-line addition around setDensity().
Build with AI
Build, Understand, Optimize, and Extend It With AI
Instead of reasoning through the geometry math alone, paste this snippet's HTML, CSS, and JS into an AI coding assistant like Claude and ask it to explain precisely how moveGlide() turns offsetLeft and offsetWidth into the sliding pill's left and width, and why the very first call is wrapped in a requestAnimationFrame rather than run immediately on page load. The same assistant can help optimize it, for example checking whether recalculating offsetLeft on every window resize is needed to keep the glide pill aligned if the segmented control's width changes. It is also useful for extending the toggle: ask it to persist the chosen density to localStorage and restore it before first paint, add a fourth "ultra-compact" density tier, or drive the same glide-pill pattern for an unrelated tab bar. Treat the code less like a finished artifact and more like a starting point for a conversation.
Prompt to recreate it
Copy this into your AI assistant of choice to build the effect from scratch, or as a jumping-off point for your own variant:
Build a segmented density toggle for a data table in plain HTML, CSS, and JavaScript with no UI library.

Requirements:
- Three real button elements (Compact, Cozy, Comfortable) inside a role="group" container, each with aria-pressed reflecting whether it is the active option, plus one absolutely-positioned sibling element acting as a sliding highlight pill behind the buttons.
- Define each density entirely as a CSS class on the table (setting th/td padding and, for the extremes, font-size) so that switching density in JavaScript never touches individual cell styles — only one class is swapped on the table element.
- On click, read the clicked button's offsetLeft and offsetWidth and set them as the pill's left and width so the pill visually glides to sit exactly behind whichever button is active, animated by a CSS transition on left and width.
- Defer the very first positioning of the pill until inside a requestAnimationFrame callback, since offsetLeft/offsetWidth are only correct after the browser has completed layout, and calling it synchronously on script load would place the pill at the wrong position.
- Render a small table of sample rows above the toggle so the density change is visibly demonstrated, and make sure hovering a row and switching density do not conflict visually.
Want to tighten it up first? Run this prompt through the AI Prompt Studio to score it across 8 quality dimensions, catch anti-patterns, and tune the wording for Claude, ChatGPT, or Gemini before you paste it in.
Step by step
How to Use
- 1Paste HTML, CSS, and JSA data table renders with a Compact / Cozy / Comfortable switcher.
- 2Click a densityThe row padding and font size change instantly across the table.
- 3Watch the highlightA pill glides under the selected segment button.
- 4Compare the modesCompact fits more rows; comfortable adds breathing room.
- 5Use the keyboardTab to the buttons and press Enter — aria-pressed tracks the active mode.
- 6Persist the choiceSave the active class to localStorage and apply it on load.
Real-world uses
Common Use Cases
Got questions?
Frequently Asked Questions
Each density is a CSS class on the table — .compact, .cozy, .comfy — that sets the th and td padding and font size. setDensity() removes the other classes and adds one, so the browser reflows all rows from the new rule. The JavaScript never sets per-cell styles, keeping CSS the single source of truth.
A single absolutely-positioned pill sits behind the buttons. On each selection, moveGlide() reads the active button's offsetLeft and offsetWidth and sets the pill's left and width, which animate via a CSS transition. Measuring the real geometry means it adapts to any label width without hardcoded positions.
The pill needs the active button's measured size, which is only correct after the browser lays the buttons out. Calling moveGlide() inside a requestAnimationFrame defers it one frame until layout is done, so the highlight starts under the default option instead of jumping from left: 0.
Because the entire state is one class name on the table, save it to localStorage in setDensity() and read it back on load, applying the class before first paint to avoid a flash. For logged-in users, store it as a profile setting and hydrate it the same way.
Hold the active density in state and bind it as the table's class. Render the segment buttons from the density list with aria-pressed tied to state. For the sliding pill, use a ref to measure the active button in a layout effect (useLayoutEffect, onMounted, ngAfterViewInit) and set the pill's style. In Tailwind, map each density to a set of padding utilities.