You Might Also Like
Learn Coding Visually
Learn to code with interactive, live-preview playgrounds — HTML, CSS, JavaScript, React & more.
 HTML Playground42 lessons · Click-based · Live preview
 CSS PlaygroundLearn CSS with a live editor
 JavaScript Playground60 lessons · DOM · Async · Canvas
 React PlaygroundLearn React with a live code editor
 GSAP PlaygroundLearn GSAP animation interactively
 SVG Playground44 lessons · shapes · paths · animation
 SCSS Playground45 lessons · Sass modules · tokens
 Tailwind PlaygroundLearn Tailwind CSS with a live editor
 Bootstrap 5 Playground50 lessons · live preview
Skeleton-to-Content Crossfade — Overlapping Fade Loading Transition
Skeleton-to-Content Crossfade · Loaders · Plain HTML, CSS & JS · Live preview
What's included
Features
About this UI Snippet
Skeleton-to-Content Crossfade — Both Layers Fade at Once, With Overlap
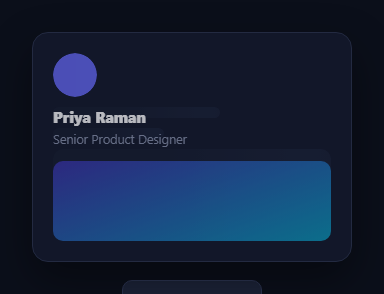
Most skeleton-to-content transitions are actually a hard swap: the placeholder disappears, then the real content appears, often with a visible flash or layout pop between the two states. A true crossfade is different — the outgoing skeleton and the incoming content fade simultaneously, briefly overlapping, so there is never a moment where neither is visible or where the swap reads as instantaneous. This snippet builds exactly that timing in plain HTML, CSS, and a small amount of JavaScript, and the crossfade's overlap is the entire point of the pattern — not a byproduct of two elements happening to occupy the same space.
Two full layers, stacked, both always present
Rather than removing the skeleton from the DOM when content is ready, both .cf-skeleton and .cf-content are absolutely positioned to fill the same card (position: absolute; inset: 0), stacked directly on top of each other. This is what makes a true overlap possible: since both layers occupy identical space at all times, transitioning one's opacity down while the other's opacity rises simultaneously produces a genuine cross-dissolve, the way a film crossfade works, rather than a layout-driven swap where one element's removal shifts the other into view.
One class flip drives both transitions
A single is-loaded class on the parent .cf-card controls both layers via CSS: .cf-skeleton opacity goes to 0 and .cf-content opacity goes to 1 in the same rule change, both using an identical transition: opacity .4s ease. Because one class toggle drives both transitions with matching durations and easing, the fade-out and fade-in are mathematically synchronized — at the 200ms mark, the skeleton is at 50% opacity and the content is simultaneously at 50% opacity, which is the actual definition of a crossfade rather than two independently-timed animations that happen to look similar.
Why the timing needs a frame, not just a class toggle
loadIn() first removes is-loaded to reset to the skeleton state, then waits for a requestAnimationFrame before scheduling the switch to loaded. Toggling classes in the same synchronous tick can let the browser coalesce the "before" and "after" states into a single paint, skipping the transition entirely — waiting a frame guarantees the reset state is actually committed and painted before the transition to loaded begins, so the crossfade reliably plays every time, not just occasionally.
Pointer-events follow opacity, not the other way around
Both layers toggle pointer-events alongside opacity — the invisible layer becomes unclickable and the visible one becomes interactive — so during the brief overlap window neither a lingering skeleton nor an about-to-appear content card can intercept clicks meant for the other.
Distinct from a plain skeleton or a hard swap
A standard skeleton loader never demonstrates the transition to real content at all — it only shows the placeholder state. And a naive swap (display: none on one, display: block on the other) has zero overlap by construction, since display can't be transitioned. This snippet is specifically about the overlap: tune the shared .4s duration, or offset the two layers' transition-delay slightly so the fade-in trails the fade-out by a beat for an even softer dissolve. Pair it with a skeleton card grid for a whole grid of independently-timed crossfading cards.
Build with AI
Build, Understand, Optimize, and Extend It With AI
Paste this snippet's HTML, CSS, and JS into an AI coding assistant like Claude and ask it to explain exactly why both the skeleton and content layers need to be absolutely positioned on top of each other for a genuine crossfade to be possible, and why a single is-loaded class toggle driving both layers' opacity with matching transition durations is what keeps the fade-out and fade-in mathematically synchronized rather than merely visually similar. It's worth asking about the requestAnimationFrame step too: what specifically would break — the transition getting skipped entirely — if loadIn() reset and re-applied the is-loaded class in the same synchronous tick instead of waiting a frame. For extending it, ask for a version where the content layer's transition has a slight delay so the fade-in visibly trails the fade-out for a softer dissolve, a variant that also crossfades a subtle scale change alongside opacity, or a grid of several of these cards that crossfade in with a staggered delay per card. Treat the code less like a finished artifact and more like a starting point for a conversation.
Prompt to recreate it
Copy this into your AI assistant of choice to build the effect from scratch, or as a jumping-off point for your own variant:
Build a "skeleton-to-content crossfade" card in plain HTML, CSS, and JavaScript where a skeleton placeholder and the real content genuinely overlap during the transition, not a simple hide-then-show swap.

Requirements:
- Two full-size layers (a skeleton placeholder layer and a real-content layer) both absolutely positioned to fill the exact same card area, so they occupy identical space at all times rather than being laid out sequentially.
- Both layers must use the same CSS opacity transition duration and easing function, and a single shared parent class toggle must simultaneously drive the skeleton's opacity down to 0 and the content's opacity up to 1 in the same rule change — not two independently-timed animations.
- Both layers must also toggle pointer-events alongside their opacity, so that only the currently more-visible layer can receive clicks, and the fading-out layer stops intercepting interaction as soon as its opacity trends toward 0.
- The JavaScript that triggers the load must first reset the parent to its unloaded (skeleton-visible) state, then wait for at least one animation frame before scheduling the switch to the loaded state, so the browser reliably commits and paints the reset state before the transition begins — the fade must never be skippable due to both class changes happening in the same synchronous tick.
- The skeleton layer must use a standard animated shimmer gradient so it clearly reads as a loading placeholder before the crossfade begins, and the real content layer must contain genuinely different markup (an image, heading, and text) rather than reusing the skeleton's shapes.
- Include a button that resets and re-triggers the entire crossfade sequence on demand, so the effect can be replayed repeatedly for a demo without reloading the page.
Want to tighten it up first? Run this prompt through the AI Prompt Studio to score it across 8 quality dimensions, catch anti-patterns, and tune the wording for Claude, ChatGPT, or Gemini before you paste it in.
Step by step
How to Use
- 1Paste HTML, CSS, and JSA skeleton card renders and crossfades into real profile content after a short delay.
- 2Watch the overlapThe shimmer fades out while the real content fades in at the same time, briefly overlapping.
- 3Click "Reload content"The card resets to the skeleton state and crossfades in again.
- 4Tune the overlapAdjust the shared .4s transition duration on both layers to make the dissolve longer or shorter.
- 5Offset the timingAdd a small transition-delay to the content layer for a fade-out-then-fade-in feel.
- 6Wire real dataReplace the 900ms setTimeout with your real fetch's .then(), calling the same is-loaded toggle.
Real-world uses
Common Use Cases
Got questions?
Frequently Asked Questions
A plain hide/show swap using display: none has zero overlap by construction, since display cannot be transitioned — one element vanishes and the other appears in the same instant. This snippet stacks both layers in the same space and animates their opacity in opposite directions simultaneously, so for the full .4s duration both are partially visible together, which is what a crossfade actually means.
A crossfade requires both the outgoing and incoming elements to occupy the exact same visual space during the transition. If the skeleton and content were laid out normally (one after another, or one only appearing after the other is removed), fading their opacity wouldn't overlap visually — the content would fade in below or after the skeleton rather than through it.
If the class were reset and re-added in the same synchronous block of code, the browser can coalesce both changes into a single paint and the CSS transition never visibly runs — the card would just jump straight to the loaded state. Waiting a frame ensures the browser actually commits and paints the reset (skeleton-visible) state first, so the subsequent transition to loaded is guaranteed to animate.
Remove the setTimeout in loadIn() and instead call the same card.classList.add('is-loaded') inside your real fetch's .then() (or an async function's completion), once your actual data has arrived and been rendered into the .cf-content layer. Keep the requestAnimationFrame-then-reset pattern if you also want to support reloading the same card multiple times.
Render both layers unconditionally (never conditionally unmount either), and toggle a single boolean loaded state that adds or removes an is-loaded class (or toggles inline opacity styles) on the parent — exactly like the vanilla version. In React, wrap the class reset in a small effect using requestAnimationFrame if you need to support replaying the transition after the initial load.