You Might Also Like
Learn Coding Visually
Learn to code with interactive, live-preview playgrounds — HTML, CSS, JavaScript, React & more.
 HTML Playground42 lessons · Click-based · Live preview
 CSS PlaygroundLearn CSS with a live editor
 JavaScript Playground60 lessons · DOM · Async · Canvas
 React PlaygroundLearn React with a live code editor
 GSAP PlaygroundLearn GSAP animation interactively
 SVG Playground44 lessons · shapes · paths · animation
 SCSS Playground45 lessons · Sass modules · tokens
 Tailwind PlaygroundLearn Tailwind CSS with a live editor
 Bootstrap 5 Playground50 lessons · live preview
Coming Soon Hero — Free HTML CSS JS Countdown Snippet
Coming Soon Hero · Heroes · Plain HTML, CSS & JS · Live preview
What's included
Features
About this UI Snippet
Coming Soon Hero — Live Countdown Timer, Dark Gradient & Email Capture Form
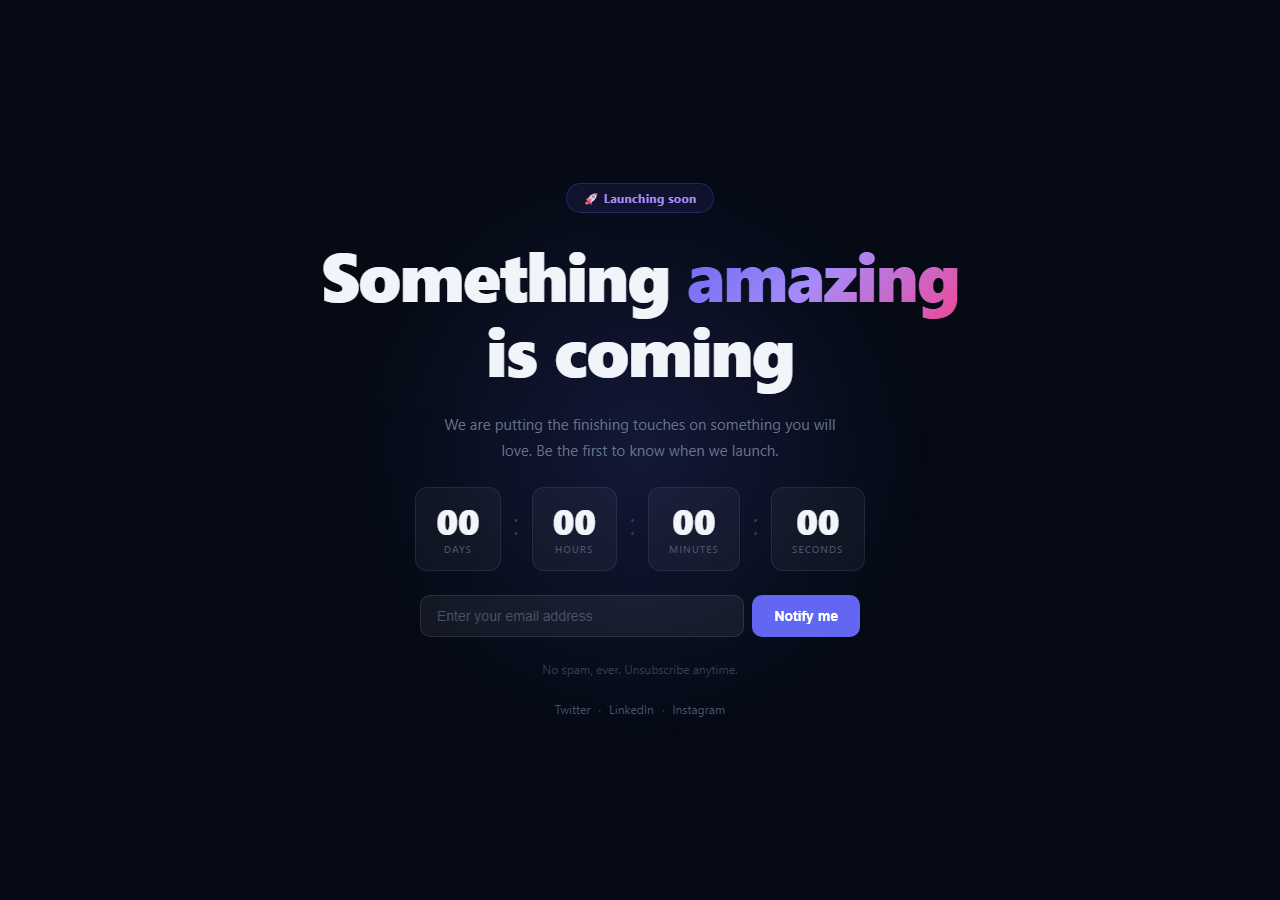
A coming soon page gives your product a professional presence before launch while building an email waitlist of early adopters. This snippet provides a complete coming soon hero: a dark background with animated radial glow, a gradient headline, a live countdown timer (days, hours, minutes, seconds), an email capture form (see also waitlist signup) with success feedback, a spam disclaimer, and social platform links — all in plain HTML, CSS, and minimal JavaScript.
The countdown timer
The tick() function runs every second via setInterval. It computes the difference between LAUNCH (a configurable Date object) and new Date(), converts milliseconds to days/hours/minutes/seconds using integer division and modulo, and updates four CD-N elements. The pad() helper zero-pads single digits. Setting LAUNCH at the top of the JS is the only configuration needed to deploy the timer for your specific date.
The animated glow
A single div with radial-gradient background and absolute positioning creates the central glow effect. A CSS keyframe animation pulses the opacity between 0.6 and 1 on a 4-second loop, giving the impression of a breathing energy source behind the content. The glow uses pointer-events: none so it never intercepts clicks.
The gradient headline
The .grad span uses background: linear-gradient(135deg, indigo, violet, pink) with background-clip: text and -webkit-text-fill-color: transparent. The font uses clamp(36px, 7vw, 68px) for fluid sizing from mobile to wide desktop.
Countdown block design
Each time unit (Days, Hours, Minutes, Seconds) has its own card block with a dark glass background (rgba white at 4% opacity), a subtle border, border-radius: 12px, and the large number in tabular-nums font-variant for stable digit width. The colon separators between blocks use a lighter colour and sit slightly lower.
Email capture with success state
The form prevents default submission, changes the button text to "✓ You're on the list!", adds a green .done class, and disables the email input. Wire the form to your mailing list API (Mailchimp, ConvertKit, Resend) inside handleSubmit() before the UI update.
Customising for your launch
Change the LAUNCH constant to your real launch date. Update the headline text. Replace the email API endpoint. Add your real social media URLs. Change the gradient colours (#6366f1 → your brand) throughout the CSS. Update the headline .grad gradient to include your primary brand colour as the starting colour stop for fully branded gradient text.
Build with AI
Build, Understand, Optimize, and Extend It With AI
You don't have to work out the countdown math yourself to trust it's correct. Paste this snippet's HTML, CSS, and JS into an AI coding assistant like Claude and ask it to explain exactly how the tick function converts the millisecond difference between LAUNCH and now into whole days, hours, minutes, and seconds using successive division and subtraction, and why Math.max(0, ...) matters once the launch date has passed. The same assistant can help optimize it — for instance asking whether running a full DOM text update on four elements every second is worth debouncing or whether requestAnimationFrame would be smoother than setInterval for the pulsing glow. It's also useful for extending the page: ask it to swap the countdown into a "we're live" banner automatically once LAUNCH passes, wire the email form to a real waitlist API with error handling, or add a progress bar showing percentage of time elapsed since the countdown started. Treat the code less like a finished artifact and more like a starting point for a conversation.
Prompt to recreate it
Copy this into your AI assistant of choice to build the effect from scratch, or as a jumping-off point for your own variant:
Build a "coming soon" landing page hero in plain HTML, CSS, and JavaScript with a live countdown timer and an email capture form — no date libraries, no frameworks.

Requirements:
- A single configurable launch date constant (a JavaScript Date) that drives the entire countdown — changing this one value must be the only step needed to redeploy for a new date.
- A function that runs every second via setInterval, computes the difference between the launch date and the current time in milliseconds, converts it to whole days, hours, minutes, and seconds using integer division and remainder at each step (not a date library), zero-pads every unit to two digits, and clamps the difference to never go negative once the launch date has passed.
- Four visually distinct countdown blocks (days, hours, minutes, seconds) using tabular/monospace numeric styling so the digits don't visually jitter in width as they change.
- A background radial-gradient glow element that pulses opacity on a slow easing loop using a CSS keyframe animation, positioned with pointer-events disabled so it never blocks clicks on the content in front of it.
- A gradient-text headline using background-clip: text on a span, with fluid font sizing via clamp() so it scales smoothly between mobile and desktop viewport widths.
- An email capture form that prevents default submission, and on submit disables the input and swaps the button's text and color to a success state, structured so a real fetch POST to a waitlist API could be dropped in before that UI update.
Want to tighten it up first? Run this prompt through the AI Prompt Studio to score it across 8 quality dimensions, catch anti-patterns, and tune the wording for Claude, ChatGPT, or Gemini before you paste it in.
Step by step
How to Use
- 1Set your launch dateIn the JS panel, change the LAUNCH constant: const LAUNCH = new Date("YYYY-MM-DDTHH:MM:SS"). The countdown updates automatically. The timer shows zeros once the launch date has passed.
- 2Update the headline and subtitleEdit the h1 text — change "amazing" to your product adjective and keep it in the .grad span for the gradient effect. Update the .sub paragraph with your specific product promise.
- 3Wire the email form to your APIIn handleSubmit(), add a fetch call before the UI update: await fetch("/api/waitlist", { method: "POST", body: JSON.stringify({email}) }). Show the success state on resolve and an error message on reject.
- 4Update the social media linksReplace href="#" on the three .soc-link anchors with your actual Twitter/X, LinkedIn, and Instagram URLs. Change the link labels to match your active platforms.
- 5Change the brand colourReplace #6366f1 throughout the CSS with your brand hex. Updates the glow, badge, input focus ring, and CTA button. Also update the gradient in .grad to include your brand colour.
- 6Export in your formatClick "HTML" for a standalone file, "JSX" for a React component using useEffect for the setInterval with cleanup, or "Tailwind" for a Tailwind CSS version.
Real-world uses
Common Use Cases
Got questions?
Frequently Asked Questions
At the top of the JS panel, set const LAUNCH = new Date("YYYY-MM-DDTHH:MM:SS"). The tick() function runs every 1000ms via setInterval. It computes LAUNCH - new Date() in milliseconds, converts to total seconds, then uses integer division (Math.floor(diff / 86400) for days, etc.) and modulo to extract each time unit. The pad() function zero-pads each unit to always show two digits. Setting LAUNCH is the only change needed.
In handleSubmit(), before the UI update code, add your API call. For a custom backend: const res = await fetch("/api/waitlist", { method: "POST", headers: {"Content-Type":"application/json"}, body: JSON.stringify({email: e.target.querySelector(".email").value}) }); if (!res.ok) { showError(); return; }. For Mailchimp, use their Embedded Forms or API v3 endpoint. Use a server-side proxy to hide API keys.
Math.max(0, LAUNCH - now) ensures diff never goes negative — all four blocks show 00 when the launch date has passed. To show a "We are live!" state when the timer expires, check if LAUNCH < new Date() inside tick() and update the countdown section innerHTML with a launch announcement instead of continuing to show the timer.
Click "JSX" to download a React component. Manage the countdown values in useState({d:"00",h:"00",m:"00",s:"00"}). Run the tick interval in a useEffect: const id = setInterval(tick, 1000); return () => clearInterval(id) — the return cleanup prevents the interval from running after the component unmounts. For email capture, make the form a Client Component ("use client") and use useState for the submitted state.