You Might Also Like
Learn Coding Visually
Learn to code with interactive, live-preview playgrounds — HTML, CSS, JavaScript, React & more.
 HTML Playground42 lessons · Click-based · Live preview
 CSS PlaygroundLearn CSS with a live editor
 JavaScript Playground60 lessons · DOM · Async · Canvas
 React PlaygroundLearn React with a live code editor
 GSAP PlaygroundLearn GSAP animation interactively
 SVG Playground44 lessons · shapes · paths · animation
 SCSS Playground45 lessons · Sass modules · tokens
 Tailwind PlaygroundLearn Tailwind CSS with a live editor
 Bootstrap 5 Playground50 lessons · live preview
Atropos 3D Parallax Card — Layered Depth Hover Card
Atropos 3D Parallax Card · Cards · Plain HTML, CSS & JS · Live preview
What's included
Features
About this UI Snippet
Atropos 3D Parallax Card — Real Depth From Per-Layer Offsets
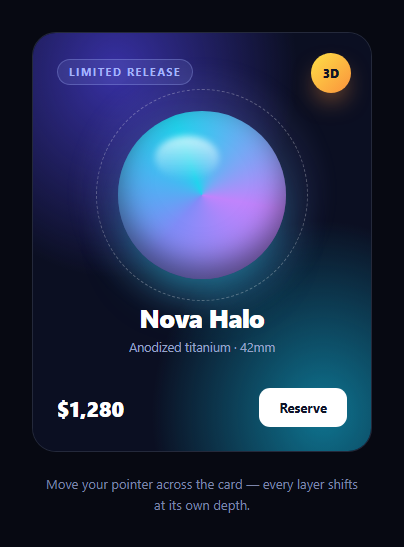
A tilt card that only rotates is a flat picture on a hinge. The thing that makes a 3D card feel like an object with depth is parallax between its layers — the badge moving further than the title, the background moving the opposite way — because differential motion is the cue the visual system actually uses to infer depth.
Atropos is a 4kb library built for exactly this, and it is a meaningfully different tool from the many tilt scripts that only apply a rotation to one element.
The required nesting, and why each level exists
Atropos will not work against arbitrary markup. It needs four nested elements, and each one owns a single transform so they do not fight:
.atropos > .atropos-scale > .atropos-rotate > .atropos-inner
- .atropos is the root Atropos binds to and where the perspective is established.
- .atropos-scale handles the lift — the card growing slightly as it becomes active.
- .atropos-rotate handles rotateX and rotateY from pointer position.
- .atropos-inner holds your content and is where the parallax children live.
Combining scale and rotation onto one element would make them multiply into skew as they animate. Splitting them across levels keeps each transform independent, which is why the nesting is mandatory rather than stylistic.
data-atropos-offset is the whole design language
Every child that should move independently declares its depth as a plain number:
<span class="a3d-badge" data-atropos-offset="14">
The number is a translation multiplier applied along the card's Z-plane as it rotates. The signs and magnitudes here are chosen as a deliberate depth stack:
- `-6` — the background gradient. Negative offsets move *against* the pointer, so the backdrop slides opposite to the foreground. This is the single most effective trick in the file: opposing motion produces far more perceived depth than everything drifting the same way. - `-3` — the glow, sitting just above the background. - `2` / `4` — the kicker pill and the copy, barely floating. - `9` — the product orb, clearly forward. - `14` — the corner badge, closest to the viewer and moving most.
Read top to bottom, those numbers *are* the card's z-order. Adjusting depth is editing one attribute — no CSS, no JavaScript.
Two things are easy to get wrong. Offsets need a positioned ancestor and position: relative on the child to layer predictably, which is why nearly every element in the CSS carries it. And past roughly ±20 the illusion breaks: layers slide so far they visibly detach from the card edges.
Configuration that matters
activeOffset: 42 sets how far the card pushes toward the viewer while active. Turned up, the whole card reads as a zoom and the per-layer parallax gets lost inside it — the layer offsets should be doing the work, not the global scale.
rotateXMax and rotateYMax at 14 degrees are deliberately conservative. Tilt scripts commonly default to 25 or more, which looks impressive on a screenshot and makes text along the far edge genuinely hard to read at a glance. duration: 320 governs the ease back to rest, so releasing the pointer settles rather than snapping.
highlight: true adds Atropos's glare layer — a soft radial sheen that tracks the pointer, which is what sells the surface as glass rather than paper. shadow with shadowScale: 1.04 grows the drop shadow slightly as the card lifts, grounding it.
Free on mobile
Atropos falls back to device orientation on touch devices with no extra code. The card tilts as the phone tilts. That is genuinely differentiating — most tilt implementations are pointer-only and are simply inert on the devices where most traffic arrives.
Reduced motion
Continuous pointer-tracked 3D motion is exactly what prefers-reduced-motion exists for, and gyroscope tilt can be actively unpleasant for people with vestibular sensitivity. The snippet queries the media list and calls instance.destroy() when reduction is requested, which restores the markup to a normal static card — the content is untouched, only the motion goes. The change listener means toggling the OS setting takes effect without a reload.
Reusing it
Keep the four-level nesting, then compose your own content inside .atropos-inner and assign offsets from a rough depth plan: backgrounds negative, body content low positive, the one element you want to pop highest. Compare it with a 3D card tilt for the single-layer version, or a glare card when you want the sheen without the parallax.
Build with AI
Build, Understand, Optimize, and Extend It With AI
The depth in this card comes from a handful of numbers, which makes it unusually productive to reason about out loud. Paste the HTML, CSS, and JS into an AI assistant like Claude and ask it to explain why Atropos splits scale and rotation across .atropos-scale and .atropos-rotate rather than applying both to one element, and what visual artifact combining them would produce. Then ask it to map every data-atropos-offset in the markup into an ordered depth stack and explain specifically why the background uses a negative value — try flipping it to positive to see how much depth is lost when every layer moves the same direction. For optimization, ask whether a large blurred radial glow layer is expensive to repaint during continuous pointer tracking, and whether promoting layers with will-change would help or hurt here. To extend it: have it drive the offsets from a data attribute loop so depths can be authored per card, add an inView guard so the instance only binds while the card is on screen, wire the orb gradient to a color picker, or add a keyboard-accessible focus state since pointer tilt is inherently mouse-only. Treat the code less like a finished artifact and more like a starting point for a conversation.
Prompt to recreate it
Copy this into your AI assistant of choice to build the effect from scratch, or as a jumping-off point for your own variant:
Build a premium 3D parallax product card using the Atropos library (v2 from a CDN — you must include BOTH its JS and its CSS) in plain HTML, CSS, and JavaScript.

Requirements:
- Use Atropos's required four-level nesting exactly: .atropos > .atropos-scale > .atropos-rotate > .atropos-inner, and explain in comments that each level owns a single transform — perspective on the root, lift on scale, rotateX/rotateY on rotate — because combining scale and rotation on one element makes them multiply into visible skew.
- Compose a product card inside .atropos-inner with at least seven layers, each assigned a data-atropos-offset that forms a deliberate depth stack: a full-bleed gradient background at a NEGATIVE offset (around -6) so it moves against the pointer, a blurred glow just above it (around -3), a kicker pill and body copy at low positive offsets (2 to 4), a large product element such as a conic-gradient orb at a clearly forward offset (around 9), a price/CTA row (around 7), and a small corner badge at the highest offset (around 14) so it sits closest to the viewer.
- Explain why the background offset is negative: opposing motion between background and foreground produces far stronger perceived depth than every layer drifting the same direction, and note that offsets beyond roughly plus or minus 20 make layers visibly detach from the card edges.
- Give the parallax children position: relative so they layer predictably above the absolutely positioned background.
- Configure Atropos with a modest activeOffset (around 42) so the global lift does not overwhelm the per-layer parallax, rotateXMax and rotateYMax of about 14 degrees (deliberately conservative — 25+ makes far-edge text hard to read while tilted), a duration around 320ms for the settle back to rest, and both shadow (with a shadowScale near 1.04) and highlight enabled so a pointer-tracking glare sells the surface as glass.
- Add a prefers-reduced-motion guard: query the media list and call instance.destroy() when reduction is requested so the card becomes a normal static card with its content intact, and attach a change listener so toggling the OS setting takes effect without a reload.
- Style it as a dark premium card: rounded 24px corners, a conic-gradient orb with an inset shadow and a soft specular highlight, a dashed orbit ring, and a white pill CTA.
Want to tighten it up first? Run this prompt through the AI Prompt Studio to score it across 8 quality dimensions, catch anti-patterns, and tune the wording for Claude, ChatGPT, or Gemini before you paste it in.
Step by step
How to Use
- 1Add both Atropos CDNsThe library needs its CSS as well as its JS — include both from the CDN panel.
- 2Paste HTML, CSS, and JSA layered product card renders and responds to pointer movement.
- 3Move your pointerEach layer shifts by its own offset, and a glare tracks the cursor.
- 4Try it on a phoneAtropos switches to device orientation automatically — tilt the device.
- 5Set your own depthsGive any child a data-atropos-offset — negative moves against the pointer.
- 6Tune the tiltAdjust rotateXMax and rotateYMax, keeping them modest for readability.
Real-world uses
Common Use Cases
Got questions?
Frequently Asked Questions
Each level owns one transform. The root establishes perspective, .atropos-scale handles the lift, .atropos-rotate handles rotateX and rotateY, and .atropos-inner holds your content. Combining scale and rotation on one element makes them multiply into visible skew during animation, so the nesting keeps each transform independent.
It moves that layer against the pointer instead of with it. Backgrounds set to negative values slide opposite to the foreground, and that opposing motion is what produces convincing depth — far more than having every layer drift the same direction at different speeds.
Practically about plus or minus 20. Beyond that, layers translate so far during rotation that they visibly detach from the card edges and the illusion collapses. The stack here runs from -6 for the background up to 14 for the badge, which is a full depth range without artifacts.
Tilt libraries often default to 25 or more, which looks striking in a screenshot but makes text on the far edge genuinely hard to read while the card is tilted. Fourteen degrees still reads clearly as 3D while keeping every word legible at a glance.
Yes. Atropos falls back to device orientation on touch, so the card tilts as the phone tilts, with no additional code. That is a real advantage over pointer-only tilt scripts, which are simply inert on mobile.
Render the four-level nesting in your template and call Atropos({ el: ref.current }) in a mount effect, keeping the returned instance in a ref. Call instance.destroy() in cleanup so remounts do not stack listeners. Import the Atropos CSS once globally rather than per component, and put data-atropos-offset directly on your JSX or template elements.