You Might Also Like
Learn Coding Visually
Learn to code with interactive, live-preview playgrounds — HTML, CSS, JavaScript, React & more.
 HTML Playground42 lessons · Click-based · Live preview
 CSS PlaygroundLearn CSS with a live editor
 JavaScript Playground60 lessons · DOM · Async · Canvas
 React PlaygroundLearn React with a live code editor
 GSAP PlaygroundLearn GSAP animation interactively
 SVG Playground44 lessons · shapes · paths · animation
 SCSS Playground45 lessons · Sass modules · tokens
 Tailwind PlaygroundLearn Tailwind CSS with a live editor
 Bootstrap 5 Playground50 lessons · live preview
Skill Tree Progress Map — Free HTML CSS JS Snippet
Skill Tree Progress Map · Dashboards · Plain HTML, CSS & JS · Live preview
What's included
Features
About this UI Snippet
Skill Tree Progress Map — Branching Node Graph with SVG Unlock Lines and Sequential Progression
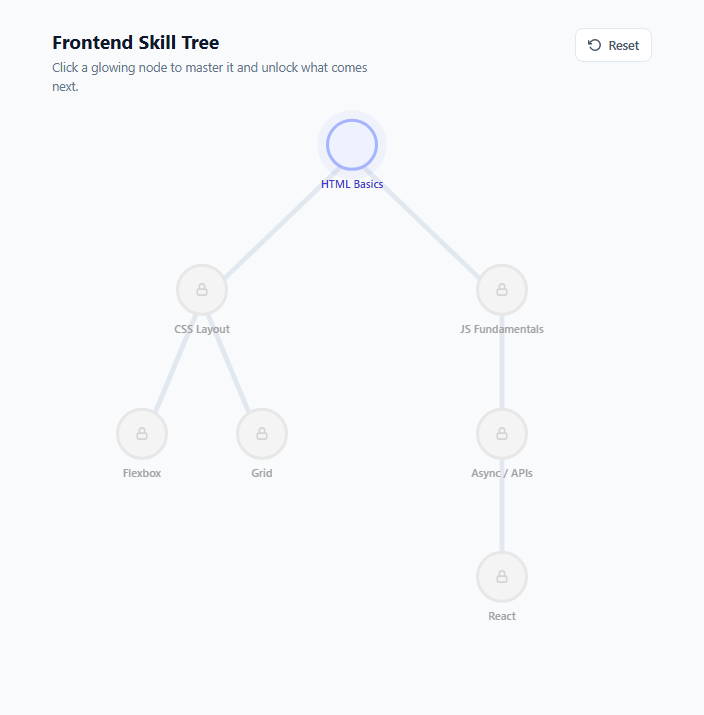
Skill trees are one of the most satisfying progress patterns borrowed from RPGs and strategy games, and they map cleanly onto real product problems: onboarding checklists that unlock in order, course curricula with prerequisites, certification paths, or feature-gated app tiers. This snippet builds a genuinely interactive, branching skill tree — seven nodes connected by lines in a tree shape, where completing a node visibly unlocks the nodes connected beneath it — using nothing but an SVG overlay, absolutely positioned buttons, and a small state machine in vanilla JavaScript.
The three-state node model
Every node lives in one of three states: locked, unlocked, or completed. A locked node is desaturated with filter: grayscale(1), shows a padlock icon, and its <button> element has the native disabled attribute set so it cannot be clicked or focused — this gets you free keyboard-accessibility semantics instead of hand-rolling aria-disabled and manual event blocking. An unlocked node is the only interactive, clickable state: it gets an indigo ring, a soft box-shadow pulse animation (@keyframes pulse-glow) to draw the eye, and the lock icon is hidden. A completed node fills solid with the accent colour, swaps in a checkmark icon, and plays a one-shot squash-and-glow pop animation the moment it finishes. The whole UI is driven by one plain JavaScript object, state, mapping node id to one of those three strings — the render() function is the single place that reads state and reconciles the DOM, so there's never a risk of the visuals drifting out of sync with the underlying data.
Drawing branch lines that actually fill with the `pathLength` trick
The connecting lines between nodes are real SVG <line> elements layered in a <svg> positioned absolutely behind the node buttons, using a fixed viewBox="0 0 500 420" so the coordinate system stays predictable regardless of how the container is resized on screen. Each connection is actually two overlapping lines: a permanent light-grey .edge-base line, and a coloured .edge-fill line on top of it that starts fully hidden. The fill trick is the pathLength="1" SVG attribute — setting it forces the browser to treat the line's total length as exactly 1 unit regardless of its real pixel length, so stroke-dasharray: 1; stroke-dashoffset: 1 reliably hides the entire line and animating stroke-dashoffset to 0 via a CSS transition reliably reveals the entire line, no matter whether that particular edge is short or long. Without pathLength, you'd have to calculate each line's real length in JavaScript with getTotalLength() to get the dash values right — pathLength sidesteps that arithmetic entirely and is the technique production dashboards use for progress-line animations.
Sequencing the unlock cascade
The tree topology is described with a tiny PARENTS lookup object (each child node lists its parent ids) and an EDGES array pairing every connected node id for line rendering. childrenOf(id) derives the reverse relationship on the fly. When a click lands on an unlocked node, completeNode() flips its state to completed, re-renders (which fills in its own icon and any inbound line), fires the pop animation via a temporary .just-completed class removed on animationend, and then — after a short setTimeout beat so the completion animation reads clearly before the next thing happens — walks childrenOf(id) and promotes any still-locked children to unlocked, which simultaneously fills their inbound edge line and starts their pulse glow. That deliberate two-step timing (complete now, unlock a beat later) is what makes the cascade feel like a real chain reaction instead of everything popping at once.
Reset and extension
The reset button calls initialState() again and re-renders, instantly returning every node to its starting locked/unlocked configuration — useful for demos, and for any real onboarding flow where a user might want to redo a track. To extend the tree with more nodes, add an entry to PARENTS, an edge pair to EDGES, a positioned <button data-node> in the HTML, and a matching SVG line pair — the render logic needs no changes because it iterates the data structures generically.
Build with AI
Build, Understand, Optimize, and Extend It With AI
Paste this snippet's HTML, CSS, and JS into an AI coding assistant like Claude and ask it to trace exactly how the PARENTS object, the EDGES array, and the render() function stay in sync — that's the core mental model for extending the tree safely. It's also a good snippet to ask an assistant to optimize: request a version where prerequisites can require ALL parents complete (not just any one), or one that persists state to localStorage or a backend API so progress survives a reload. A third useful ask is converting the fixed 7-node layout into a data-driven generator that lays out an arbitrary tree shape automatically from just the PARENTS relationships, rather than hand-placed x/y percentages, which is a genuinely interesting small graph-layout problem to work through with an assistant.
Prompt to recreate it
Copy this into your AI assistant of choice to build the effect from scratch, or as a jumping-off point for your own variant:
Build an interactive branching skill-tree progress map in plain HTML, CSS, and JavaScript — a small directed graph of nodes connected by lines, where completing a node unlocks the nodes connected beneath it.

Requirements:
- At least 6-7 nodes arranged in a branching (non-linear) tree shape, connected by lines drawn in an SVG overlay positioned behind the nodes, using a fixed viewBox coordinate system so layout stays consistent.
- Each node has exactly one of three visual/interactive states: locked (dimmed/grayscale, shows a lock icon, not clickable or focusable), unlocked (clearly highlighted and clickable, inviting interaction), and completed (distinct filled color, shows a checkmark icon).
- Clicking an unlocked node marks it completed with a satisfying pop or glow animation, and this must immediately unlock every node connected directly beneath it that was previously locked — including animating the connecting line so it visibly fills with color from parent to child rather than snapping instantly.
- The unlock cascade should feel sequenced (the completing node's own animation should read clearly before its children's lines start filling), not all fire in the exact same instant.
- A single plain JavaScript state object should be the one source of truth for every node's status, with one render function that reconciles all DOM classes and disabled attributes from that state — no state duplicated in the DOM.
- Locked nodes must be genuinely non-interactive (not just visually dimmed) — use a real disabled attribute or equivalent so they are unreachable by keyboard and unclickable by mouse.
- Include a reset control that returns the entire tree to its initial state (only the root node unlocked, everything else locked) and re-renders correctly.
Want to tighten it up first? Run this prompt through the AI Prompt Studio to score it across 8 quality dimensions, catch anti-patterns, and tune the wording for Claude, ChatGPT, or Gemini before you paste it in.
Step by step
How to Use
- 1Click a glowing node to complete itOnly nodes in the "unlocked" state (indigo ring, pulsing glow) are clickable. Clicking one calls completeNode(), which flips its state to completed, plays the pop-glow animation via the .just-completed class, and fills its checkmark icon.
- 2Watch the unlock cascadeAfter a short delay, childrenOf(id) is used to find every node connected beneath the one you just completed. Any locked child flips to unlocked, its inbound SVG line fills with colour via the pathLength stroke-dashoffset transition, and it starts pulsing to invite the next click.
- 3Reset the whole treeClick the Reset button to call initialState() again, which sets n1 back to unlocked and every other node back to locked, then re-renders. Useful for demoing the cascade repeatedly or letting a user restart a learning track.
- 4Change the tree shapeEdit the PARENTS object to redefine which node unlocks which — for example n8: ["n4", "n5"] would make a node require two prerequisites completed before it unlocks. Add the matching entry to EDGES and a positioned button plus SVG line pair in the HTML.
- 5Reposition nodes for a different layoutNode position is just inline left/top percentages against the 500x420 viewBox coordinate system, matched by the SVG line x1/y1/x2/y2 values. Change both together to redraw the tree as a horizontal path, a diamond, or a wide fan instead of the default top-down branch.
- 6Export and wire to real progress dataClick JSX to export a React component, then replace the in-memory state object with data fetched from your backend (e.g. a user's completed lesson ids) and persist completeNode changes with an API call or localStorage instead of only local state.
Real-world uses
Common Use Cases
Got questions?
Frequently Asked Questions
Each edge is two stacked SVG <line> elements sharing identical coordinates: a static grey base line and a colored fill line with the pathLength="1" attribute set. That attribute tells the browser to treat the line's length as exactly 1 unit no matter its real pixel length, so stroke-dasharray: 1 and stroke-dashoffset: 1 reliably hide the whole line as one dash segment. Adding the .filled class transitions stroke-dashoffset to 0 over 0.7s with a CSS transition, which visually draws the colored line across its full length regardless of whether it is short or long — no JavaScript length calculation needed.
Setting the native disabled attribute on locked node <button> elements automatically removes them from the tab order, prevents click and keydown activation, and is announced correctly by screen readers without any manual aria-disabled or event.preventDefault() wiring. Combining disabled with the .locked CSS class (which adds the grayscale filter and lock icon) gives both the correct assistive-technology behavior and the correct visual treatment from a single state, which is the standard robust pattern for interactive-but-conditionally-disabled controls.
The PARENTS object already supports an array of multiple parent ids per node, e.g. n8: ["n4", "n5"]. You just need to change the unlock check: instead of unconditionally unlocking a child when any one parent completes, add a helper that checks PARENTS[childId].every(p => state[p] === "completed") before flipping the child to unlocked, and call that check inside completeNode() after any node completes (not just the direct parent) since the last-needed prerequisite could be either parent.
Yes — replace the in-memory state object's initial value with a value read from localStorage.getItem() (JSON-parsed) if present, falling back to initialState() otherwise, and call localStorage.setItem() at the end of render() so every state change is saved automatically. For multi-device or multi-user persistence, swap the localStorage calls for a fetch() to your backend, optimistically updating the UI in completeNode() and rolling back on request failure.
Every node's position is just an inline left/top percentage computed against the SVG's 500x420 viewBox coordinate system, and each edge line's x1/y1/x2/y2 attributes must match those same node center coordinates. To go horizontal, swap the x and y values consistently for every node and every line — for example a node at x:250,y:40 (top-center) becomes x:40,y:210 (left-center) — and adjust the viewBox and container aspect-ratio in the CSS to a wide rather than tall rectangle.