You Might Also Like
Learn Coding Visually
Learn to code with interactive, live-preview playgrounds — HTML, CSS, JavaScript, React & more.
 HTML Playground42 lessons · Click-based · Live preview
 CSS PlaygroundLearn CSS with a live editor
 JavaScript Playground60 lessons · DOM · Async · Canvas
 React PlaygroundLearn React with a live code editor
 GSAP PlaygroundLearn GSAP animation interactively
 SVG Playground44 lessons · shapes · paths · animation
 SCSS Playground45 lessons · Sass modules · tokens
 Tailwind PlaygroundLearn Tailwind CSS with a live editor
 Bootstrap 5 Playground50 lessons · live preview
Flexbox Alignment Game — Free HTML CSS JS Snippet
Flexbox Alignment Game · Games · Plain HTML, CSS & JS · Live preview
What's included
Features
About this UI Snippet
Flexbox Alignment Game — Ghost-Layer Targets, Position-Based Win Detection & Live Generated CSS
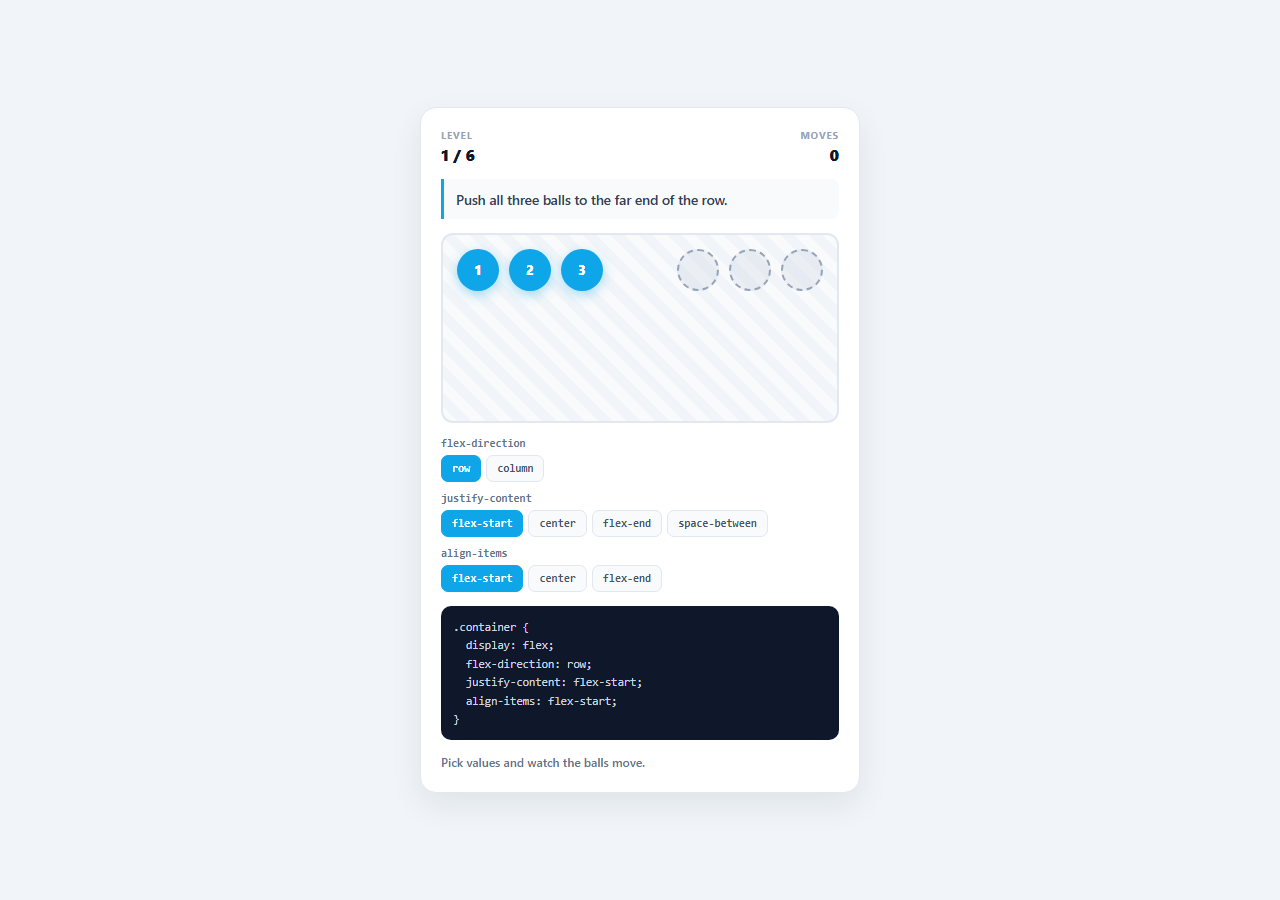
Flexbox is learned by watching things move, not by reading property tables, and the fastest way to build that intuition is a tight loop: change one value, see the layout react immediately, and know instantly whether the result is right. This snippet is a playable flexbox trainer built around exactly that loop — a stage with dashed target slots, a row of chips for flex-direction, justify-content and align-items, and balls that animate to their new positions the moment a value changes, with the equivalent CSS rule printed live underneath.
Targets drawn by flexbox itself, not by hardcoded coordinates
The stage holds two absolutely positioned layers of identical size. The lower one, the ghost layer, is a flex container filled with dashed .fx-slot circles and given the level's solution styles; the upper one holds the real .fx-ball elements and receives whatever the player has selected. Because the target positions are produced by applying real flex properties to a real container rather than by storing pixel coordinates, they stay correct at every stage width, on every device, and after any resize — there is no coordinate table to fall out of sync with the CSS. Adding a level means writing one solution object, not measuring anything.
Winning is positional, so alternative routes are accepted
isSolved() never compares the player's chosen property values against the level's solution object. It measures both layers with getBoundingClientRect(), reduces each element to its centre point, and requires every ball centre to sit within a six-pixel tolerance of some slot centre. That means any combination of properties that genuinely lands the balls on their targets counts as a win — which is the honest definition of "did you solve the layout" and prevents the game from teaching one memorised answer per level. The tolerance exists because flex distribution produces sub-pixel fractional positions that will not compare exactly equal, and because a strict equality check would fail intermittently at certain container widths.
Measuring at the right moment
Setting justifyContent on the live layer changes layout synchronously, but the check runs inside a requestAnimationFrame callback so measurement happens after the browser has settled the new layout rather than in the middle of the same task that mutated it. The balls animate to their new positions with a springy cubic-bezier transition, but the check deliberately does not wait for that animation: getBoundingClientRect() on a transitioning element returns its live interpolated box, so waiting for the transition would only delay the verdict, while measuring the settled layout box immediately is both correct and instant.
Generated CSS as the real reward
Every change re-renders a code panel containing the exact rule the player has constructed — display: flex plus the three chosen properties, formatted as copy-ready CSS. This is what converts play into transferable knowledge: the player ends each level looking at the declaration block that produced the layout they just built, in the same syntax they will type into a real stylesheet.
State kept in one object, chips derived from it
A single state object holds the three current values, and syncChips() re-derives which chip in each group is active by comparing chip.dataset.value against state[prop]. Nothing tracks selection independently in the DOM, so the visual state of the controls cannot drift from the styles actually applied to the layer — the same one-way data-flow discipline a framework would enforce, implemented in a dozen lines of vanilla JavaScript. A move counter increments only when a chip changes the value rather than on every click, so re-clicking the already-active option costs nothing.
Build with AI
Build, Understand, Optimize, and Extend It With AI
Paste this snippet into an AI assistant like Claude and ask it to extend the control set with align-self on individual balls, which introduces the idea that one item can opt out of the container's cross-axis alignment — the concept that trips up most people learning flexbox. Other good extensions: add flex-wrap levels where the stage is deliberately too narrow, add a par-moves target per level so players optimise rather than brute-force, add a "show me" button that animates the ghost solution's properties one at a time with the code panel narrating each change, or port the same ghost-layer-and-measure architecture to a CSS Grid version using grid-column, grid-row and place-items.
Prompt to recreate it
Copy this into your AI assistant of choice to build the effect from scratch, or as a jumping-off point for your own variant:
Build a playable flexbox alignment game in plain HTML, CSS, and JavaScript — no frameworks or libraries.

Requirements:
- A stage containing two absolutely positioned, identically sized layers: a non-interactive "ghost" layer of dashed target slots, and a live layer of coloured balls.
- A levels array where each level is a data object with a ball count, a plain-English goal, and a solution object of flex property values. Style the ghost layer with the solution object so the targets are positioned by real flexbox — never by hardcoded pixel coordinates.
- Control chips for flex-direction (row/column), justify-content (flex-start/center/flex-end/space-between) and align-items (flex-start/center/flex-end), applied to the live layer immediately on click, with the balls animating to their new positions.
- Detect a win positionally, not by comparing property values: measure both layers with getBoundingClientRect(), reduce each element to its centre point, and require every ball centre within a small pixel tolerance of a slot centre — so any property combination that genuinely lands the balls is accepted.
- Run the measurement inside requestAnimationFrame so it happens after the browser settles the new layout, and re-check on window resize.
- Print a live, copy-ready CSS declaration block showing display: flex plus the three currently selected values, updating on every change.
- Keep the three values in one state object and re-derive which chip is active from it, so the controls can never disagree with the applied styles. Count a move only when a click actually changes a value.
- Include at least six levels, several of which are only solvable in column mode so the player has to internalise the main-axis/cross-axis swap.
Want to tighten it up first? Run this prompt through the AI Prompt Studio to score it across 8 quality dimensions, catch anti-patterns, and tune the wording for Claude, ChatGPT, or Gemini before you paste it in.
Step by step
How to Use
- 1Read the goal and find the dashed slotsEach level states its objective in plain English and draws dashed circles where the balls need to end up. Those slots are positioned by real flex properties on a hidden ghost layer, so they sit correctly at any stage size.
- 2Pick a flex-directionSwitching between row and column changes which axis is the main axis — and therefore what justify-content and align-items each control. Levels 4 through 6 only solve in column mode, which is the fastest way to internalise the axis swap.
- 3Choose justify-content and align-itemsEvery chip applies its value to the live layer immediately and the balls animate to their new positions with a spring transition, so you see the effect of a single property change in isolation.
- 4Read the generated CSSThe dark code panel always shows the exact rule you have built — display: flex plus your three current values — formatted as a copy-ready declaration block, so the layout and the syntax stay connected.
- 5Land every ball to advanceThe win check measures both layers with getBoundingClientRect() and requires each ball centre within six pixels of a slot centre. Any property combination that genuinely lands them counts, and the balls turn green when the level is solved.
- 6Watch your move countThe counter increments only when a chip actually changes a value, not on every click. Clearing all six levels in as few moves as possible is the natural replay goal once you know the properties.
Real-world uses
Common Use Cases
Got questions?
Frequently Asked Questions
Where they end up. isSolved() measures both layers with getBoundingClientRect(), reduces every element to its centre, and requires each ball centre within six pixels of a slot centre. The level solution object is used only to style the ghost targets, never compared against your selections — so any combination that lands the balls correctly is accepted.
Flex distribution routinely produces fractional pixel positions (a container width that does not divide evenly across items, for example), so ball and slot centres would rarely be exactly equal even when the layout is visually identical. A small tolerance absorbs that sub-pixel noise while still being far tighter than the gap between any two distinct alignment values.
Setting a style property and reading geometry in the same task can measure a layout the browser has not finished settling. Deferring the read to the next animation frame guarantees the new layout is in place. Note the check does not wait for the CSS transition to finish — getBoundingClientRect() returns the interpolated box mid-transition, so waiting would only delay the verdict without changing it.
Push an object onto the LEVELS array with three keys: balls (how many items), goal (the plain-English instruction), and solution (an object with flexDirection, justifyContent and alignItems). The ghost layer is styled with that solution object, so the dashed targets position themselves — you never need to compute or store coordinates.
Yes. Keep the LEVELS array in a module, hold the three property values in component state, and bind them straight to the live layer's style object so the framework handles the style updates. Put the getBoundingClientRect() comparison in an effect that runs after the style change commits — useEffect in React, watch plus nextTick in Vue, ngAfterViewChecked or a signal effect in Angular — using refs to both layers rather than getElementById, and remember to remove the resize listener on unmount.