
Learn Coding Visually
Learn to code with interactive, live-preview playgrounds — HTML, CSS, JavaScript, React & more.
 HTML Playground42 lessons · Click-based · Live preview
 CSS PlaygroundLearn CSS with a live editor
 JavaScript Playground60 lessons · DOM · Async · Canvas
 React PlaygroundLearn React with a live code editor
 GSAP PlaygroundLearn GSAP animation interactively
 SVG Playground44 lessons · shapes · paths · animation
 SCSS Playground45 lessons · Sass modules · tokens
 Tailwind PlaygroundLearn Tailwind CSS with a live editor
 Bootstrap 5 Playground50 lessons · live preview
Rich Text Editor — Free HTML CSS JS WYSIWYG Snippet
Rich Text Editor · Forms · Plain HTML, CSS & JS · Live preview
What's included
Features
About this UI Snippet
Rich Text Editor — WYSIWYG contenteditable Toolbar, Active States, Link Insertion & HTML Output
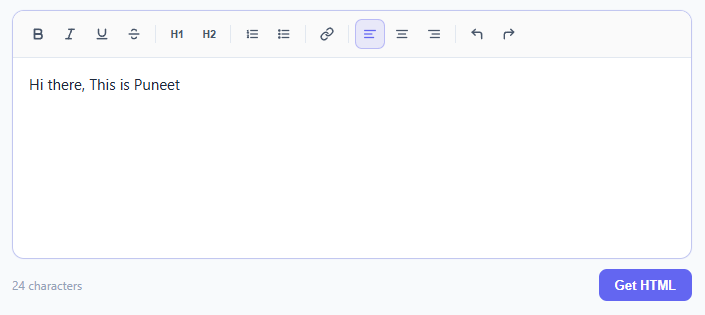
A rich text editor is one of the most requested UI components for web apps — comment boxes (add an @mention autocomplete), blog editors (or a markdown live preview), email composers, note-taking tools, and form text areas all benefit from giving users basic formatting control. Building one from scratch with pure HTML, CSS, and vanilla JavaScript is entirely possible using the browser's built-in contenteditable attribute and the document.execCommand() API. This snippet delivers a complete, production-quality WYSIWYG editor: a styled toolbar with 14 controls, active state tracking, inline link insertion, a live character count, and an HTML output viewer — with zero dependencies.
How contenteditable and execCommand work
The contenteditable="true" attribute on a div turns it into an editable region. The browser manages its own internal selection and editing state. document.execCommand(commandName, false, value) operates on the current selection inside the focused contenteditable element. Commands like bold, italic, underline, and strikeThrough toggle inline formatting tags (<b>, <i>, <u>, <strike>) around the selected text. formatBlock wraps the current block in a heading (H1, H2) or paragraph tag. insertOrderedList and insertUnorderedList convert the current paragraph to a list. justifyLeft, justifyCenter, and justifyRight set the text-align of the current block.
Active toolbar state with queryCommandState
document.queryCommandState(commandName) returns true when the current selection or cursor position is inside text that has that formatting applied. The updateToolbar() function iterates over every toolbar button with a data-cmd attribute and calls queryCommandState to toggle the .active CSS class. This function is called on every keyup, mouseup, and selectionchange event — so the toolbar always reflects the formatting at the cursor. When the user clicks inside a bold word, the Bold button immediately appears pressed.
Inline link insertion with selection preservation
Inserting a link requires the user to first select text, then open the link input row without losing the selection. When the link button is clicked, the current selection range is cloned and stored in savedRange using window.getSelection().getRangeAt(0).cloneRange(). The link input row slides open and focuses the URL input. When the user clicks Insert (or presses Enter), the saved range is restored via sel.removeAllRanges(); sel.addRange(savedRange) before calling exec('createLink', url). After insertion, all new <a> elements without a target get target="_blank" and rel="noopener noreferrer" applied automatically.
Placeholder text without a real input
A contenteditable div does not support the native placeholder attribute. This snippet overlays an absolutely positioned div.placeholder on top of the editor area. The syncPlaceholder() function hides it (adds the .hidden class, which sets opacity: 0) whenever editor.textContent.length > 0 or the editor contains any HTML tags. This covers both typed text and formatted blocks like headings or lists that produce HTML but may have no visible characters yet.
Live character count and HTML output
The character count reads editor.textContent.length on every input event — textContent strips all HTML tags and counts only visible characters. The "Get HTML" button reads editor.innerHTML and injects it into a read-only textarea below the editor. The textarea auto-selects on open so the user can copy the HTML immediately. This makes the snippet useful for generating HTML content that will be saved to a database or CMS.
Build with AI
Build, Understand, Optimize, and Extend It With AI
You do not have to work through the selection-preservation trick by hand. Paste this snippet's HTML, CSS, and JS into an AI coding assistant like Claude and ask it to explain exactly why the link button clones the current selection range into a saved variable before the URL input steals focus, and why that saved range must be restored onto window.getSelection before calling the createLink command. The same assistant can help you optimize it — ask whether calling updateToolbar on every keyup, mouseup, and selectionchange event is redundant given they can fire in quick succession, and whether that could be debounced without making the toolbar feel laggy. It's also useful for extending the editor: ask it to add a font-size or text-color dropdown wired through execCommand, implement a real placeholder-clearing fix for headings and lists that produce empty-looking HTML, or add paste handling that strips foreign formatting from pasted content. Treat the code less like a finished artifact and more like a starting point for a conversation.
Prompt to recreate it
Copy this into your AI assistant of choice to build the effect from scratch, or as a jumping-off point for your own variant:
Build a WYSIWYG rich text editor in plain HTML, CSS, and JavaScript using a contenteditable div and document.execCommand — no external editor library, no ProseMirror or Quill.

Requirements:
- A contenteditable div as the editing surface, with a toolbar of buttons for bold, italic, underline, strikethrough, heading levels, ordered and unordered lists, text alignment (left/center/right), and undo/redo, where each button's click calls execCommand with the button's associated command name and optional value, then refocuses the editor.
- Toolbar mousedown handlers must call preventDefault before running the command, so the browser's text selection inside the editable area is never lost when a toolbar button is clicked.
- Implement live active-state highlighting: on every keyup, mouseup, and selectionchange event (while the editor is focused), check queryCommandState for each formatting command and toggle an active visual class on the matching toolbar button, so the toolbar always reflects the formatting under the current cursor position.
- Implement link insertion that preserves the user's text selection across a UI interruption: when the link toolbar button is clicked, clone the current selection range into a saved variable before showing a URL input field (which will steal focus), then on confirming the URL, restore the saved range onto the live selection before calling the createLink command — and afterward force every newly created link without a target attribute to open in a new tab with rel-based security attributes.
- Since a contenteditable element does not support the native placeholder attribute, implement a fake placeholder using an absolutely positioned overlay div that hides itself whenever the editor has any text content or any HTML tags inside it (not just when textContent is non-empty), so headings or lists with no visible text still correctly hide the placeholder.
- Add a live character counter driven by textContent length on the input event, and a button that dumps the editor's current innerHTML into a read-only, auto-selecting textarea for copying.
Want to tighten it up first? Run this prompt through the AI Prompt Studio to score it across 8 quality dimensions, catch anti-patterns, and tune the wording for Claude, ChatGPT, or Gemini before you paste it in.
Source Code
<div class="rte-wrap">
  <div class="editor-shell" id="editor-shell">
    <div class="toolbar" id="toolbar">
      <button class="tb-btn" data-cmd="bold" title="Bold" type="button"><svg width="14" height="14" viewBox="0 0 24 24" fill="none" stroke="currentColor" stroke-width="2.8" stroke-linecap="round" stroke-linejoin="round"><path d="M6 4h8a4 4 0 0 1 0 8H6z"/><path d="M6 12h9a4 4 0 0 1 0 8H6z"/></svg></button>
      <button class="tb-btn" data-cmd="italic" title="Italic" type="button"><svg width="14" height="14" viewBox="0 0 24 24" fill="none" stroke="currentColor" stroke-width="2.5" stroke-linecap="round"><line x1="19" y1="4" x2="10" y2="4"/><line x1="14" y1="20" x2="5" y2="20"/><line x1="15" y1="4" x2="9" y2="20"/></svg></button>
      <button class="tb-btn" data-cmd="underline" title="Underline" type="button"><svg width="14" height="14" viewBox="0 0 24 24" fill="none" stroke="currentColor" stroke-width="2.5" stroke-linecap="round"><path d="M6 4v6a6 6 0 0 0 12 0V4"/><line x1="4" y1="20" x2="20" y2="20"/></svg></button>
      <button class="tb-btn" data-cmd="strikeThrough" title="Strikethrough" type="button"><svg width="14" height="14" viewBox="0 0 24 24" fill="none" stroke="currentColor" stroke-width="2.5" stroke-linecap="round"><line x1="4" y1="12" x2="20" y2="12"/><path d="M8 6.5C8 5.1 9.8 4 12 4s4 1.1 4 2.5"/><path d="M16 17.5C16 18.9 14.2 20 12 20s-4-1.1-4-2.5"/></svg></button>
      <span class="tb-sep"></span>
      <button class="tb-btn" data-cmd="formatBlock" data-val="H1" title="Heading 1" type="button"><span class="tb-label">H1</span></button>
      <button class="tb-btn" data-cmd="formatBlock" data-val="H2" title="Heading 2" type="button"><span class="tb-label">H2</span></button>
      <span class="tb-sep"></span>
      <button class="tb-btn" data-cmd="insertOrderedList" title="Ordered List" type="button"><svg width="14" height="14" viewBox="0 0 24 24" fill="none" stroke="currentColor" stroke-width="2.2" stroke-linecap="round"><line x1="10" y1="6" x2="21" y2="6"/><line x1="10" y1="12" x2="21" y2="12"/><line x1="10" y1="18" x2="21" y2="18"/><path d="M4 6h1v4"/><path d="M4 10h2"/><path d="M6 18H4c0-1 2-2 2-3s-1-1.5-2-1"/></svg></button>
      <button class="tb-btn" data-cmd="insertUnorderedList" title="Unordered List" type="button"><svg width="14" height="14" viewBox="0 0 24 24" fill="none" stroke="currentColor" stroke-width="2.2" stroke-linecap="round"><line x1="9" y1="6" x2="20" y2="6"/><line x1="9" y1="12" x2="20" y2="12"/><line x1="9" y1="18" x2="20" y2="18"/><circle cx="4" cy="6" r="1" fill="currentColor"/><circle cx="4" cy="12" r="1" fill="currentColor"/><circle cx="4" cy="18" r="1" fill="currentColor"/></svg></button>
      <span class="tb-sep"></span>
      <button class="tb-btn" id="btn-link" title="Insert Link" type="button"><svg width="14" height="14" viewBox="0 0 24 24" fill="none" stroke="currentColor" stroke-width="2.3" stroke-linecap="round" stroke-linejoin="round"><path d="M10 13a5 5 0 0 0 7.54.54l3-3a5 5 0 0 0-7.07-7.07l-1.72 1.71"/><path d="M14 11a5 5 0 0 0-7.54-.54l-3 3a5 5 0 0 0 7.07 7.07l1.71-1.71"/></svg></button>
      <span class="tb-sep"></span>
      <button class="tb-btn" data-cmd="justifyLeft" title="Align Left" type="button"><svg width="14" height="14" viewBox="0 0 24 24" fill="none" stroke="currentColor" stroke-width="2.2" stroke-linecap="round"><line x1="3" y1="6" x2="21" y2="6"/><line x1="3" y1="12" x2="15" y2="12"/><line x1="3" y1="18" x2="18" y2="18"/></svg></button>
      <button class="tb-btn" data-cmd="justifyCenter" title="Align Center" type="button"><svg width="14" height="14" viewBox="0 0 24 24" fill="none" stroke="currentColor" stroke-width="2.2" stroke-linecap="round"><line x1="3" y1="6" x2="21" y2="6"/><line x1="6" y1="12" x2="18" y2="12"/><line x1="4" y1="18" x2="20" y2="18"/></svg></button>
      <button class="tb-btn" data-cmd="justifyRight" title="Align Right" type="button"><svg width="14" height="14" viewBox="0 0 24 24" fill="none" stroke="currentColor" stroke-width="2.2" stroke-linecap="round"><line x1="3" y1="6" x2="21" y2="6"/><line x1="9" y1="12" x2="21" y2="12"/><line x1="6" y1="18" x2="21" y2="18"/></svg></button>
      <span class="tb-sep"></span>
      <button class="tb-btn" data-cmd="undo" title="Undo" type="button"><svg width="14" height="14" viewBox="0 0 24 24" fill="none" stroke="currentColor" stroke-width="2.5" stroke-linecap="round" stroke-linejoin="round"><polyline points="9 14 4 9 9 4"/><path d="M20 20v-7a4 4 0 0 0-4-4H4"/></svg></button>
      <button class="tb-btn" data-cmd="redo" title="Redo" type="button"><svg width="14" height="14" viewBox="0 0 24 24" fill="none" stroke="currentColor" stroke-width="2.5" stroke-linecap="round" stroke-linejoin="round"><polyline points="15 14 20 9 15 4"/><path d="M4 20v-7a4 4 0 0 1 4-4h12"/></svg></button>
    </div>

    <div class="link-row" id="link-row">
      <input class="link-input" id="link-input" type="url" placeholder="https://example.com" />
      <button class="link-ok" id="link-ok" type="button">Insert</button>
      <button class="link-cancel" id="link-cancel" type="button">Cancel</button>
    </div>

    <div class="editor-area">
      <div class="editor" id="editor" contenteditable="true" role="textbox" aria-multiline="true" aria-label="Rich text editor" spellcheck="true"></div>
      <div class="placeholder" id="placeholder">Start typing here — use the toolbar to format your text...</div>
    </div>
  </div>

  <div class="editor-footer">
    <span class="char-count" id="char-count">0 characters</span>
    <button class="get-html-btn" id="get-html-btn" type="button">Get HTML</button>
  </div>

  <textarea class="html-out" id="html-out" readonly placeholder="HTML output will appear here..."></textarea>
</div>
* { box-sizing: border-box; margin: 0; padding: 0; }
body { font-family: system-ui, -apple-system, sans-serif; background: #f8fafc; min-height: 100vh; display: flex; align-items: flex-start; justify-content: center; padding: 32px 16px; }
.rte-wrap { width: 100%; max-width: 680px; display: flex; flex-direction: column; gap: 10px; }
.editor-shell { background: #fff; border: 1.5px solid #e2e8f0; border-radius: 12px; overflow: hidden; transition: border-color 0.15s, box-shadow 0.15s; }
.editor-shell:focus-within { border-color: #6366f1; box-shadow: 0 0 0 3px rgba(99,102,241,0.12); }
/* Toolbar */
.toolbar { display: flex; align-items: center; flex-wrap: wrap; gap: 2px; padding: 8px 10px; border-bottom: 1.5px solid #e2e8f0; background: #fafafa; }
.tb-btn { width: 30px; height: 30px; border: 1px solid transparent; border-radius: 7px; background: transparent; color: #475569; cursor: pointer; display: flex; align-items: center; justify-content: center; flex-shrink: 0; transition: background 0.12s, border-color 0.12s, color 0.12s; }
.tb-btn:hover { background: #f1f5f9; border-color: #e2e8f0; color: #1e293b; }
.tb-btn.active { background: rgba(99,102,241,0.12); border-color: rgba(99,102,241,0.35); color: #6366f1; }
.tb-label { font-size: 11px; font-weight: 700; letter-spacing: -0.3px; line-height: 1; }
.tb-sep { width: 1px; height: 18px; background: #e2e8f0; margin: 0 4px; flex-shrink: 0; }
/* Link row */
.link-row { display: none; align-items: center; gap: 8px; padding: 8px 12px; background: #f8faff; border-bottom: 1.5px solid #e2e8f0; }
.link-row.open { display: flex; }
.link-input { flex: 1; height: 32px; border: 1.5px solid #c7d2fe; border-radius: 7px; padding: 0 10px; font-size: 13px; color: #1e293b; outline: none; background: #fff; transition: border-color 0.15s; }
.link-input:focus { border-color: #6366f1; }
.link-ok { height: 32px; padding: 0 14px; background: #6366f1; color: #fff; border: none; border-radius: 7px; font-size: 13px; font-weight: 600; cursor: pointer; transition: background 0.12s; }
.link-ok:hover { background: #4f46e5; }
.link-cancel { height: 32px; padding: 0 12px; background: transparent; color: #64748b; border: 1px solid #e2e8f0; border-radius: 7px; font-size: 13px; cursor: pointer; transition: background 0.12s; }
.link-cancel:hover { background: #f1f5f9; }
/* Editor area */
.editor-area { position: relative; }
.editor { min-height: 200px; padding: 14px 16px; font-size: 15px; line-height: 1.7; color: #1e293b; outline: none; word-break: break-word; }
.editor:empty { min-height: 200px; }
.editor h1 { font-size: 1.6em; font-weight: 700; margin: 0.3em 0 0.2em; color: #0f172a; }
.editor h2 { font-size: 1.25em; font-weight: 700; margin: 0.3em 0 0.2em; color: #0f172a; }
.editor ul, .editor ol { padding-left: 1.5em; margin: 0.4em 0; }
.editor li { margin: 0.15em 0; }
.editor a { color: #6366f1; text-decoration: underline; }
.placeholder { position: absolute; top: 14px; left: 16px; font-size: 15px; color: #9ca3af; pointer-events: none; line-height: 1.7; user-select: none; transition: opacity 0.1s; }
.placeholder.hidden { opacity: 0; }
/* Footer */
.editor-footer { display: flex; align-items: center; justify-content: space-between; }
.char-count { font-size: 12px; color: #94a3b8; }
.get-html-btn { height: 32px; padding: 0 16px; background: #6366f1; color: #fff; border: none; border-radius: 8px; font-size: 13px; font-weight: 600; cursor: pointer; transition: background 0.12s; }
.get-html-btn:hover { background: #4f46e5; }
/* Output textarea */
.html-out { width: 100%; min-height: 80px; max-height: 220px; padding: 12px 14px; font-size: 12px; font-family: 'Menlo', 'Consolas', monospace; color: #334155; background: #f8fafc; border: 1.5px solid #e2e8f0; border-radius: 10px; resize: vertical; outline: none; display: none; line-height: 1.6; }
.html-out.visible { display: block; }const editor = document.getElementById('editor');
const toolbar = document.getElementById('toolbar');
const placeholder = document.getElementById('placeholder');
const charCount = document.getElementById('char-count');
const htmlOut = document.getElementById('html-out');
const linkRow = document.getElementById('link-row');
const linkInput = document.getElementById('link-input');
let savedRange = null;
/* — Core execCommand helper — */
function exec(cmd, val) {
document.execCommand(cmd, false, val || null);
editor.focus();
}
/* — Toolbar button active states — */
const stateCommands = ['bold', 'italic', 'underline', 'strikeThrough',
'insertOrderedList', 'insertUnorderedList',
'justifyLeft', 'justifyCenter', 'justifyRight'];
function updateToolbar() {
toolbar.querySelectorAll('[data-cmd]').forEach(btn => {
const cmd = btn.dataset.cmd;
if (stateCommands.includes(cmd)) {
try {
btn.classList.toggle('active', document.queryCommandState(cmd));
} catch(e) {}
}
});
}
/* — Toolbar click handler — */
toolbar.addEventListener('mousedown', e => {
const btn = e.target.closest('[data-cmd]');
if (!btn) return;
e.preventDefault();
exec(btn.dataset.cmd, btn.dataset.val);
updateToolbar();
});
/* — Link button — */
document.getElementById('btn-link').addEventListener('click', () => {
// Save selection before the input steals focus
const sel = window.getSelection();
if (sel && sel.rangeCount) savedRange = sel.getRangeAt(0).cloneRange();
linkRow.classList.add('open');
linkInput.value = '';
linkInput.focus();
});
function insertLink() {
const url = linkInput.value.trim();
linkRow.classList.remove('open');
if (!url) return;
// Restore selection
if (savedRange) {
const sel = window.getSelection();
sel.removeAllRanges();
sel.addRange(savedRange);
savedRange = null;
}
exec('createLink', url);
// Make link open in new tab
editor.querySelectorAll('a:not([target])').forEach(a => {
a.target = '_blank';
a.rel = 'noopener noreferrer';
});
}
document.getElementById('link-ok').addEventListener('click', insertLink);
linkInput.addEventListener('keydown', e => { if (e.key === 'Enter') insertLink(); });
document.getElementById('link-cancel').addEventListener('click', () => {
linkRow.classList.remove('open');
savedRange = null;
});
/* — Placeholder — */
function syncPlaceholder() {
placeholder.classList.toggle('hidden', editor.textContent.length > 0 || editor.innerHTML.includes('<'));
}
/* — Character count — */
function updateCount() {
const len = editor.textContent.length;
charCount.textContent = len + (len === 1 ? ' character' : ' characters');
syncPlaceholder();
}
editor.addEventListener('input', () => { updateCount(); updateToolbar(); });
editor.addEventListener('keyup', updateToolbar);
editor.addEventListener('mouseup', updateToolbar);
document.addEventListener('selectionchange', () => {
if (document.activeElement === editor) updateToolbar();
});
/* — Get HTML button — */
document.getElementById('get-html-btn').addEventListener('click', () => {
htmlOut.value = editor.innerHTML;
htmlOut.classList.add('visible');
htmlOut.select();
});
/* — Init — */
updateCount();Step by step
How to Use
- 1Click in the editor area and start typingThe placeholder text disappears on first keystroke. Type your content — the editor behaves like a normal text area but produces rich HTML. The character count at the bottom updates live as you type.
- 2Select text and click toolbar buttons to formatHighlight any word or phrase, then click Bold, Italic, Underline, or Strikethrough in the toolbar. The button appears pressed (active state) while the cursor is inside formatted text. Click H1 or H2 to convert the current paragraph to a heading block.
- 3Insert links with the link buttonSelect the text you want to link, then click the link (chain) button in the toolbar. A small input row appears — paste or type the URL and press Insert or Enter. The selected text becomes a clickable link that opens in a new tab. Press Cancel to dismiss without inserting.
- 4Use list and alignment buttonsClick the ordered list button to create a numbered list, or the unordered list button for bullet points. Use the three alignment buttons (left, center, right) to change paragraph alignment. These work on the current block the cursor is in — no selection needed.
- 5Undo and redo changesClick the Undo button to reverse the last change, or Redo to reapply it. These call the browser's native undo stack which tracks every execCommand and keystroke. Standard keyboard shortcuts Ctrl+Z and Ctrl+Y also work inside the editor without any extra code.
- 6Click Get HTML to copy the editor outputPress the "Get HTML" button to reveal a read-only textarea containing the raw HTML from the editor. The textarea auto-selects the content so you can press Ctrl+C to copy it. Use this HTML to save to a database, pass to a backend API, or render in another part of your page.
Real-world uses
Common Use Cases
Got questions?
Frequently Asked Questions
execCommand() is marked as "deprecated" in MDN documentation, but browsers continue to support it and have no announced removal timeline — it remains the only reliable cross-browser way to implement WYSIWYG editing without a full framework. Modern editors like Quill and older versions of TipTap use it internally. For production apps requiring advanced formatting (tables, embeds, collaborative editing), a library like TipTap (ProseMirror-based) or Lexical is recommended. For simple formatting — bold, italic, lists, links, headings — execCommand() works reliably in all major browsers.
Read editor.innerHTML for the full rich HTML, or editor.textContent for plain text only. To autosave, add a debounced input event listener: let timer; editor.addEventListener("input", () => { clearTimeout(timer); timer = setTimeout(() => { fetch("/api/save", { method: "POST", body: JSON.stringify({ html: editor.innerHTML }), headers: { "Content-Type": "application/json" } }); }, 800); }). Always sanitise the HTML server-side before storing or rendering it — use a library like DOMPurify on the client or a server-side sanitiser to strip script tags and event attributes.
For font size, add a select element to the toolbar: <select id="font-size"><option value="1">Small</option><option value="3">Normal</option><option value="5">Large</option></select> and handle its change event with exec("fontSize", e.target.value). For text colour, add <input type="color" id="text-color"> and handle its input event with exec("foreColor", e.target.value). Both use execCommand() with a value argument. Add the same toolbar button active-state logic by calling document.queryCommandValue("fontSize") and document.queryCommandValue("foreColor") in updateToolbar() to keep the controls in sync with the cursor position.
Never inject editor.innerHTML directly into a page without sanitisation. On the client, run the saved HTML through DOMPurify.sanitize(html) before rendering — this strips script tags, onerror attributes, and javascript: href values. Install DOMPurify via npm or load it from a CDN. On the server (Node.js), use the sanitize-html package with a strict allowedTags list covering only the tags this editor produces: b, i, u, strike, h1, h2, ul, ol, li, a, p, br, div, span. Set allowedAttributes to { a: ["href", "target", "rel"] } and strip all other attributes.