More Layouts Snippets
Front-End Coding Playgrounds
Learn to code with interactive, live-preview playgrounds — HTML, CSS, JavaScript, React & more.
 HTML Playground42 lessons · Click-based · Live preview
 CSS PlaygroundLearn CSS with a live editor
 JavaScript Playground60 lessons · DOM · Async · Canvas
 React PlaygroundLearn React with a live code editor
 GSAP PlaygroundLearn GSAP animation interactively
 SVG Playground44 lessons · shapes · paths · animation
 SCSS Playground45 lessons · Sass modules · tokens
 Tailwind PlaygroundLearn Tailwind CSS with a live editor
 Bootstrap 5 Playground50 lessons · live preview
Chat UI — Free HTML CSS JS Messaging Snippet
Chat Bubble UI · Layouts · Plain HTML, CSS & JS · Live preview
What's included
Features
About this UI Snippet
Chat UI — Dynamic Message Append, Outgoing/Incoming Bubbles & Auto-Scroll
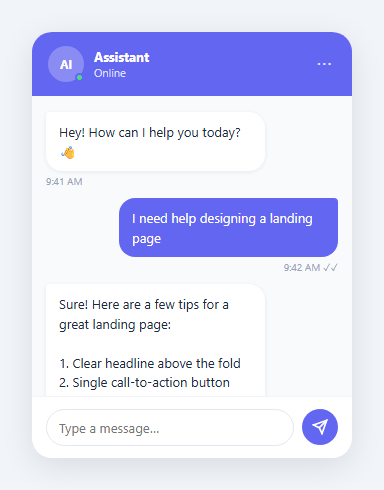
A chat UI is the messaging interface pattern used in customer support widgets like the floating chat widget, social apps, AI chatbots (see the AI prompt composer), and collaboration tools. This snippet provides the complete UI: a scrollable message list with outgoing and incoming bubble styles, a text input with send button, Enter key support, and auto-scroll to the latest message.
Sending messages
sendMsg() reads the input value, trims whitespace, and returns early if empty. It creates a div.msg.outgoing element, sets its innerHTML with the message text and current time via toLocaleTimeString. The message is appended to the #msgs container and the container scrolls to scrollTop = scrollHeight to show the new message. The input is cleared.
Incoming vs outgoing bubbles
.msg.outgoing aligns to the right with an accent background. .msg.incoming aligns to the left with a grey background. Both use max-width: 70% to prevent bubbles from spanning the full chat width. The timestamp sits below the bubble text in a smaller, dimmer colour.
Enter key support
The input has onkeydown="if(event.key==='Enter') sendMsg()" — pressing Enter sends the message without needing to click the button.
Auto-scroll
msgs.scrollTop = msgs.scrollHeight scrolls the message container to its maximum height after appending each message, keeping the latest message always visible.
The message append pattern
sendMessage() creates a new .message div with class "outgoing" and the message text, then appends it to .messages. A short setTimeout creates the simulated incoming reply. Each message has a .time span showing the current time formatted as HH:MM. The container uses overflow-y: auto and a JavaScript call to scrollTop = scrollHeight after each append to auto-scroll to the most recent message.
Message bubbles with CSS
Outgoing messages float right using margin-left: auto. Incoming messages have no margin override so they sit at the left. Both use border-radius with an asymmetric corner: outgoing messages have border-bottom-right-radius: 4px (the "tail" corner), incoming have border-bottom-left-radius: 4px. This is the standard chat bubble tail pattern.
The typing indicator
Before the simulated reply arrives, three animated dots appear (.typing-indicator) using the same bounce animation as the Dots Loader snippet in this library. The indicator is removed when the reply message is appended.
Customising for real use
Wire sendMessage() to a WebSocket or API endpoint. Render incoming messages from the server's message event. For a real chat UI, each message needs a sender ID, timestamp, and message ID for proper rendering and ordering.
Build with AI
Build, Understand, Optimize, and Extend It With AI
Rather than assuming the auto-scroll and bubble styling are trivial, paste this snippet's HTML, CSS, and JS into an AI coding assistant like Claude and ask it to explain exactly why setting scrollTop to scrollHeight reliably scrolls to the bottom regardless of how many messages exist, and why the outgoing and incoming bubbles use opposite asymmetric border-radius corners instead of a uniform rounded rectangle. The same assistant can help optimize it — ask whether appending raw text into innerHTML in sendMsg() is safe if a user types HTML-like characters, and how you'd escape it properly without losing the ability to render rich content like links. It's also a good partner for extending the UI: ask it to add a typing indicator that appears before the simulated reply, wire sendMsg() to a real WebSocket connection instead of the setTimeout-based fake reply, or add read-receipt checkmarks that update from single to double tick asynchronously. Treat the code less like a finished artifact and more like a starting point for a conversation.
Prompt to recreate it
Copy this into your AI assistant of choice to build the effect from scratch, or as a jumping-off point for your own variant:
Build a "chat bubble UI" in plain HTML, CSS, and JavaScript — no framework, no library.

Requirements:
- A fixed-width chat panel with a header showing an avatar, an online status dot, a name and status line, followed by a scrollable message list and a bottom input row with a text field and a send button.
- Every message must be a div with a shared base class plus either an "incoming" or "outgoing" modifier class: outgoing messages align to the right with an accent-colored bubble, incoming messages align to the left with a neutral bubble, and both must be capped at a maximum width (not full container width) so short messages don't stretch edge to edge.
- Give outgoing and incoming bubbles opposite asymmetric corner radii (a small "tail" corner on the side facing the edge of the screen) so they visually read as speech bubbles pointing toward their sender's side.
- Sending a message must read and trim the input's value, do nothing if it's empty, create a new outgoing message element with the trimmed text and a formatted current timestamp, append it to the message list, clear the input, and scroll the message container to its maximum scroll position so the new message is always visible.
- Pressing the Enter key while focused in the text input must trigger the exact same send function as clicking the send button — no duplicated logic between the two paths.
- After an outgoing message is sent, simulate a delayed incoming reply (via a timeout of under a second) that appends its own incoming-styled message and re-scrolls the container to the bottom.
Step by step
How to Use
- 1Type and send a messageType in the input and press Enter or click Send. Your message appears as an outgoing bubble. The timestamp shows the current time.
- 2Update the chat headerIn the HTML panel, change the contact name and status in .chat-header.
- 3Add incoming messagesIn the JS panel, add an incoming message after sending: append a .msg.incoming div to mimic a reply.
- 4Change bubble coloursUpdate background on .msg.outgoing (accent) and .msg.incoming (grey) in the CSS panel.
- 5Connect to a WebSocketReplace the static incoming message placeholder with a WebSocket onmessage handler that appends .msg.incoming divs from server data.
- 6Export in your formatClick "HTML" for a standalone file, "JSX" for a React component, or "Tailwind" for a React + Tailwind version.
Real-world uses
Common Use Cases
Got questions?
Frequently Asked Questions
sendMsg() calls document.createElement("div"), sets el.className = "msg outgoing", sets el.innerHTML with the text and timestamp, appends it to #msgs, then sets msgs.scrollTop = msgs.scrollHeight to scroll to the new message.
msgs.scrollTop = msgs.scrollHeight sets the scroll position to the maximum possible value — the total height of all messages. This is called after every append, keeping the latest message visible.
In sendMsg(), after appending the outgoing message, create a second element with className = "msg incoming" and simulate a reply: setTimeout(() => { const reply = document.createElement("div"); reply.className = "msg incoming"; reply.innerHTML = "<p>Got it!</p>"; msgs.append(reply); msgs.scrollTop = msgs.scrollHeight; }, 1000); }
Open a WebSocket connection: const ws = new WebSocket("wss://your-server.com"). In sendMsg(), call ws.send(text) instead of immediately appending. In ws.onmessage, append .msg.incoming divs with the received data.
For emoji, add an emoji picker button that inserts characters into the input value. For files, add a <input type="file"> button. On file selection, read with FileReader and display as an <img> in the bubble.
Yes. Click "JSX" for a React component. In React, manage messages as an array in useState. Use useRef on the message container and call ref.current.scrollTo({ top: ref.current.scrollHeight }) in a useEffect after messages update.