
Learn Coding Visually
Learn to code with interactive, live-preview playgrounds — HTML, CSS, JavaScript, React & more.
 HTML Playground42 lessons · Click-based · Live preview
 CSS PlaygroundLearn CSS with a live editor
 JavaScript Playground60 lessons · DOM · Async · Canvas
 React PlaygroundLearn React with a live code editor
 GSAP PlaygroundLearn GSAP animation interactively
 SVG Playground44 lessons · shapes · paths · animation
 SCSS Playground45 lessons · Sass modules · tokens
 Tailwind PlaygroundLearn Tailwind CSS with a live editor
 Bootstrap 5 Playground50 lessons · live preview
AI Image Generator UI — Free HTML CSS JS Snippet
AI Image Generator UI · Layouts · Plain HTML, CSS & JS · Live preview
What's included
Features
About this UI Snippet
AI Image Generator UI — Prompt Bar, Aspect-Ratio Pills, Shimmer Loading Tiles & Blur-Up Variation Grid
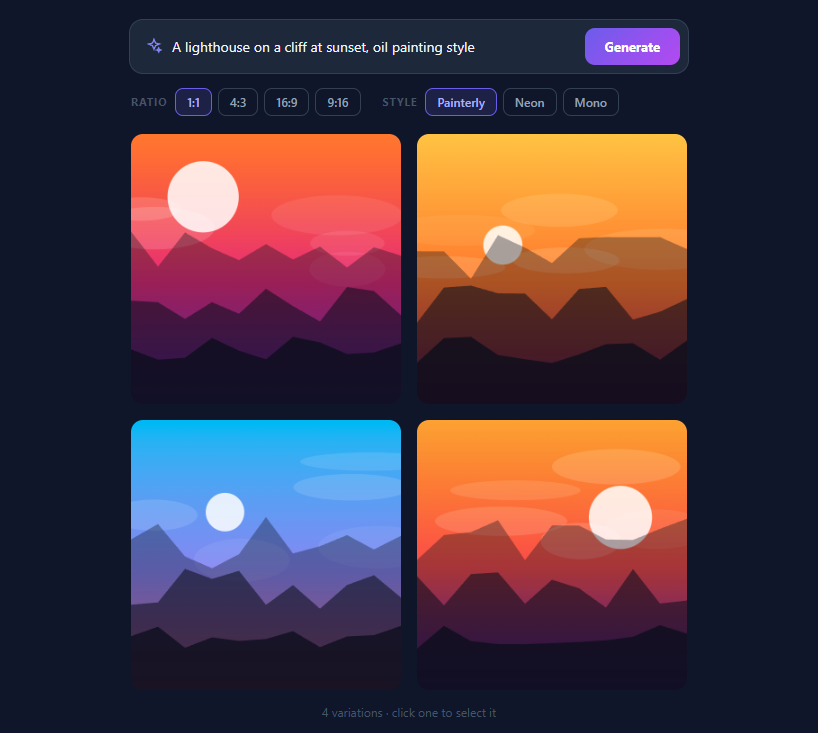
Text-to-image products — Midjourney, DALL·E, Ideogram, Firefly — share a settled interface grammar: a prompt bar with a generate button, quick-option pills for aspect ratio and style, and a grid of four variations that appear through a progressive loading treatment. This snippet rebuilds that entire front end in vanilla HTML, CSS, and JavaScript with zero API dependency: instead of calling a diffusion model, each tile paints a deterministic procedural landscape on a <canvas>, seeded from the prompt text — so the demo generates "different images for different prompts" while remaining fully self-contained and instant to replay.
The prompt bar and option pills
The prompt bar is a flex row — sparkle icon, borderless input, gradient Generate button — inside a rounded container whose border and focus ring light up via :focus-within, the CSS pseudo-class that styles a parent when any child holds focus. Below it sit two pill groups handled by event delegation: one click listener per group (not per button) resolves the target with closest('.opt-pill'), swaps the .active class, and records the choice. Ratio pills write directly to each tile's aspect-ratio CSS property — the modern way to get stable 1:1, 4:3, 16:9, or 9:16 boxes with no padding-top hacks — and style pills select one of three colour palettes.
Procedural placeholder art: hash → seed → scene
Real generators return URLs; a self-contained demo needs to *make* images. Each canvas paints a layered scene: a three-stop vertical gradient sky, a translucent sun disc, soft elliptical cloud blobs, and three mountain silhouette layers built from random-walk polygons at increasing darkness — a convincing abstract landscape in ~40 lines. Determinism comes from seeding: the prompt string is hashed with the classic h * 31 + charCode rolling hash, combined with the tile index and style, and fed to a mulberry32 PRNG — a tiny seeded random generator. Same prompt, same four images; change one word and all four change. This hash-to-PRNG-to-art pipeline is the same architecture as identicon avatars, and it teaches seeded generation, which real diffusion models use identically (that is exactly what a "seed" parameter is).
The loading treatment: shimmer, blur-up, and staggered progress
Diffusion models take seconds and real products show partial progress; this UI simulates that with three coordinated effects per tile. A shimmer sweep — a translucent diagonal gradient with background-size: 200% animated across via background-position keyframes — signals activity. The canvas underneath starts at filter: blur(14px) and scale(1.08), so the finished image *unblurs into place* over 0.7s when the loading class is removed, mimicking how diffusion previews sharpen. And a centred percentage counter increments on a per-tile interval with randomised speed, so the four tiles finish at different moments — the staggered completion that makes the grid feel like four parallel jobs rather than one synchronised fake. When the last tile finishes (checked with every() over the grid children), the Generate button re-enables.
Selection and hover actions
Finished tiles behave like results: clicking selects one (indigo border plus a corner check badge, enforced single-selection by clearing siblings), and hovering reveals a bottom-right action cluster — download and re-run-variations icon buttons on translucent backdrop-filter: blur chips that lift in with an opacity/translate transition. The action buttons call stopPropagation() so clicking them doesn't toggle selection — the small event-plumbing detail that separates a mockup from a usable component. To go production, replace paint() with an <img> whose src comes from your generation API and keep every other behaviour unchanged.
Build with AI
Build, Understand, Optimize, and Extend It With AI
Two very different things are worth extracting from this snippet with an AI assistant, and it helps to ask about them separately. First, the product wiring: paste the code into Claude and ask it to convert the demo into a real client for your chosen provider — it will write the backend proxy route, map the ratio pills to the provider's size parameters, swap paint() for an <img> with the loading class removed on onload, and connect real progress events to the counter, all while preserving the shimmer and blur-up treatment. Second, the generative art: ask it to explain the hash → mulberry32 → layered-canvas pipeline and then push it further — different scene types per style pill (city skyline, ocean, abstract geometry), noise-based terrain instead of random walks, or exporting tiles at print resolution by repainting the same seed on a 2048px canvas. If you are demoing rather than shipping, ask for an auto-play mode that cycles curated prompts on a timer for a landing-page hero. Each of these is a focused, verifiable request — much more productive than "improve this".
Prompt to recreate it
Copy this into your AI assistant of choice to build the effect from scratch, or as a jumping-off point for your own variant:
Build a Midjourney-style AI image generator interface in plain HTML, CSS, and JavaScript that works completely offline by painting procedural placeholder art — no API calls, no frameworks.

Requirements:
- A prompt bar containing a sparkle icon, a borderless text input, and a gradient "Generate" button, where the container's border and glow ring light up via :focus-within; Enter in the input also triggers generation, and the button disables while a batch is running.
- Two pill option groups handled by event delegation: aspect ratio (1:1, 4:3, 16:9, 9:16) applied to result tiles through the CSS aspect-ratio property, and three visual styles that select different colour palettes.
- On generate, render a 2×2 grid of four variation tiles, each containing a canvas painted with a layered procedural landscape: a three-stop vertical gradient sky, a translucent sun disc, soft elliptical cloud blobs, and three darkening mountain-silhouette layers built from random-walk polygons.
- Generation must be deterministic: hash the prompt string with a rolling multiply-and-add hash, combine with the tile index and style, and feed a mulberry32 seeded PRNG so the same prompt always reproduces the same four images while any edit changes them all.
- While "generating", each tile shows three coordinated effects: a shimmer sweep animated via background-position over an oversized translucent gradient, the canvas blurred and slightly scaled up (transitioning to sharp over ~0.7s when done for a blur-up reveal), and a centred percentage counter that advances at a randomised per-tile speed so the four tiles finish at different times; re-enable the Generate button only when every tile has completed.
- Finished tiles support single selection (accent border plus a corner check badge, clearing siblings) and reveal hover action chips — download and variations icon buttons on translucent backdrop-blurred backgrounds — whose clicks stop propagation so they do not toggle selection.
- Track all interval handles and clear them at the start of each generation so regenerating mid-run leaves no orphaned timers, and comment where a real image API would replace the canvas painting.
Want to tighten it up first? Run this prompt through the AI Prompt Studio to score it across 8 quality dimensions, catch anti-patterns, and tune the wording for Claude, ChatGPT, or Gemini before you paste it in.
Source Code
<div class="gen-wrap">
  <!-- Prompt bar -->
  <div class="prompt-bar">
    <svg class="prompt-spark" width="16" height="16" viewBox="0 0 24 24" fill="none" stroke="currentColor" stroke-width="2"><path d="M12 2l2.4 5.6L20 9l-5.6 2.4L12 17l-2.4-5.6L4 9l5.6-1.4z"/><path d="M19 15l1 2.3L22 18l-2 .7-1 2.3-1-2.3-2-.7 2-.7z"/></svg>
    <input class="prompt-input" id="prompt-input" type="text"
      value="A lighthouse on a cliff at sunset, oil painting style"
      placeholder="Describe the image you want…">
    <button class="gen-btn" id="gen-btn">Generate</button>
  </div>

  <!-- Options row -->
  <div class="options-row">
    <div class="opt-group" id="ratio-group">
      <span class="opt-label">Ratio</span>
      <button class="opt-pill active" data-ratio="1/1">1:1</button>
      <button class="opt-pill" data-ratio="4/3">4:3</button>
      <button class="opt-pill" data-ratio="16/9">16:9</button>
      <button class="opt-pill" data-ratio="9/16">9:16</button>
    </div>
    <div class="opt-group" id="style-group">
      <span class="opt-label">Style</span>
      <button class="opt-pill active" data-style="0">Painterly</button>
      <button class="opt-pill" data-style="1">Neon</button>
      <button class="opt-pill" data-style="2">Mono</button>
    </div>
  </div>

  <!-- Results grid -->
  <div class="results" id="results"></div>

  <p class="gen-hint" id="gen-hint">4 variations · click one to select it</p>
</div>
* { box-sizing: border-box; margin: 0; padding: 0; }
body { font-family: system-ui, sans-serif; background: #0f172a; min-height: 100vh; display: flex; align-items: center; justify-content: center; padding: 24px; }
.gen-wrap { width: 100%; max-width: 560px; }
/* — Prompt bar — */
.prompt-bar {
display: flex; align-items: center; gap: 10px;
background: #1e293b; border: 1px solid #334155;
border-radius: 14px; padding: 8px 8px 8px 16px;
transition: border-color 0.15s, box-shadow 0.15s;
}
.prompt-bar:focus-within {
border-color: #6366f1;
box-shadow: 0 0 0 3px rgba(99,102,241,0.22);
}
.prompt-spark { color: #818cf8; flex-shrink: 0; }
.prompt-input {
flex: 1; background: none; border: none; outline: none;
color: #f1f5f9; font-size: 14px; font-family: inherit; min-width: 0;
}
.prompt-input::placeholder { color: #475569; }
.gen-btn {
background: linear-gradient(135deg, #6366f1, #a855f7);
color: #fff; border: none; border-radius: 10px;
padding: 10px 20px; font-size: 13px; font-weight: 700;
font-family: inherit; cursor: pointer; flex-shrink: 0;
transition: opacity 0.15s, transform 0.15s;
}
.gen-btn:hover { opacity: 0.9; }
.gen-btn:active { transform: scale(0.97); }
.gen-btn:disabled { opacity: 0.5; cursor: wait; }
/* — Options — */
.options-row { display: flex; gap: 22px; margin: 14px 2px 16px; flex-wrap: wrap; }
.opt-group { display: flex; align-items: center; gap: 6px; }
.opt-label { font-size: 11px; font-weight: 700; text-transform: uppercase; letter-spacing: 0.07em; color: #475569; margin-right: 2px; }
.opt-pill {
background: none; border: 1px solid #334155; color: #94a3b8;
border-radius: 8px; padding: 5px 11px;
font-size: 12px; font-weight: 600; font-family: inherit;
cursor: pointer; transition: all 0.15s;
}
.opt-pill:hover { border-color: #475569; color: #e2e8f0; }
.opt-pill.active { background: rgba(99,102,241,0.15); border-color: #6366f1; color: #a5b4fc; }
/* — Results grid — */
.results { display: grid; grid-template-columns: 1fr 1fr; gap: 12px; }
.tile {
position: relative; border-radius: 14px; overflow: hidden;
aspect-ratio: 1/1; cursor: pointer;
border: 2px solid transparent;
transition: border-color 0.2s, transform 0.2s;
}
.tile:hover { transform: translateY(-2px); }
.tile.selected { border-color: #6366f1; }
.tile canvas { width: 100%; height: 100%; display: block; }
/* shimmer while "generating" */
.tile.loading::after {
content: ''; position: absolute; inset: 0;
background: linear-gradient(110deg, transparent 30%, rgba(148,163,184,0.14) 50%, transparent 70%);
background-size: 200% 100%;
animation: shimmer 1.3s linear infinite;
}
.tile.loading canvas { filter: blur(14px) saturate(1.2); transform: scale(1.08); }
.tile canvas { transition: filter 0.7s ease, transform 0.7s ease; }
@keyframes shimmer { from { background-position: 200% 0; } to { background-position: -200% 0; } }
/* progress % */
.tile-progress {
position: absolute; inset: 0; display: flex;
align-items: center; justify-content: center;
font-size: 13px; font-weight: 700; color: rgba(255,255,255,0.9);
text-shadow: 0 1px 6px rgba(0,0,0,0.5);
font-variant-numeric: tabular-nums;
}
/* hover actions on finished tiles */
.tile-actions {
position: absolute; right: 8px; bottom: 8px;
display: flex; gap: 6px;
opacity: 0; transform: translateY(4px);
transition: opacity 0.18s, transform 0.18s;
}
.tile:hover .tile-actions { opacity: 1; transform: none; }
.tile-btn {
width: 28px; height: 28px; border-radius: 8px;
background: rgba(15,23,42,0.75); backdrop-filter: blur(4px);
border: none; color: #e2e8f0; cursor: pointer;
display: flex; align-items: center; justify-content: center;
}
.tile-btn:hover { background: rgba(99,102,241,0.9); }
.tile-check {
position: absolute; top: 8px; left: 8px;
width: 22px; height: 22px; border-radius: 50%;
background: #6366f1; color: #fff;
display: none; align-items: center; justify-content: center;
}
.tile.selected .tile-check { display: flex; }
.gen-hint { margin-top: 12px; font-size: 12px; color: #475569; text-align: center; }// Procedural placeholder art: each tile paints a deterministic gradient scene
// seeded by (prompt hash + tile index + style), standing in for a diffusion result.
const PALETTES = [
[['#f97316','#db2777','#7c3aed'], ['#fbbf24','#f97316','#be185d'], ['#38bdf8','#818cf8','#f472b6'], ['#f59e0b','#ef4444','#6d28d9']],
[['#22d3ee','#a855f7','#0f172a'], ['#4ade80','#22d3ee','#312e81'], ['#f472b6','#a855f7','#1e1b4b'], ['#facc15','#fb7185','#4c1d95']],
[['#e2e8f0','#94a3b8','#1e293b'], ['#cbd5e1','#64748b','#0f172a'], ['#f8fafc','#94a3b8','#334155'], ['#e2e8f0','#475569','#1e293b']],
];
const results = document.getElementById('results');
const genBtn = document.getElementById('gen-btn');
const hint = document.getElementById('gen-hint');
let ratio = '1/1';
let styleIdx = 0;
let timers = [];
function hash(str) {
let h = 0;
for (let i = 0; i < str.length; i++) h = (h * 31 + str.charCodeAt(i)) >>> 0;
return h;
}
function paint(canvas, seed, colors) {
const ctx = canvas.getContext('2d');
const W = canvas.width = 300, H = canvas.height = 300;
const rnd = mulberry(seed);
// layered gradient sky
const g = ctx.createLinearGradient(0, 0, 0, H);
g.addColorStop(0, colors[0]); g.addColorStop(0.55, colors[1]); g.addColorStop(1, colors[2]);
ctx.fillStyle = g; ctx.fillRect(0, 0, W, H);
// sun / moon
ctx.beginPath();
ctx.arc(60 + rnd() * 180, 50 + rnd() * 80, 18 + rnd() * 22, 0, Math.PI * 2);
ctx.fillStyle = 'rgba(255,255,255,0.85)'; ctx.fill();
// soft blobs (clouds / texture)
for (let i = 0; i < 5; i++) {
ctx.beginPath();
ctx.ellipse(rnd() * W, 40 + rnd() * 120, 40 + rnd() * 50, 10 + rnd() * 14, 0, 0, Math.PI * 2);
ctx.fillStyle = 'rgba(255,255,255,' + (0.06 + rnd() * 0.1) + ')'; ctx.fill();
}
// mountain silhouettes
for (let layer = 0; layer < 3; layer++) {
const base = H * (0.55 + layer * 0.15);
ctx.beginPath(); ctx.moveTo(0, H);
ctx.lineTo(0, base);
for (let x = 0; x <= W; x += 30) {
ctx.lineTo(x, base - rnd() * (60 - layer * 15));
}
ctx.lineTo(W, H); ctx.closePath();
ctx.fillStyle = 'rgba(10,14,28,' + (0.35 + layer * 0.22) + ')';
ctx.fill();
}
}
function mulberry(a) {
return function() {
a |= 0; a = (a + 0x6D2B79F5) | 0;
let t = Math.imul(a ^ (a >>> 15), 1 | a);
t = (t + Math.imul(t ^ (t >>> 7), 61 | t)) ^ t;
return ((t ^ (t >>> 14)) >>> 0) / 4294967296;
};
}
function generate() {
timers.forEach(clearInterval);
timers = [];
genBtn.disabled = true;
hint.textContent = 'Generating 4 variations…';
results.innerHTML = '';
const seedBase = hash(document.getElementById('prompt-input').value + styleIdx);
for (let i = 0; i < 4; i++) {
const tile = document.createElement('div');
tile.className = 'tile loading';
tile.style.aspectRatio = ratio;
tile.innerHTML = '<canvas></canvas>' +
'<div class="tile-progress">0%</div>' +
'<div class="tile-check"><svg width="12" height="12" viewBox="0 0 24 24" fill="none" stroke="currentColor" stroke-width="3"><path d="M20 6L9 17l-5-5"/></svg></div>' +
'<div class="tile-actions">' +
'<button class="tile-btn" title="Download" aria-label="Download"><svg width="13" height="13" viewBox="0 0 24 24" fill="none" stroke="currentColor" stroke-width="2"><path d="M21 15v4a2 2 0 0 1-2 2H5a2 2 0 0 1-2-2v-4M7 10l5 5 5-5M12 15V3"/></svg></button>' +
'<button class="tile-btn" title="Variations" aria-label="Variations"><svg width="13" height="13" viewBox="0 0 24 24" fill="none" stroke="currentColor" stroke-width="2"><path d="M23 4v6h-6M1 20v-6h6"/><path d="M3.5 9a9 9 0 0 1 14.9-3.4L23 10M1 14l4.6 4.4A9 9 0 0 0 20.5 15"/></svg></button>' +
'</div>';
results.appendChild(tile);
paint(tile.querySelector('canvas'), seedBase + i * 7919, PALETTES[styleIdx][i]);
// fake diffusion progress: each tile finishes at a slightly different time
const progEl = tile.querySelector('.tile-progress');
let p = 0;
const speed = 1.6 + Math.random() * 1.4;
const t = setInterval(() => {
p = Math.min(100, p + speed + Math.random() * 2);
progEl.textContent = Math.floor(p) + '%';
if (p >= 100) {
clearInterval(t);
tile.classList.remove('loading');
progEl.remove();
if ([...results.children].every(c => !c.classList.contains('loading'))) {
genBtn.disabled = false;
hint.textContent = '4 variations · click one to select it';
}
}
}, 60);
timers.push(t);
tile.addEventListener('click', () => {
[...results.children].forEach(c => c.classList.remove('selected'));
tile.classList.add('selected');
});
tile.querySelectorAll('.tile-btn').forEach(b =>
b.addEventListener('click', e => e.stopPropagation()));
}
}
// option pills
document.getElementById('ratio-group').addEventListener('click', e => {
const btn = e.target.closest('.opt-pill'); if (!btn) return;
document.querySelectorAll('#ratio-group .opt-pill').forEach(b => b.classList.remove('active'));
btn.classList.add('active');
ratio = btn.dataset.ratio;
});
document.getElementById('style-group').addEventListener('click', e => {
const btn = e.target.closest('.opt-pill'); if (!btn) return;
document.querySelectorAll('#style-group .opt-pill').forEach(b => b.classList.remove('active'));
btn.classList.add('active');
styleIdx = +btn.dataset.style;
});
genBtn.addEventListener('click', generate);
document.getElementById('prompt-input').addEventListener('keydown', e => {
if (e.key === 'Enter') generate();
});
generate();Step by step
How to Use
- 1Generate and explore the demoType a prompt (or keep the default) and click Generate or press Enter. Four tiles appear with shimmer sweeps, blurred previews, and staggered progress counters, then sharpen into finished "images". Click a tile to select it — indigo border and check badge — and hover to reveal the download/variations buttons. Change the ratio or style pills and generate again: the same prompt always reproduces the same four images because generation is seeded.
- 2Swap the canvas art for a real image APIIn generate(), replace the paint() call with an image request. Create an <img> in place of the canvas, call your backend — which proxies to a text-to-image API (OpenAI Images, Stability, Fal, Replicate) with { prompt, aspect_ratio: ratio, style } — and set img.src from the returned URL. Keep the .loading class until img.onload fires, then remove it so the existing blur-up reveal plays. Never call image APIs directly from the browser; the key must stay server-side.
- 3Make the progress counter realAPIs like Replicate and Fal stream progress events or expose polling endpoints. Replace the randomised interval with your job status: on each poll/event, set progEl.textContent = job.progress + "%". For APIs without progress (OpenAI Images), keep the simulated counter but cap it at ~90% until the response arrives — the standard trick that keeps users informed without lying about completion.
- 4Customise ratios, styles, and grid sizeRatio pills carry their value in data-ratio and it is applied straight to tile.style.aspectRatio — add a 3:2 or 21:9 pill by copying a button. Styles are palette indices into the PALETTES array; add a fourth palette (three colour stops per tile) and a matching pill with data-style="3". For a 9-image grid, change the loop to i < 9 and the .results grid to grid-template-columns: repeat(3, 1fr).
- 5Wire the download buttonFor the canvas demo: canvas.toBlob(blob => { const a = document.createElement("a"); a.href = URL.createObjectURL(blob); a.download = "image.png"; a.click(); }). For real images, fetch the URL as a blob first (a plain download attribute fails cross-origin), or have your server send Content-Disposition: attachment. The variations button should re-call your API with the selected image's seed plus a strength parameter.
- 6Export and composeClick JSX for a React version — hold tiles in state as an array of { id, status, progress, url } and render the grid from it. This front end pairs with the AI Prompt Composer for advanced prompt editing, the Skeleton Card Grid for gallery pages, and the Image Lightbox for full-screen viewing of the selected result.
Real-world uses
Common Use Cases
Got questions?
Frequently Asked Questions
Route through your own backend — API keys must never ship to the browser. Create an endpoint (e.g. POST /api/generate) that receives { prompt, ratio, style }, translates ratio into the provider's size parameter (1:1 → 1024x1024, 16:9 → 1792x1024 for OpenAI; width/height for Stability), appends your style preset to the prompt, and requests n=4 images. Client-side, in generate(), replace paint() with: const res = await fetch("/api/generate", { method: "POST", body: JSON.stringify({ prompt, ratio, style: styleIdx }) }); then for each returned URL create an <img>, insert it in the tile, and remove the .loading class inside img.onload so the blur-up transition fires. For queue-based providers (Replicate, Fal), store the prediction id per tile and poll or subscribe for status, feeding real percentages to the existing progress element.
Math.random() cannot be seeded, so every generation would produce unrelated images and the same prompt would never reproduce its results — breaking the core mental model of image generators, where a prompt plus a seed identifies an image. The demo hashes the prompt string into a 32-bit integer (h = h*31 + charCode, the Java-style rolling hash), offsets it per tile with a prime multiplier so the four variations differ, and feeds it to mulberry32 — a well-known 4-line PRNG that turns one integer seed into a deterministic random stream. The payoff: typing the same prompt always regenerates identical images (like re-running a diffusion model with a fixed seed), while any edit produces a visibly new set. It also makes bugs reproducible, which pure randomness never is.
Depends on the provider. Replicate and Fal expose per-prediction progress: poll GET /predictions/:id (or use their SSE/webhook streams) and write the reported percentage straight into progEl.textContent, replacing the randomised interval entirely. Stability's API and OpenAI Images return only the finished image, so keep a simulated counter but make it asymptotic: advance quickly to ~60%, slow down, and never pass 90% until the response lands, then jump to 100% and remove the loading class. Users read a stalled 90% as "almost done" but read a completed-then-still-loading 100% as broken — that asymmetry is why every major product uses the cap. Also keep the shimmer regardless of counter strategy; motion signals liveness even when numbers stall.
Tailwind covers nearly everything: the prompt bar is flex items-center gap-2.5 bg-slate-800 border border-slate-700 rounded-2xl focus-within:border-indigo-500 focus-within:ring-4 focus-within:ring-indigo-500/20; pills are px-3 py-1.5 text-xs font-semibold border border-slate-700 rounded-lg with data-[active]:bg-indigo-500/15 data-[active]:text-indigo-300; the grid is grid grid-cols-2 gap-3; and blur-up is transition-[filter,transform] duration-700 with data-[loading]:blur-xl data-[loading]:scale-105. The shimmer needs one custom keyframe in your config. In React, render each tile's canvas via a ref and paint inside useEffect keyed on [prompt, style, ratio]; hold tile status in state but keep progress in a ref updated via requestAnimationFrame to avoid 60 renders/sec. In Angular, the same applies with @ViewChildren canvas refs and signals for tile status — and run the progress intervals outside the zone (NgZone.runOutsideAngular) so change detection is not hammered.