Source Code
<div class="wrap">
  <div class="table-head">
    <h2 class="table-title">Team Directory</h2>
    <div class="table-actions">
      <button class="add-row-btn" id="add-row-btn">+ Add row</button>
    </div>
  </div>
  <div class="table-scroll">
    <table class="tbl" id="tbl">
      <thead>
        <tr>
          <th>Name</th>
          <th>Role</th>
          <th>Department</th>
          <th>Email</th>
          <th class="del-col"></th>
        </tr>
      </thead>
      <tbody id="tbody"></tbody>
    </table>
  </div>
  <div class="table-foot">
    <span id="row-count">4 rows</span>
    <button class="save-btn" id="save-btn">Save changes</button>
  </div>
</div>
* { box-sizing: border-box; margin: 0; padding: 0; }
body { font-family: system-ui, sans-serif; background: #f8fafc; min-height: 100vh; padding: 32px 20px; }
.wrap { max-width: 780px; margin: 0 auto; }
.table-head { display: flex; justify-content: space-between; align-items: center; margin-bottom: 12px; }
.table-title { font-size: 18px; font-weight: 800; color: #0f172a; }
.add-row-btn { background: #6366f1; color: #fff; border: none; border-radius: 9px; padding: 8px 16px; font-size: 13px; font-weight: 700; cursor: pointer; transition: background 0.12s; }
.add-row-btn:hover { background: #4f46e5; }
.table-scroll { overflow-x: auto; border-radius: 12px; box-shadow: 0 1px 6px rgba(0,0,0,0.06); }
.tbl { width: 100%; border-collapse: collapse; background: #fff; }
.tbl thead tr { background: #f8fafc; }
.tbl th { padding: 10px 12px; text-align: left; font-size: 11px; font-weight: 700; text-transform: uppercase; letter-spacing: 0.5px; color: #64748b; border-bottom: 1px solid #e2e8f0; }
.del-col { width: 40px; }
.tbl td { padding: 6px 8px; border-bottom: 1px solid #f1f5f9; vertical-align: middle; }
.tbl tbody tr:last-child td { border-bottom: none; }
.tbl tbody tr:hover { background: #fafafa; }
.tbl tbody tr.new-row { animation: row-in 0.2s ease; background: rgba(99,102,241,0.03); }
@keyframes row-in { from { opacity: 0; transform: translateY(-4px); } to { opacity: 1; transform: none; } }
.cell-input { width: 100%; border: 1.5px solid transparent; border-radius: 6px; padding: 6px 8px; font-size: 13px; color: #0f172a; background: transparent; outline: none; font-family: inherit; transition: border-color 0.12s, background 0.12s; }
.cell-input:focus { border-color: #6366f1; background: #fff; box-shadow: 0 0 0 3px rgba(99,102,241,0.1); }
.cell-input:hover { border-color: #e2e8f0; background: #fafafa; }
.cell-input::placeholder { color: #94a3b8; }
.del-btn { width: 28px; height: 28px; border-radius: 7px; border: none; background: transparent; color: #cbd5e1; font-size: 16px; cursor: pointer; display: flex; align-items: center; justify-content: center; transition: background 0.12s, color 0.12s; }
.del-btn:hover { background: #fee2e2; color: #dc2626; }
.table-foot { display: flex; justify-content: space-between; align-items: center; margin-top: 12px; }
.table-foot span { font-size: 12px; color: #94a3b8; }
.save-btn { background: #0f172a; color: #fff; border: none; border-radius: 9px; padding: 9px 18px; font-size: 13px; font-weight: 700; cursor: pointer; transition: opacity 0.12s; }
.save-btn:hover { opacity: 0.85; }let rows = [
{ name: 'Alex Johnson', role: 'Senior Engineer', dept: 'Engineering', email: 'alex@company.com' },
{ name: 'Sara Miller', role: 'Product Designer', dept: 'Design', email: 'sara@company.com' },
{ name: 'Raj Patel', role: 'Backend Engineer', dept: 'Engineering', email: 'raj@company.com' },
{ name: 'Maya Kim', role: 'Product Manager', dept: 'Product', email: 'maya@company.com' },
];
function render() {
const tbody = document.getElementById('tbody');
tbody.innerHTML = '';
rows.forEach((r, i) => {
const tr = document.createElement('tr');
['name','role','dept','email'].forEach(key => {
const td = document.createElement('td');
const inp = document.createElement('input');
inp.className = 'cell-input';
inp.type = key === 'email' ? 'email' : 'text';
inp.value = r[key];
inp.placeholder = key.charAt(0).toUpperCase() + key.slice(1) + '…';
inp.oninput = e => { rows[i][key] = e.target.value; };
td.appendChild(inp);
tr.appendChild(td);
});
const delTd = document.createElement('td');
const delBtn = document.createElement('button');
delBtn.className = 'del-btn';
delBtn.title = 'Delete row';
delBtn.innerHTML = '×';
delBtn.onclick = () => { rows.splice(i, 1); render(); };
delTd.appendChild(delBtn);
tr.appendChild(delTd);
tbody.appendChild(tr);
});
document.getElementById('row-count').textContent = rows.length + ' row' + (rows.length !== 1 ? 's' : '');
}
function addRow() {
rows.push({ name: '', role: '', dept: '', email: '' });
render();
// Focus first input of new row and add animation class
const tbody = document.getElementById('tbody');
const lastRow = tbody.lastElementChild;
if (lastRow) { lastRow.classList.add('new-row'); lastRow.querySelector('input').focus(); }
}
function saveData() {
// In production: POST rows to your API
const valid = rows.filter(r => r.name.trim());
alert('Saved ' + valid.length + ' rows!\n\n(In production: send JSON to your API endpoint)');
}
render();
document.getElementById('add-row-btn').addEventListener('click', addRow);
document.getElementById('save-btn').addEventListener('click', saveData);Learn Coding Visually
Learn to code with interactive, live-preview playgrounds — HTML, CSS, JavaScript, React & more.
 HTML Playground42 lessons · Click-based · Live preview
 CSS PlaygroundLearn CSS with a live editor
 JavaScript Playground60 lessons · DOM · Async · Canvas
 React PlaygroundLearn React with a live code editor
 GSAP PlaygroundLearn GSAP animation interactively
 SVG Playground44 lessons · shapes · paths · animation
 SCSS Playground45 lessons · Sass modules · tokens
 Tailwind PlaygroundLearn Tailwind CSS with a live editor
 Bootstrap 5 Playground50 lessons · live preview
Editable Table — Free HTML CSS JS Inline Edit Snippet
Editable Table · Tables · Plain HTML, CSS & JS · Live preview
What's included
Features
About this UI Snippet
Editable Table — Inline Cell Inputs, Add Row Animation, Delete & Save All Changes
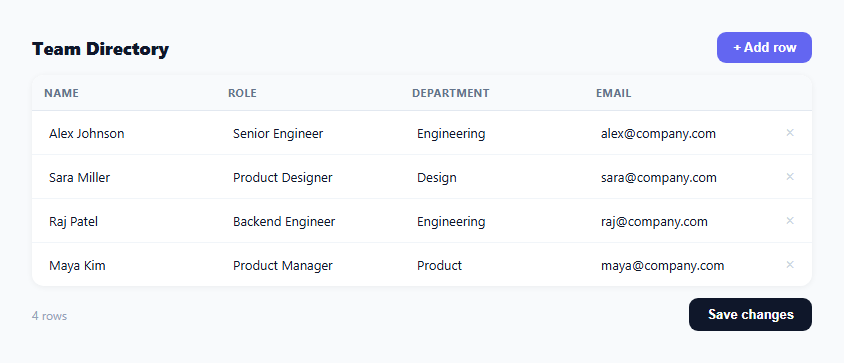
An editable table lets users modify data directly in a table without navigating to a separate form. It is the standard pattern for spreadsheet-style data editing in admin panels, CRM tools, project management apps, and any interface where users need to edit multiple records at once. This snippet provides a complete inline editable table: all four column cells use text inputs that are transparent by default and show a focus border on edit, plus add row with animation, delete row with a hover-reveal × button, row count in the footer, and a save button.
How the inline cell editing works
The table is rendered entirely from a rows array. Each cell contains an input element (type="text" or type="email") styled to be invisible by default — transparent border and background that match the table cell. On hover, a faint border appears. On focus (click to edit), a full indigo border appears with a soft box-shadow ring. This creates the impression of plain text that transforms into an editable field on interaction — the standard inline edit pattern.
The data binding
Each input has an oninput handler that writes back to rows[i][key] — rows is a flat array of objects. The render() function reads from this array and re-creates the full tbody on each change. This simple re-render approach means the data is always in sync without complex two-way binding.
Add row with animation
addRow() pushes an empty row object to the array, calls render(), then selects the last row in the tbody and adds the .new-row class. This class applies a slide-in keyframe animation and a light indigo background tint. The first input of the new row receives focus automatically so the user can start typing immediately.
Delete row
The × button calls rows.splice(i, 1) to remove the row at index i, then re-renders. The entire table re-renders from the updated array — simple and reliable without needing to track DOM elements.
Save all changes
The saveData() function collects all current row values from the rows array. It filters out completely empty rows (no name). In production, replace the alert with a POST or PUT fetch call to your API endpoint.
Customising the columns
The four columns (name, role, dept, email) are defined in the ['name','role','dept','email'] array passed to forEach. Add or remove columns by updating this array and adding matching keys to the rows array objects. Update the thead th elements to match. Pair it with the Data Table snippet for read-only views and the Sortable Table for click-to-sort columns.
Build with AI
Build, Understand, Optimize, and Extend It With AI
Rather than tracing the re-render approach yourself, paste this snippet's HTML, CSS, and JS into an AI coding assistant like Claude and ask it to explain exactly why render() clears and rebuilds the entire tbody's innerHTML from the rows array on every single keystroke's oninput handler, rather than mutating only the one changed cell, and what that costs versus a more surgical DOM update. The same assistant can help optimize it, for instance checking whether rebuilding all rows on every keystroke causes focus loss or cursor-jump bugs as the table grows larger. It's also useful for extending the table: ask it to add per-cell validation styling for invalid emails, support pasting a block of tab-separated spreadsheet data across multiple cells at once, or add column sorting that reorders the underlying rows array. Treat the code less like a finished artifact and more like a starting point for a conversation.
Prompt to recreate it
Copy this into your AI assistant of choice to build the effect from scratch, or as a jumping-off point for your own variant:
Build an inline-editable data table in plain HTML, CSS, and JavaScript with no library.

Requirements:
- Keep all table data in a single array of plain objects (not scattered across DOM element properties), and make one render function the only place that builds the table body, iterating that array to create a row per object and a real text input inside each cell (not a contenteditable div) pre-filled with that field's current value.
- Wire each cell's input so that typing in it writes the new value back into the corresponding object in the underlying array immediately (not only on blur or Enter), keeping the array as the single source of truth for what the table currently contains.
- Style the inputs so they are visually indistinguishable from plain table text at rest (transparent border and background), gain a subtle border on hover to hint they're editable, and show a clear focused border and highlight ring when actively being edited.
- Implement an "add row" button that appends a new blank object to the array, re-renders the table, then automatically focuses the first input of the newly added row and applies a brief slide-in highlight animation to just that row so the user notices where the new row landed.
- Implement a delete button on each row (only visible or emphasized on row hover) that removes that specific object from the array by its position and re-renders, plus a live row-count readout that updates automatically after every add or delete.
- Implement a "save" action that gathers the full current array, filters out entirely empty rows, and is structured so swapping in a real fetch POST to a backend endpoint would be a one-line change.
Want to tighten it up first? Run this prompt through the AI Prompt Studio to score it across 8 quality dimensions, catch anti-patterns, and tune the wording for Claude, ChatGPT, or Gemini before you paste it in.
Step by step
How to Use
- 1Click any cell to edit inlineAll cells are transparent text inputs. Click to focus — an indigo border and focus ring appear, signalling edit mode. Type to change the value. Click outside to blur and save the change to the rows array.
- 2Click "+ Add row" to insert a new rowA new blank row slides in at the bottom of the table with a light indigo tint animation and the first cell auto-focused. Type to fill in the row data.
- 3Click × to delete a rowHover over any row to reveal the × delete button on the right. Click it to remove the row immediately. The row count in the footer updates.
- 4Click "Save changes" to collect all dataThe saveData() function collects all rows from the array. Replace the alert with a fetch POST to your API: fetch("/api/team", { method:"POST", body: JSON.stringify(rows) }).
- 5Add or remove columnsUpdate the ["name","role","dept","email"] array in render() and add matching headers in the thead. Also add the new key to the empty row object in addRow(): { name:"", role:"", dept:"", email:"", newCol:"" }.
- 6Export in your formatClick "HTML" for a standalone file, "JSX" for a React component using useState for rows and controlled inputs, or "Tailwind" for a Tailwind CSS version.
Real-world uses
Common Use Cases
Got questions?
Frequently Asked Questions
Each table cell contains an input element with a transparent border (border: 1.5px solid transparent) and transparent background. On hover, .cell-input:hover adds border-color: #e2e8f0 — a faint visible border. On focus (click to edit), .cell-input:focus adds border-color: #6366f1 and a box-shadow ring. This creates the appearance of plain text that becomes an editable field when clicked — the inline edit pattern. The input type and value are set from the row data array on each render().
In the render forEach loop, check the column key: if (key === "status") { const sel = document.createElement("select"); sel.className = "cell-input"; ["Active","Inactive","Pending"].forEach(opt => { const o = document.createElement("option"); o.value = o.textContent = opt; if (r[key] === opt) o.selected = true; sel.appendChild(o); }); sel.onchange = e => rows[i][key] = e.target.value; td.appendChild(sel); } else { /* existing input code */ }. Style the select the same as .cell-input.
In saveData(), validate each row: const errors = rows.flatMap((r, i) => { const rowErrors = []; if (!r.name.trim()) rowErrors.push("Row "+(i+1)+": Name is required"); if (r.email && !r.email.includes("@")) rowErrors.push("Row "+(i+1)+": Invalid email"); return rowErrors; }); if (errors.length) { alert(errors.join("\n")); return; }. For inline validation, add .cell-input.invalid { border-color: #ef4444; } and set the class when the input blurs with an invalid value.
Click "JSX" to download. Manage rows with useState(initialRows). For controlled inputs, bind value={row.key} and onChange={e => setRows(prev => prev.map((r,i) => i===idx ? {...r, [key]: e.target.value} : r))}. For add row: setRows(prev => [...prev, {name:"",role:"",dept:"",email:""}]). For delete: setRows(prev => prev.filter((_,i) => i !== idx)). Focus the new row input using a useEffect with a dependency on rows.length.